Manually add content: Adding banners
The easiest way to add banners to your site is to automatically add them as indicated under section “Installing demo data”, and then simply replace them with your own banners. However, if you just want to manually add your banners, here’s how to do it:
Homepage banners
1. Homepage main slider banners
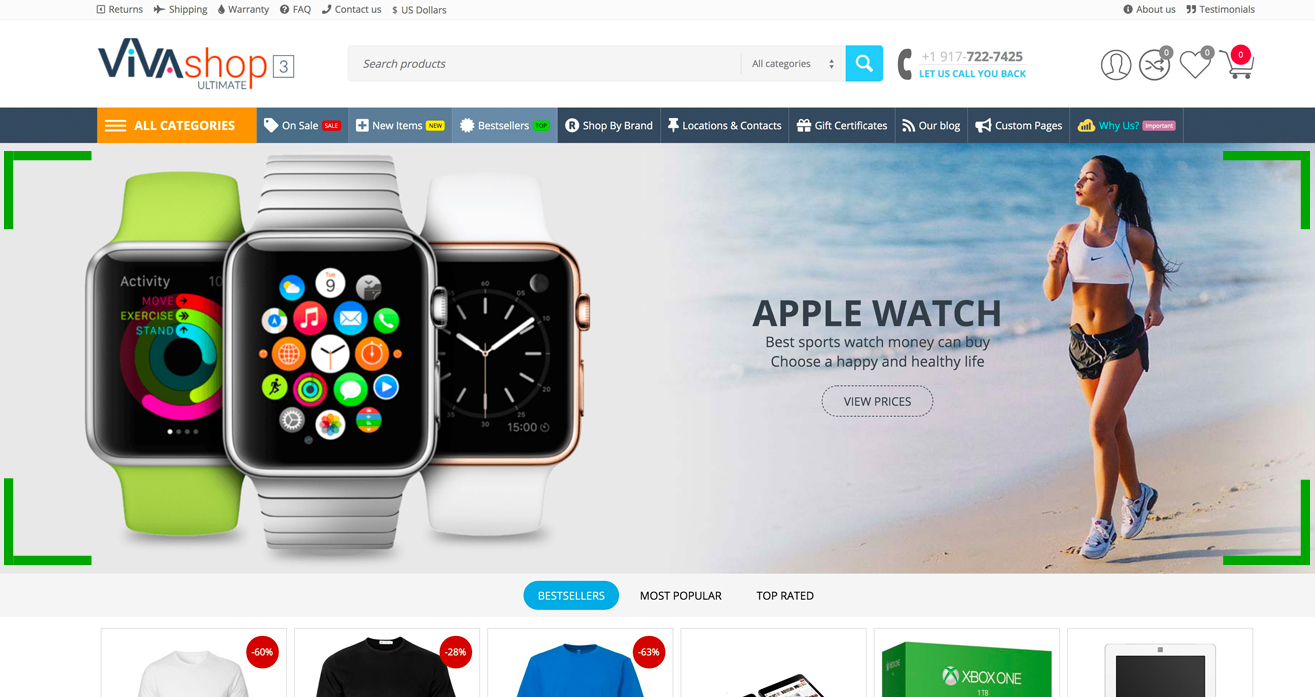
VIVAshop comes with the option of adding full width banner sliders on the homepage. To add a banner on your homepage banner slider you firstly need to create it. The image used for the banner can either be your own image, or use any of the demo images which you may find in folder “SIMPLE BANNERS” from the downloaded theme archive under “vivashop_demo_data/Homepage Main Slider Banners” folder. If you use your own image, this image will need to have the following recommended sizes: 2048px x 600px. To learn how to create a banner please refer to the CS-Cart documentation here. If you use the provided demo images, create 4 banners and name them as follows (or choose any other name you want for them):
VIVAshop - Homepage - Main slider - Banner 1 (you can use the demo image called “Home-page-main-slider-banner-1.jpg”)
VIVAshop - Homepage - Main slider - Banner 2 (you can use the demo image called “Home-page-main-slider-banner-2.jpg”)
VIVAshop - Homepage - Main slider - Banner 3 (you can use the demo image called “Home-page-main-slider-banner-3.jpg”)
VIVAshop - Homepage - Main slider - Banner 4 (you can use the demo image called “Home-page-main-slider-banner-4.jpg”)
The following procedure will show you how to add simple demo banners/images to your main slider block, however, if you want to add more advanced banners, please see section “Extended Banners Pro” which shows you how to create more complex banners with the help of the “Extended Banners Pro” add-on which comes included in the theme package. Should you want to use the “Extended Banners Pro” add-on to create more complex banners, the sources for these banners may be found in the “ET-BANNERS” folder from “vivashop_demo_data/Homepage Main Slider Banners” folder.
After you create your banners you simply need to allocate them to the “Main slider banners- VIVAshop” block on your homepage. To do so, please follow these steps:
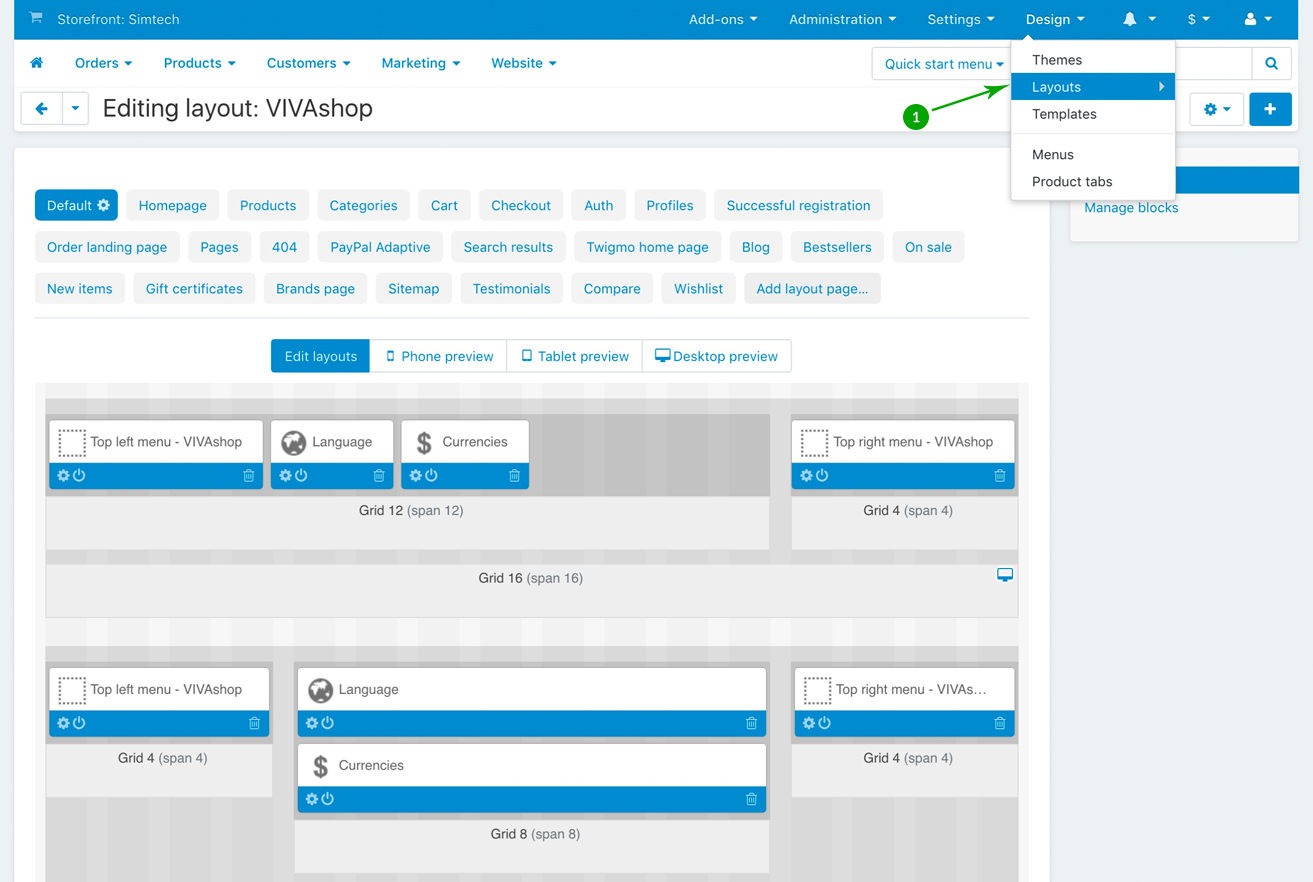
- Step 1
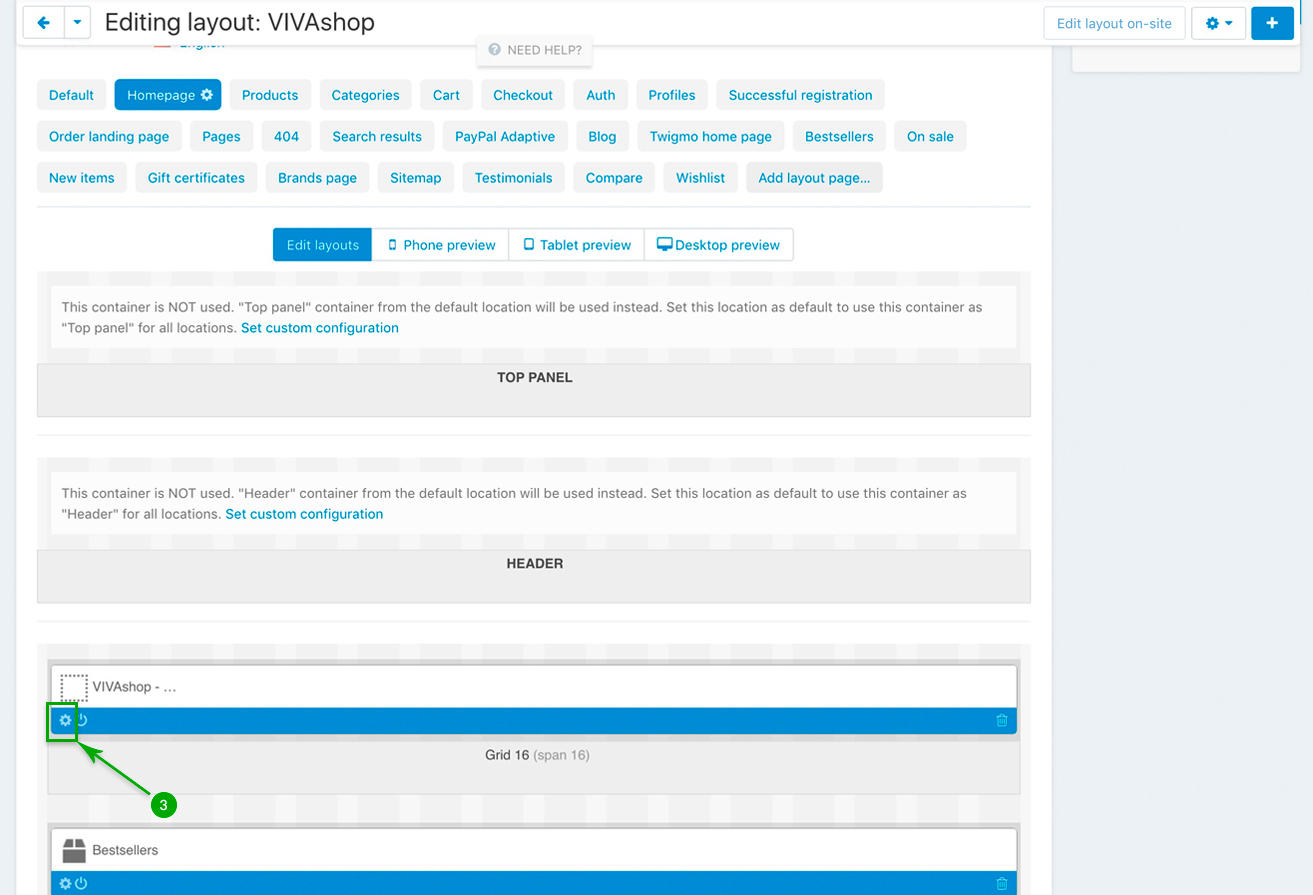
In your admin panel, go to “Design” - “Layouts”:

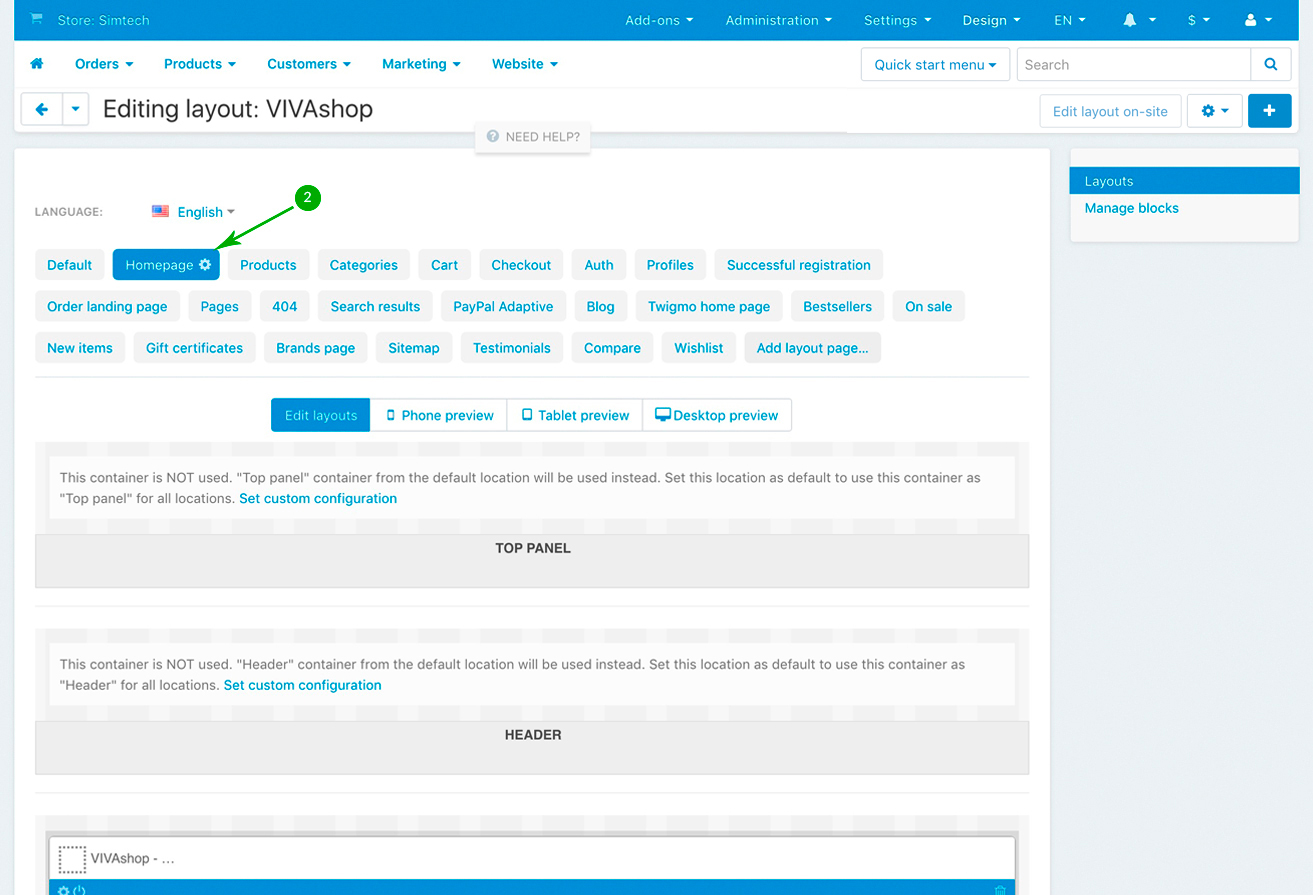
- Step 2
Click on the “Homepage” tab

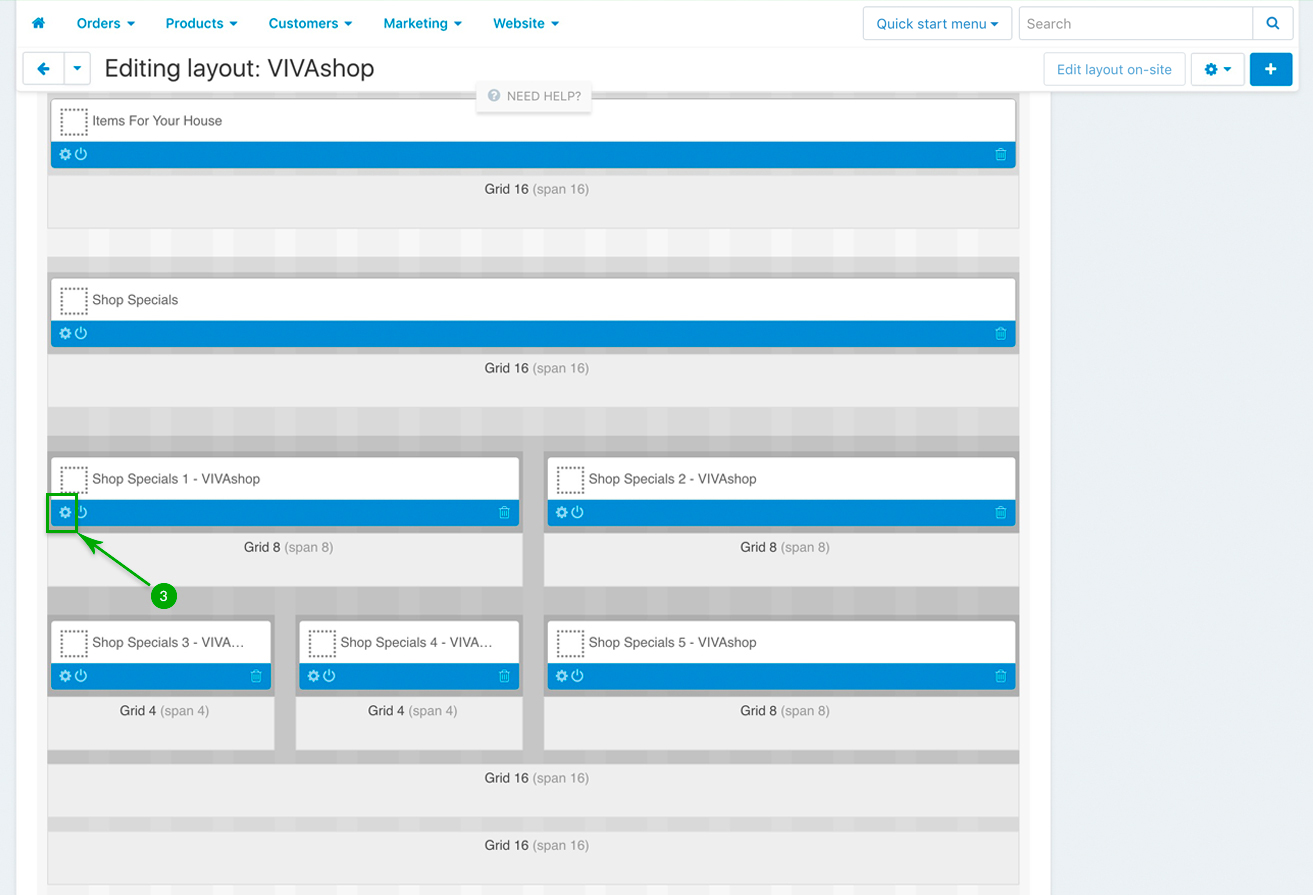
- Step 3
Look for the “Main slider banners - VIVAshop ” block and click on the “Block options” of this block
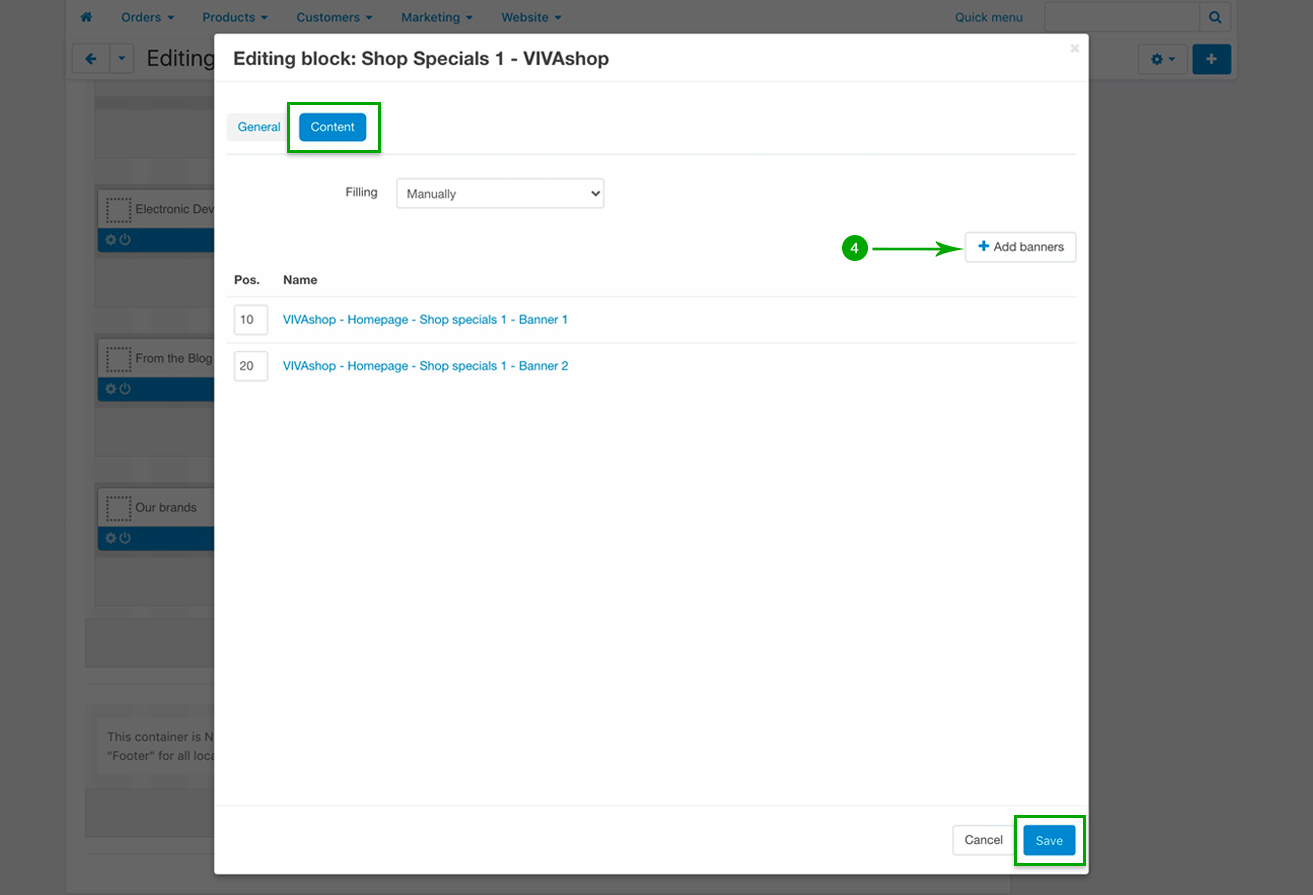
- Step 4
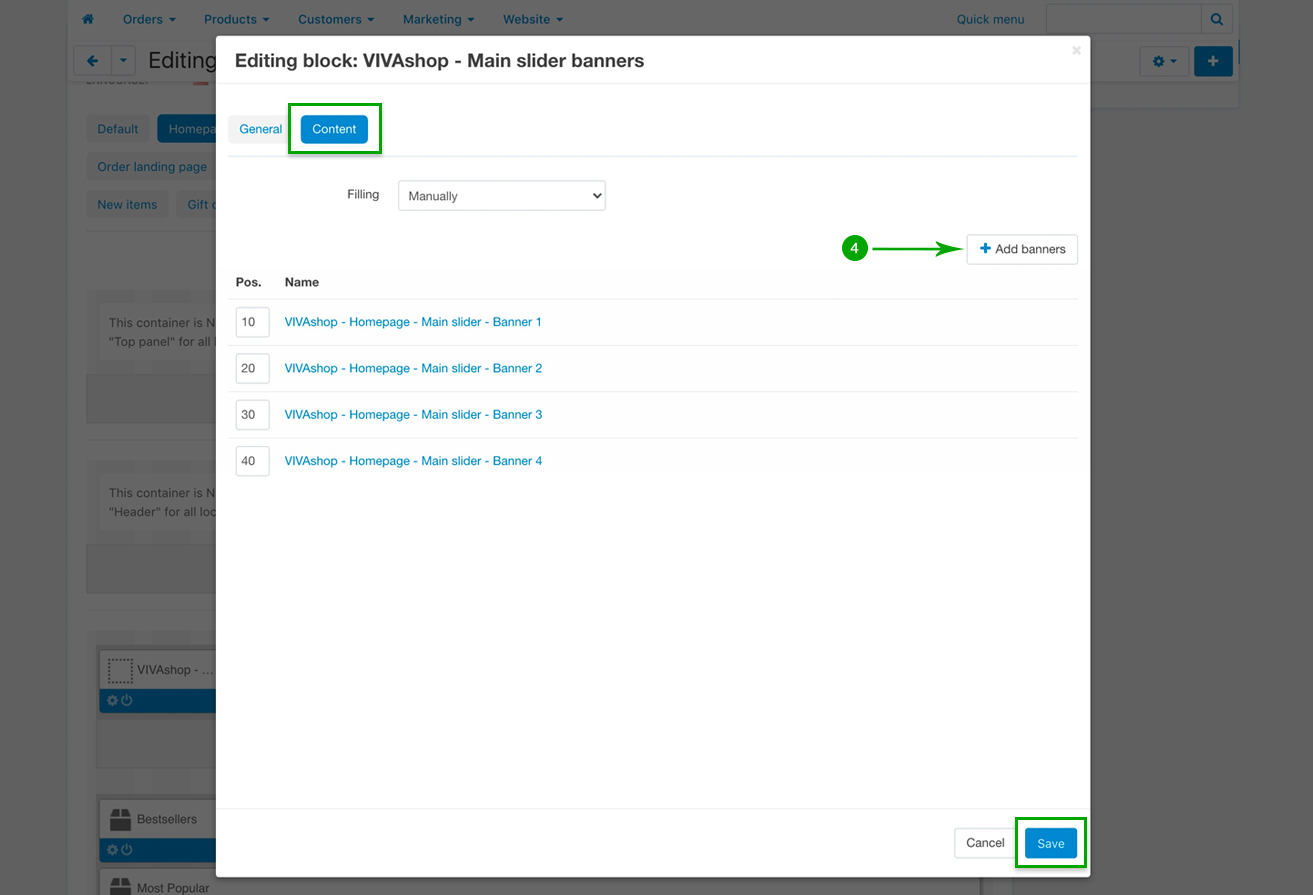
In the newly opened pop-up window, click on the “Content” tab, and then click on the “Add banners” button to add your banners. Select the 4 banners you have created above, and then click on the “Save” button:
VIVAshop - Homepage - Main slider - Banner 1
VIVAshop - Homepage - Main slider - Banner 2
VIVAshop - Homepage - Main slider - Banner 3
VIVAshop - Homepage - Main slider - Banner 4
2. Homepage “Shop Specials” banners
By default, VIVAshop comes with two sets of featured banners on the homepage. The first set was named by us “Shop Specials”, but of course you can change the block name as well as it’s description according your wishes, just by simply accessing your admin panel and going to “Design” - “Layouts”, then click on the “Homepage” tab, and then click on the “Block options” of the “Shop Specials” block, then change the block name under the “General” tab, as well as change the block content under the “Content” tab.
Once you have changed the block name and content accordingly, you may proceed with adding the banners to their respective blocks. But before adding the banners, you firstly need to create them. To learn how to create a banner please refer to the CS-Cart documentation here. If you want to create more advanced banners, please see section “Extended Banners Pro” which shows you how to create more complex banners with the help of the “Extended Banners Pro” add-on which comes included in the theme package.
The images used for the banners can either be your own images, or use the demo images which you may find in folder “SIMPLE BANNERS” from the downloaded theme archive under “vivashop_demo_data/Homepage Shop Specials” folder. Should you want to use the “Extended Banners Pro” add-on to create more complex banners, the sources for these banners may be found in the “ET-BANNERS” folder from “vivashop_demo_data/Homepage Shop Specials” folder.
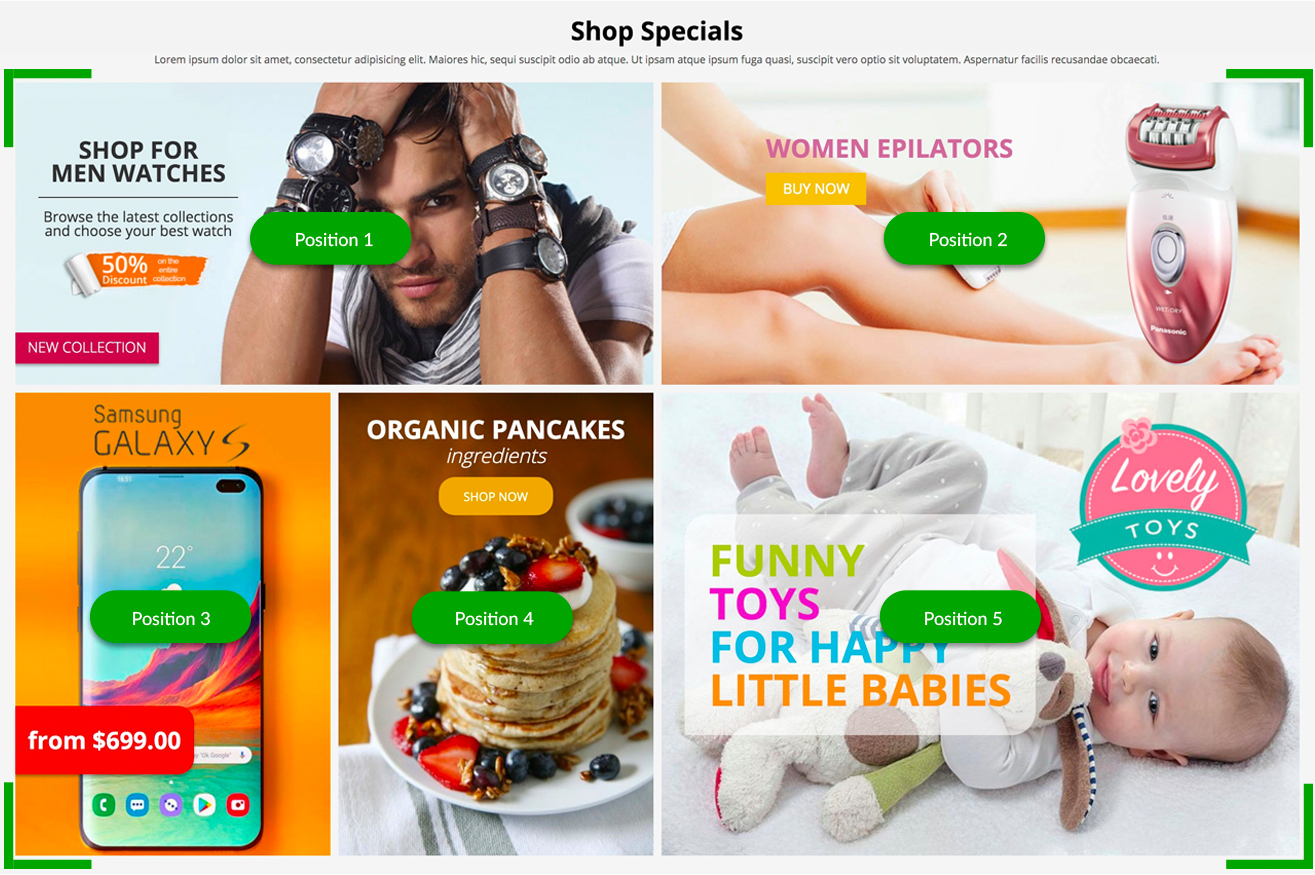
The following procedure will show you how to add simple demo banners/images to the “Shop Specials” section on the homepage, using the provided demo images that you may find inside the “SIMPLE BANNERS” folder, under “vivashop_demo_data/Homepage Shop Specials” folder. So, here there are the banner names that you need to create, the image used for each of them, the corresponding block name and position in the “Shop Specials” section (see image above), as well as the size of each banner:
| BLOCK POSITION | BLOCK NAME | BANNER NAME | IMAGE USED FOR BANNER | BANNER SIZE |
|---|---|---|---|---|
| Position 1 | Shop Specials 1 - VIVAshop | VIVAshop - Homepage - Shop specials 1 - Banner 1 | Shop-Specials-1.jpg | 795px x 379px |
| VIVAshop - Homepage - Shop specials 1 - Banner 2 | Shop-Specials-2.jpg | 795px x 379px | ||
| Position 2 | Shop Specials 2 - VIVAshop | VIVAshop - Homepage - Shop specials 2 - Banner 1 | Shop-Specials-3.jpg | 795px x 379px |
| VIVAshop - Homepage - Shop specials 2 - Banner 2 | Shop-Specials-4.jpg | 795px x 379px | ||
| Position 3 | Shop Specials 3 - VIVAshop | VIVAshop - Homepage - Shop specials 3 - Banner 1 | Shop-Specials-5.jpg | 392px x 580px |
| Position 4 | Shop Specials 4 - VIVAshop | VIVAshop - Homepage - Shop specials 4 - Banner 1 | Shop-Specials-6.jpg | 392px x 580px |
| VIVAshop - Homepage - Shop specials 4 - Banner 2 | Shop-Specials-7.jpg | 392px x 580px | ||
| Position 5 | Shop Specials 5 - VIVAshop | VIVAshop - Homepage - Shop specials 5 - Banner 1 | Shop-Specials-8.jpg | 795px x 580px |
After you create your banners you need to allocate them to their respective blocks. The example below will show you how to add the corresponding banners to the block called “Shop Specials 1 - VIVAshop” which is located in Position 1 in the image above, so please follow the steps below:
- Step 1
In your admin panel, go to “Design” - “Layouts”:
- Step 2
Click on the “Homepage” tab
- Step 3
Look for the “Shop Specials 1 - VIVAshop” block and click on the “Block options” of this block
- Step 4
In the newly opened pop-up window, click on the “Content” tab, and then click on the “Add banners” button to add your banners. Select the 2 banners you have created above, and then click on the “Save” button:
VIVAshop - Homepage - Shop specials 1 - Banner 1
VIVAshop - Homepage - Shop specials 1 - Banner 2
Repeat the above 4 steps in order to add the corresponding banners to the other 4 blocks from section “Shop Specials”, in accordance to the table presented above.
3. Homepage “Shop Collections” banners
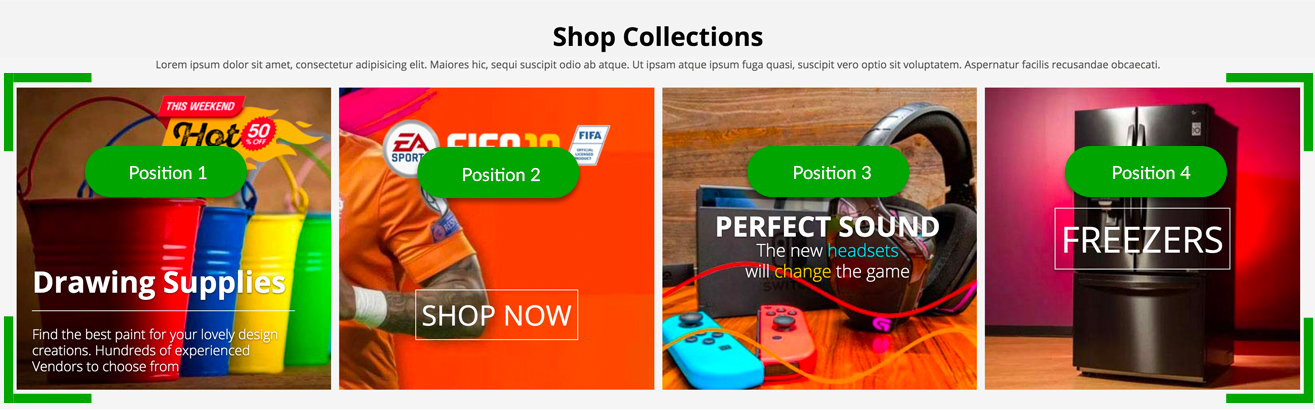
The second set of featured banners on the homepage was named by us “Shop Collections”,. The same as the first set of featured banners you can change the block name as well as it’s description according your wishes, just by simply accessing your admin panel and going to “Design” - “Layouts”, then click on the “Homepage” tab, and then click on the “Block options” of the “Shop Collections” block, then change the block name under the “General” tab, as well as change the block content under the “Content” tab.
Once you have changed the block name and content accordingly, you may proceed with adding the banners to their respective blocks. But before adding the banners, you firstly need to create them. To learn how to create a banner please refer to the CS-Cart documentation here. If you want to create more advanced banners, please see section “Extended Banners Pro” which shows you how to create more complex banners with the help of the “Extended Banners Pro” add-on which comes included in the theme package.
The images used for the banners can either be your own images, or use the demo images which you may find in folder “SIMPLE BANNERS” from the downloaded theme archive under “vivashop_demo_data/Homepage Shop Collections” folder. Should you want to use the “Extended Banners Pro” add-on to create more complex banners, the sources for these banners may be found in the “ET-BANNERS” folder from “vivashop_demo_data/Homepage Shop Collections” folder.
The following procedure will show you how to add simple demo banners/images to the “Shop Collections” section on the homepage, using the provided demo images that you may find inside the “SIMPLE BANNERS” folder, under “vivashop_demo_data/Homepage Shop Collections” folder. So, here there are the banner names that you need to create, the image used for each of them, the corresponding block name and position in the “Shop Collections” section (see image above), as well as the size of each banner:
| BLOCK POSITION | BLOCK NAME | BANNER NAME | IMAGE USED FOR BANNER | BANNER SIZE |
|---|---|---|---|---|
| Position 1 | Shop Collections 1 - VIVAshop | VIVAshop - Homepage - Shop Collections 1 - Banner 1 | Shop-Collections-1.jpg | 392px x 380px |
| VIVAshop - Homepage - Shop Collections 1 - Banner 2 | Shop-Collections-2.jpg | 392px x 380px | ||
| Position 2 | Shop Collections 2 - VIVAshop | VIVAshop - Homepage - Shop Collections 2 - Banner 1 | Shop-Collections-3.jpg | 392px x 380px |
| Position 3 | Shop Collections 3 - VIVAshop | VIVAshop - Homepage - Shop Collections 3 - Banner 1 | Shop-Collections-4.jpg | 392px x 380px |
| VIVAshop - Homepage - Shop Collections 3 - Banner 2 | Shop-Collections-5.jpg | 392px x 380px | ||
| VIVAshop - Homepage - Shop Collections 3 - Banner 3 | Shop-Collections-6.jpg | 392px x 380px | ||
| Position 4 | Shop Collections 4 - VIVAshop | VIVAshop - Homepage - Shop Collections 4 - Banner 1 | Shop-Collections-7.jpg | 392px x 380px |
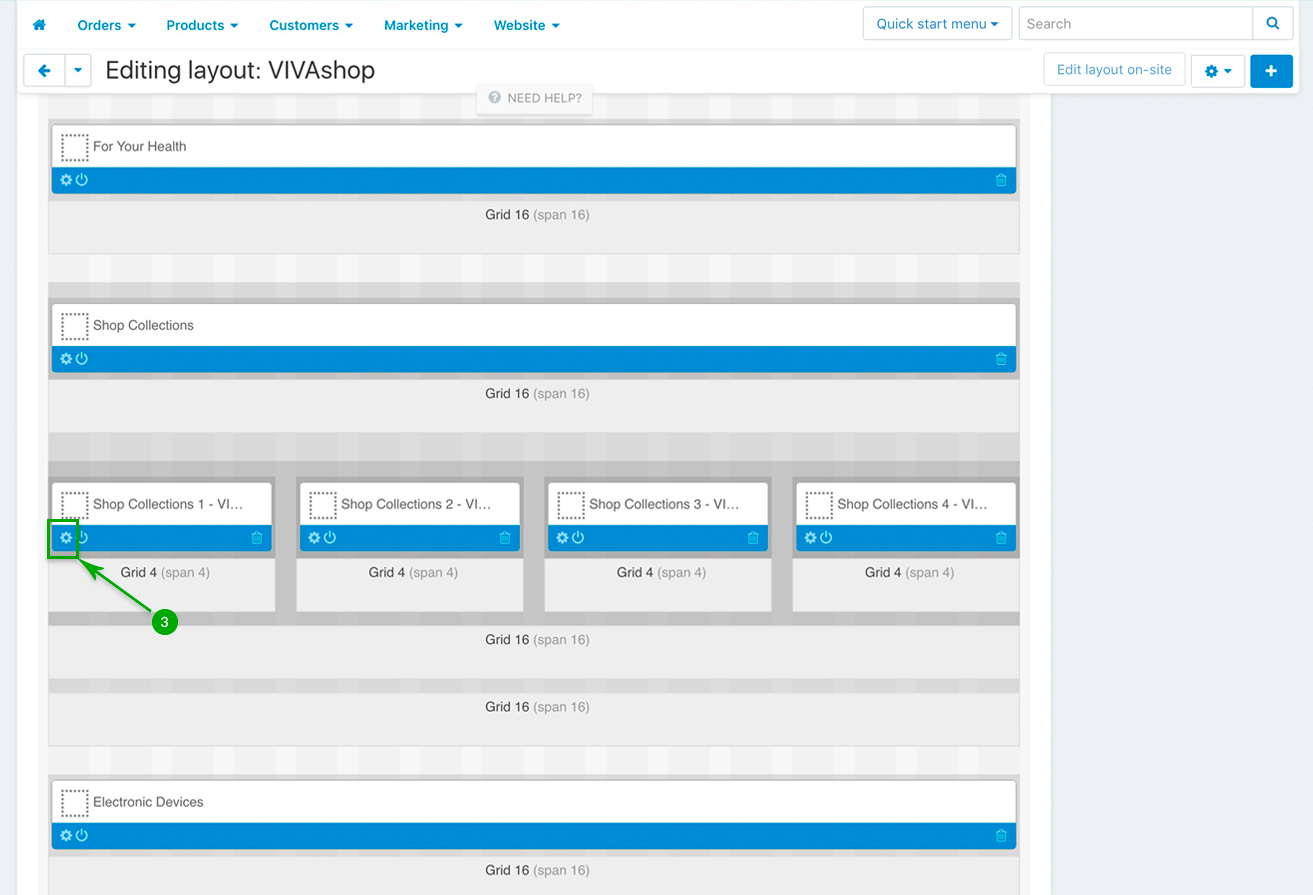
After you create your banners you need to allocate them to their respective blocks. The example below will show you how to add the corresponding banners to the block called “Shop Collections 1 - VIVAshop” which is located in Position 1 in the image above, so please follow the steps below:
- Step 1
In your admin panel, go to “Design” - “Layouts”:
- Step 2
Click on the “Homepage” tab
- Step 3
Look for the “Shop Collections 1 - VIVAshop” block and click on the “Block options” of this block
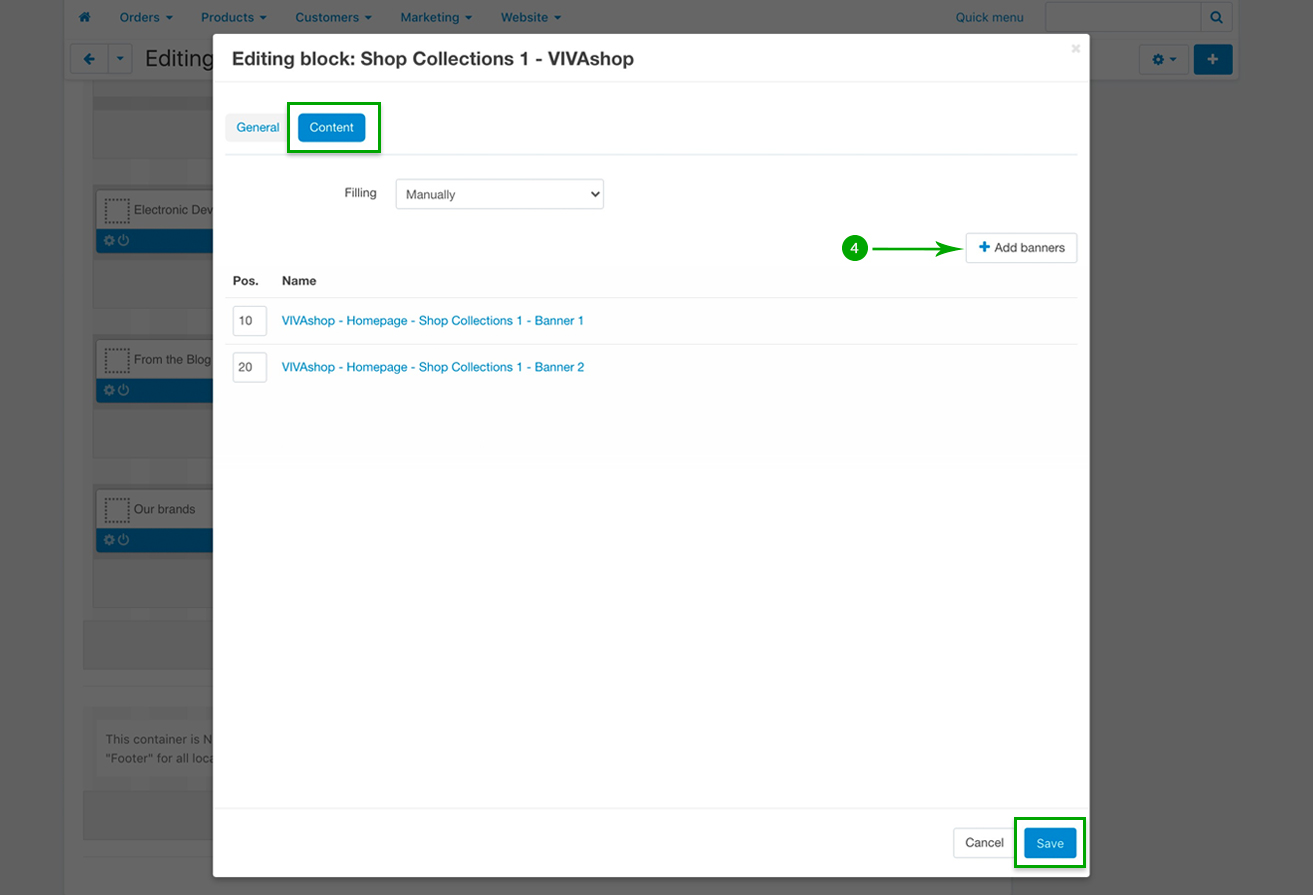
- Step 4
In the newly opened pop-up window, click on the “Content” tab, and then click on the “Add banners” button to add your banners. Select the 2 banners you have created above, and then click on the “Save” button:
VIVAshop - Homepage - Shop Collections 1 - Banner 1
VIVAshop - Homepage - Shop Collections 1 - Banner 2
Repeat the above 4 steps in order to add the corresponding banners to the other 4 blocks from section “Shop Collections”, in accordance to the table presented above.
Category side block banners
On the side bar of the Category pages, there are two blocks with banners. To add your own banners here you firstly need to create them. As mentioned above, to learn how to create a banner please refer to the CS-Cart documentation here. If you want to add more advanced banners, please see section “Extended Banners Pro” which shows you how to create more complex banners with the help of the “Extended Banners Pro” add-on which comes included in the theme package.
The images used for the banners can either be your own images, or use the demo images which you may find in folder “SIMPLE BANNERS” from the downloaded theme archive under “vivashop_demo_data/Category Side Banners” folder.
The following procedure will show you how to add a simple demo banner/image to the “Category side banner 1 - VIVAshop” block on the sidebar of the Category page, using the provided demo image that you may find inside the “SIMPLE BANNERS” folder, under “vivashop_demo_data/Category Side Banners” folder. These are the banner names that you need to create, the image used for each of them, the position of each block on the Category sidebar, as well as the corresponding block name and the size of each banner:
| BLOCK POSITION | BLOCK NAME | BANNER NAME | IMAGE USED FOR BANNER | BANNER SIZE |
|---|---|---|---|---|
| Position 1 | Category side banner 1 - VIVAshop | VIVAshop - Category - Side block 1 - Banner 1 | Category-Side-block-1-Banner-1.jpg | 372px x 351px |
| Position 2 | Category side banner 2 - VIVAshop | VIVAshop - Category - Side block 2 - Banner 1 | Category-Side-block-1-Banner-2.jpg | 372px x 351px |
After you create your banners you need to alocate them to their respective blocks. The example below will show you how to add the corresponding banners to the block called “Category side banner 1 - VIVAshop” which is located in Position 1 in the image above, so please follow the steps below:
- Step 1
In your admin panel, go to “Design” - “Layouts”:
- Step 2
Click on the “Categories” tab
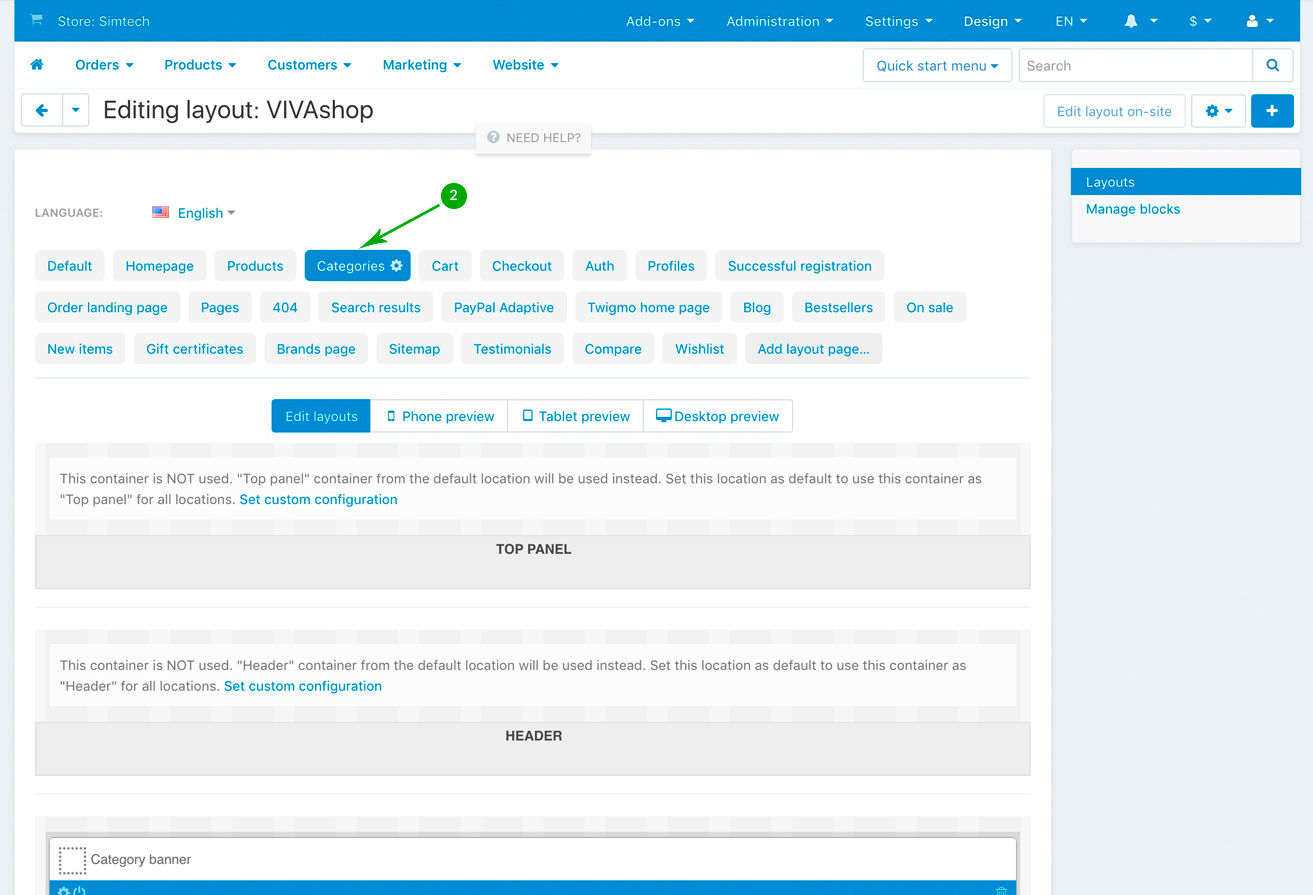
- Step 3
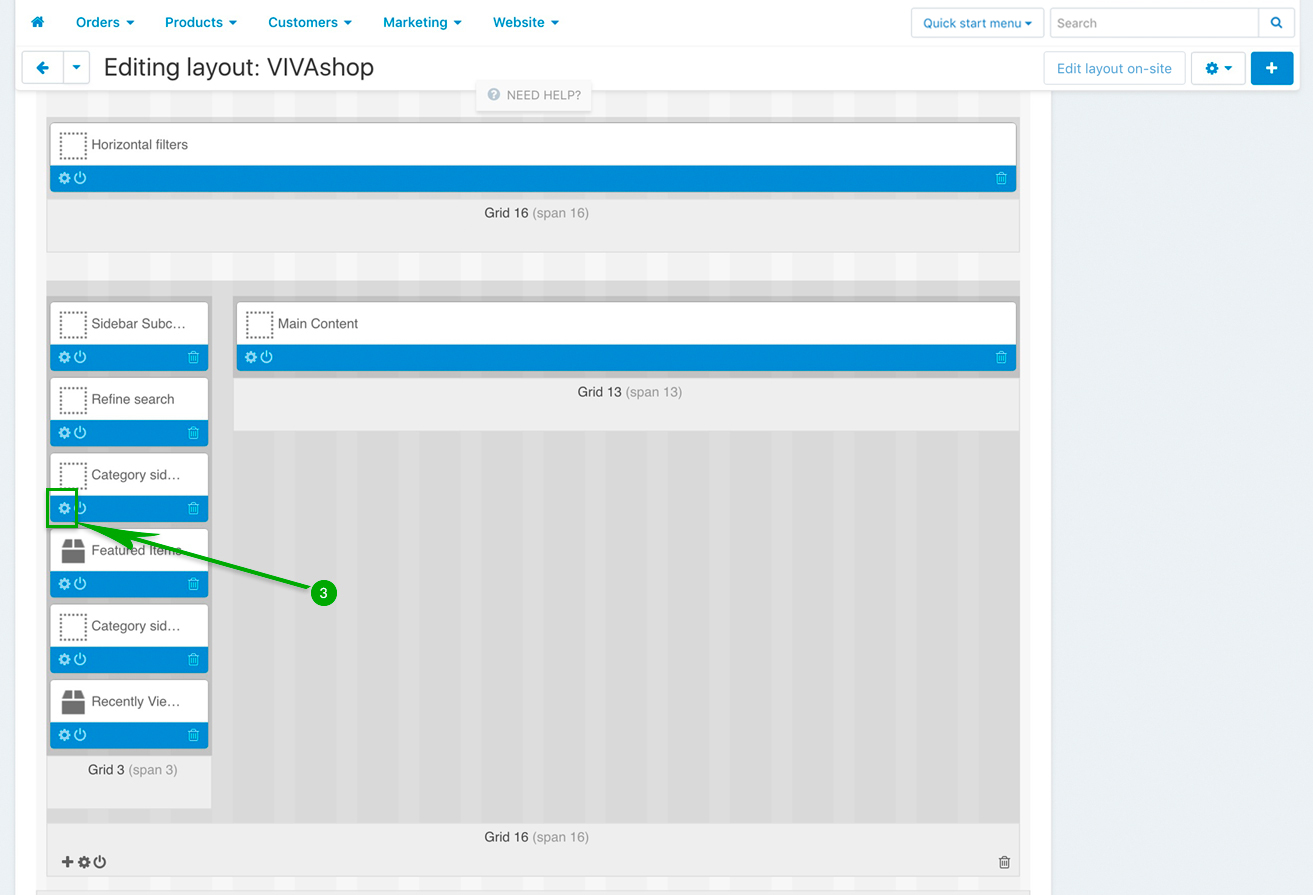
Look for the “Category side banner 1 - VIVAshop” block and click on the “Block options” of this block
- Step 4
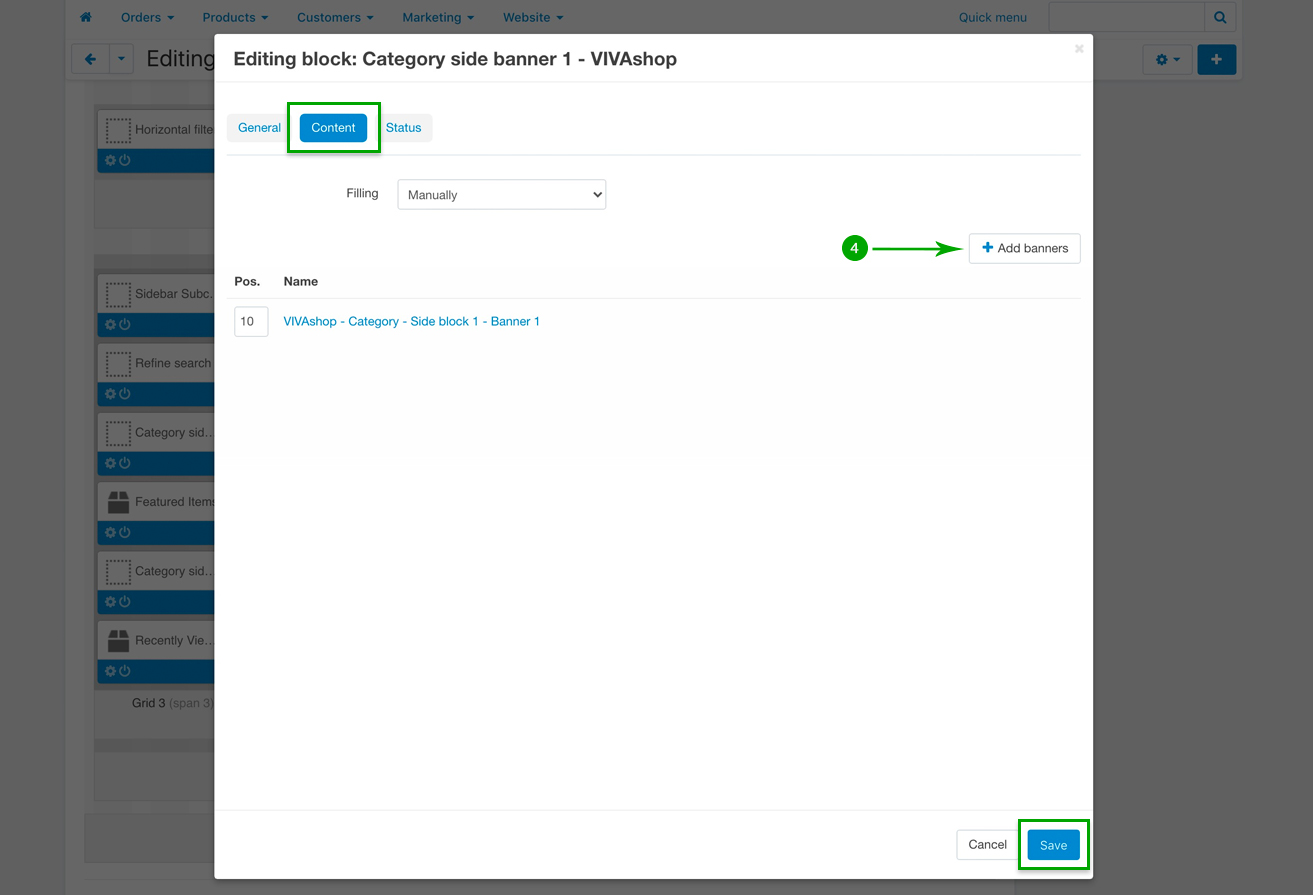
In the newly opened pop-up window, click on the “Content” tab, and then click on the “Add banners” button to add your banners. Select the banner you have created above, and then click on the “Save” button:
VIVAshop - Category - Side block 1 - Banner 1
Repeat the above 4 steps in order in order to add the banner called “VIVAshop - Category - Side block 2 - Banner 1” to the block “Category side banner 2 - VIVAshop”
Special pages banners
The ones that we call “Special pages” are the the “On Sale” page, “New Items” page and the “Bestsellers” page. On each of these pages you can add a full width banner (or even more banners integrated in banner slider).
To add your own banners here you firstly need to create them. To learn how to create a banner please refer to the CS-Cart documentation here. If you want to add more advanced banners, please see section “Extended Banners Pro” which shows you how to create more complex banners with the help of the “Extended Banners Pro” add-on which comes included in the theme package.
The images used for the banners can either be your own images, or use the demo images which you may find in folder “SIMPLE BANNERS” from the downloaded theme archive under “vivashop_demo_data/Special Pages Banner” folder.
The following procedure will show you how to add a simple demo banner/image to the “On sale banner - VIVAshop” block on the sidebar of the “On Sale”, using the provided demo image that you may find inside the “SIMPLE BANNERS” folder, under “vivashop_demo_data/Special Pages Banner” folder. These are the banner names that you need to create, the image used for each of them, the position of each block on the Category sidebar, as well as the corresponding block name and the size of each banner:
| BLOCK POSITION | BLOCK NAME | BANNER NAME | IMAGE USED FOR BANNER | BANNER SIZE |
|---|---|---|---|---|
| On Sale | On Sale banner - VIVAshop | VIVAshop - On sale - Banner | on-sale-banner.jpg | 2048px x 250px |
| New Items | New Items banner - VIVAshop | VIVAshop - New items - Banner | new-items-banner.jpg | 2048px x 250px |
| Bestsellers | Bestsellers banner - VIVAshop | VIVAshop - Bestsellers - Banner | bestsellers-banner.jpg | 2048px x 250px |
After you create your banners you need to allocate them to their respective blocks. The example below will show you how to add the corresponding banners to the block called “On sale banner - VIVAshop” which is located on the “On Sale” page, so please follow the steps below:
- Step 1
In your admin panel, go to “Design” - “Layouts”:
- Step 2
Click on the “On sale” tab
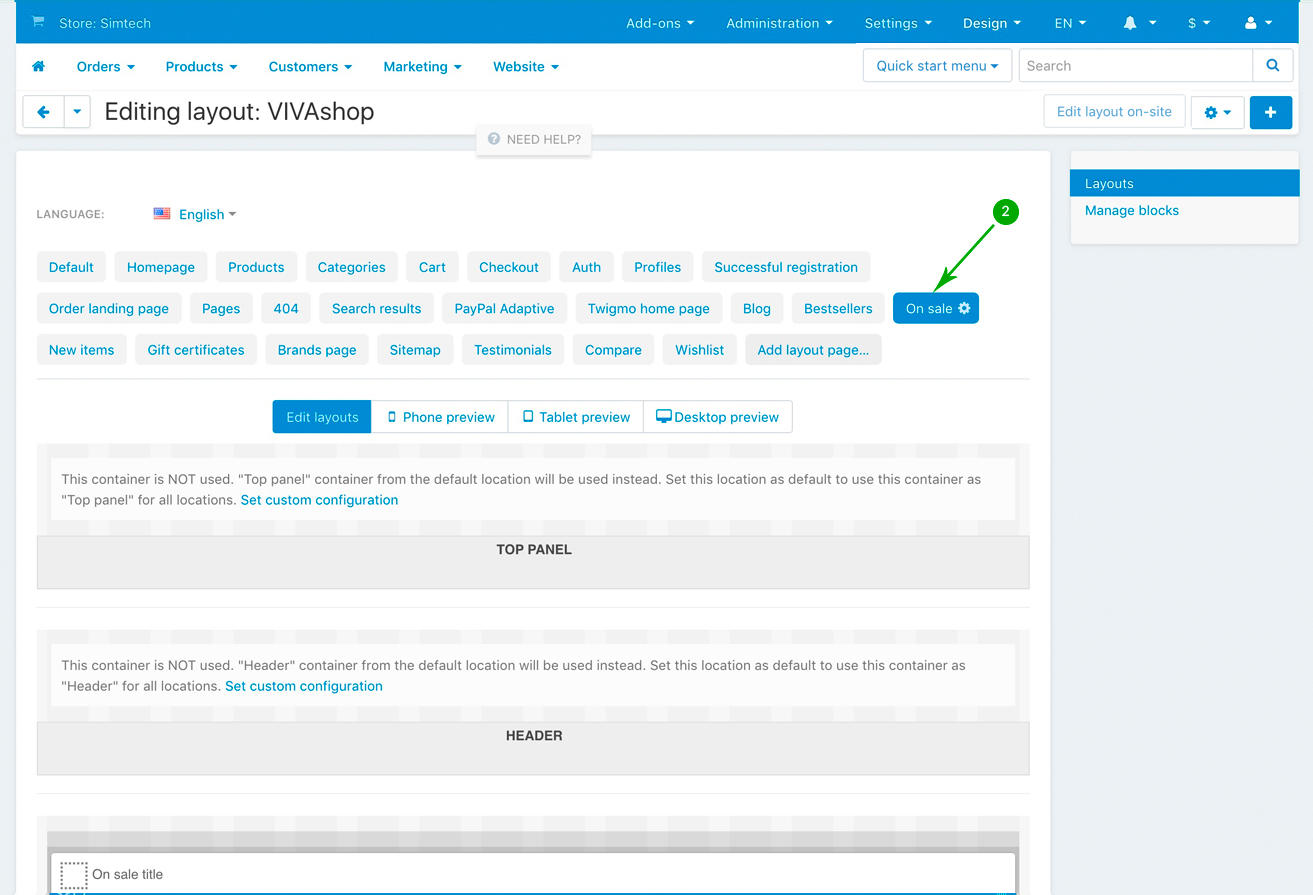
- Step 3
Look for the “On sale banner - VIVAshop” block and click on the “Block options” of this block
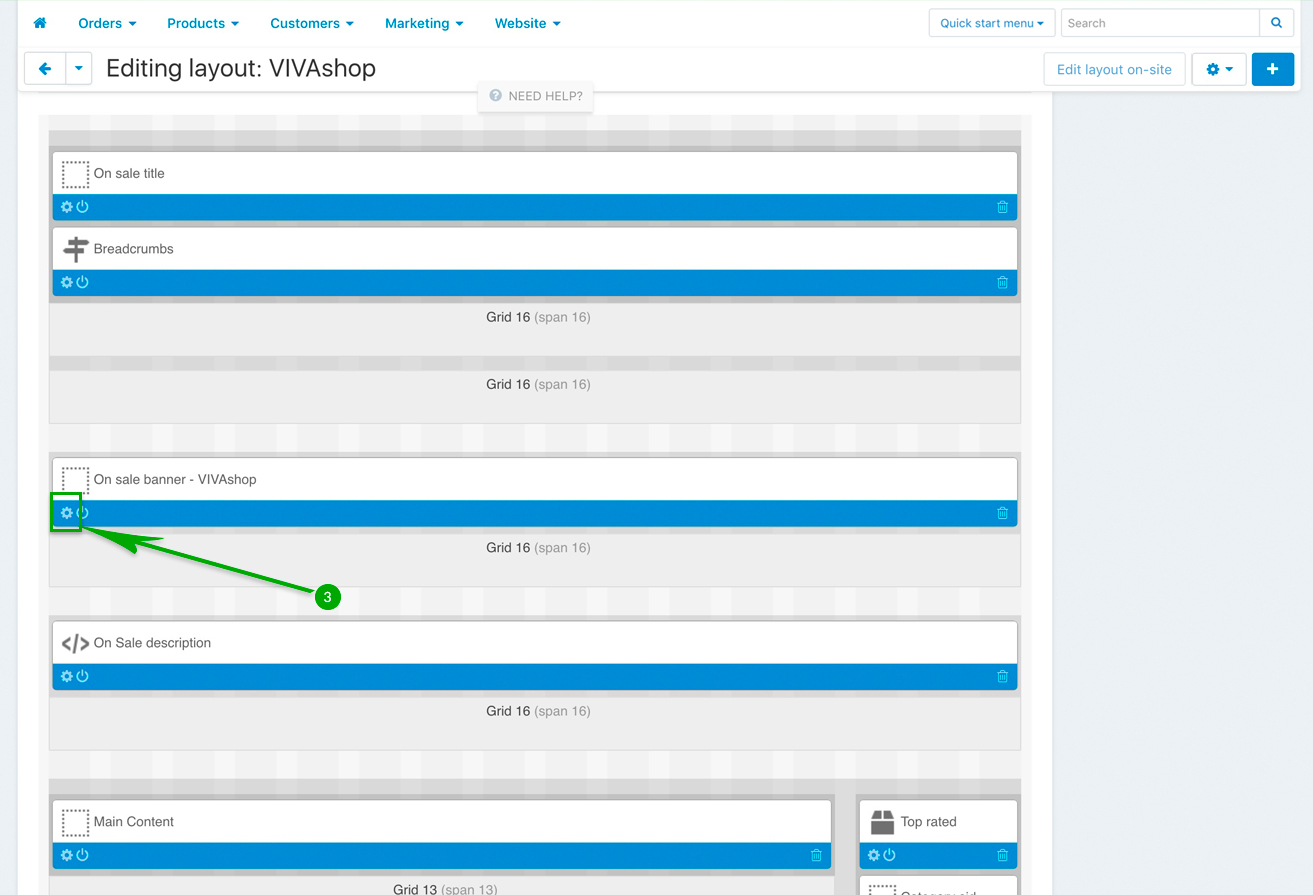
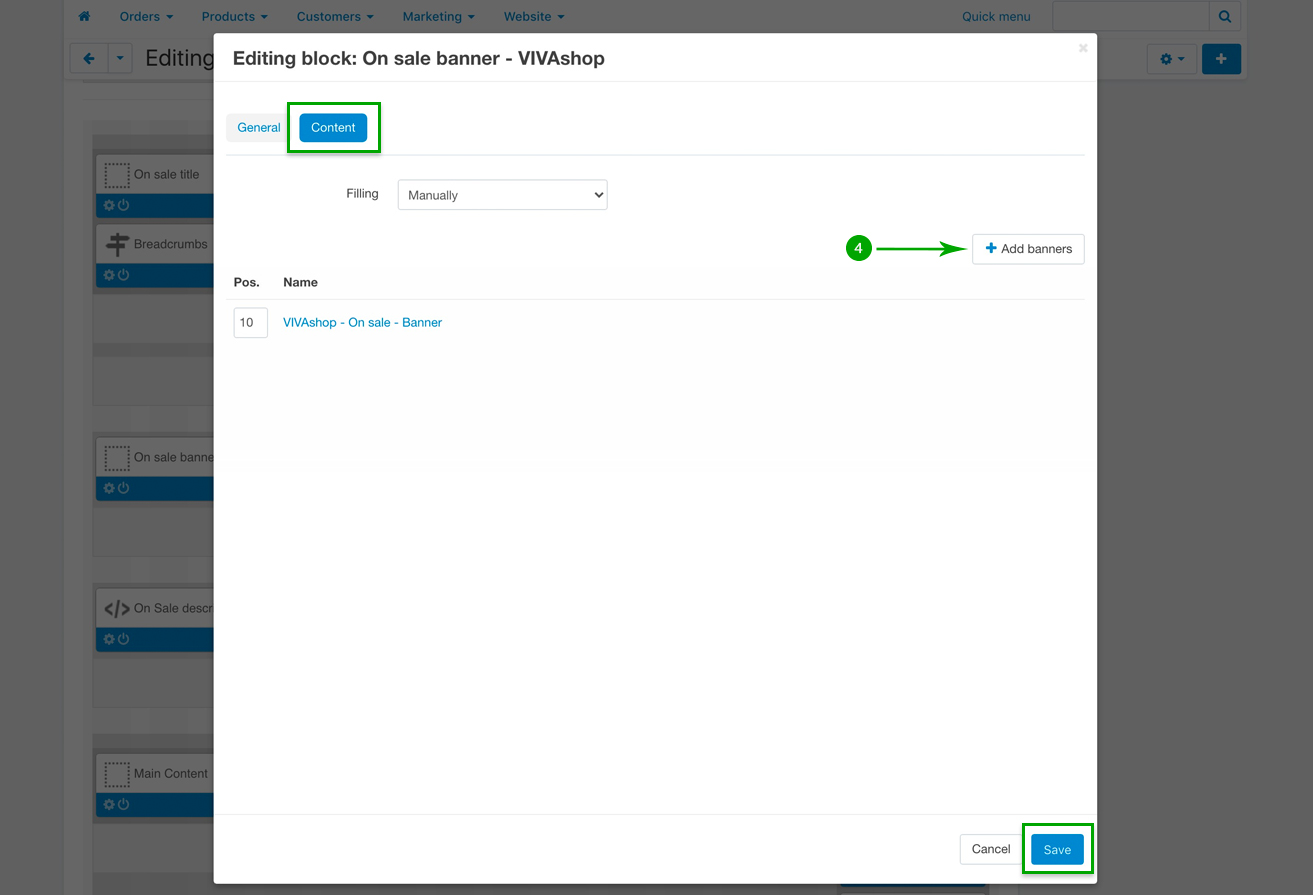
- Step 4
In the newly opened pop-up window, click on the “Content” tab, and then click on the “Add banners” button to add your banners. Select the banner you have created above, and then click on the “Save” button:
VIVAshop - On sale - Banner
Repeat the above 4 steps in order in order to add the banner called “VIVAshop - New items - Banner” to the block “New items banner - VIVAshop” on the “New items” page, as well as add the banner called “VIVAshop - Bestsellers - Banner” to the block “Bestsellers banner - VIVAshop” on the “Bestsellers” page.
Other banners