Advanced Mega Menu
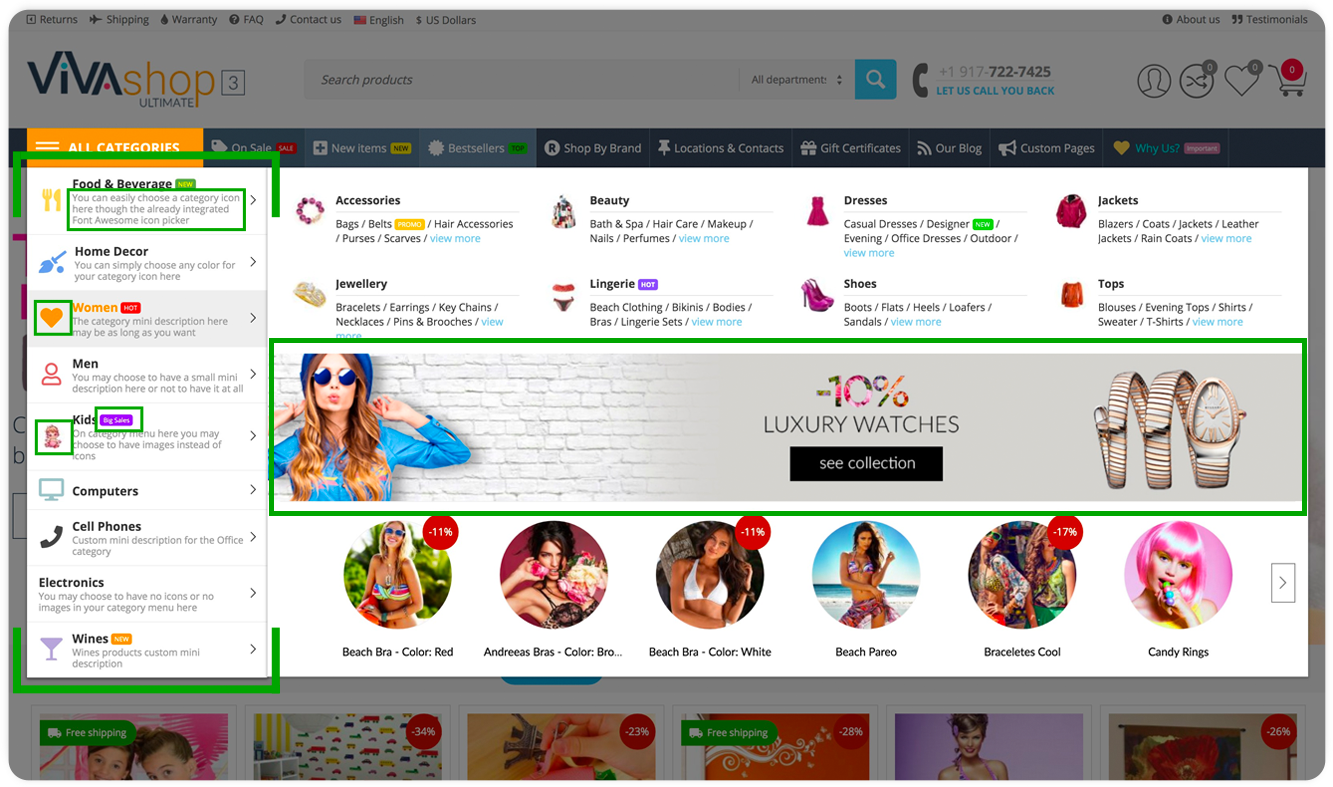
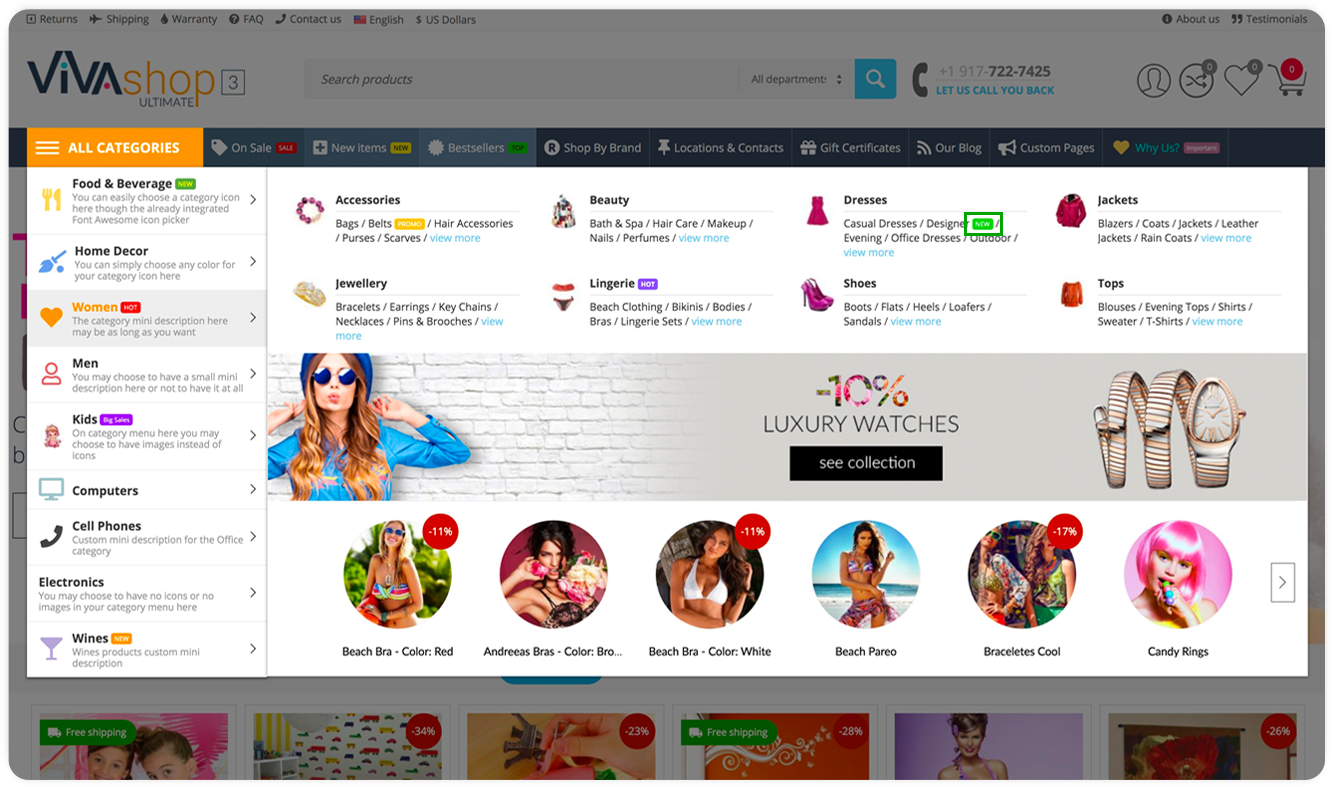
The “Advanced Mega Menu” add-on allows you to add category Font Awesome icons or image thumbnails, mini-description, category labels, as well as Mega Menu images/banners to all of your first level categories, add category labels and display image thumbnails for all of your second level categories, as well as add category labels for all of the other category levels.
First level categories - Add Font Awesome icons/images, mini-description, labels, and Mega Menu images/banners
Please follow the steps below in order to learn how to add category Font Awesome icons or images, mini-description, labels, as well as Mega Menu images/banners for your first level categories:
- Step 1
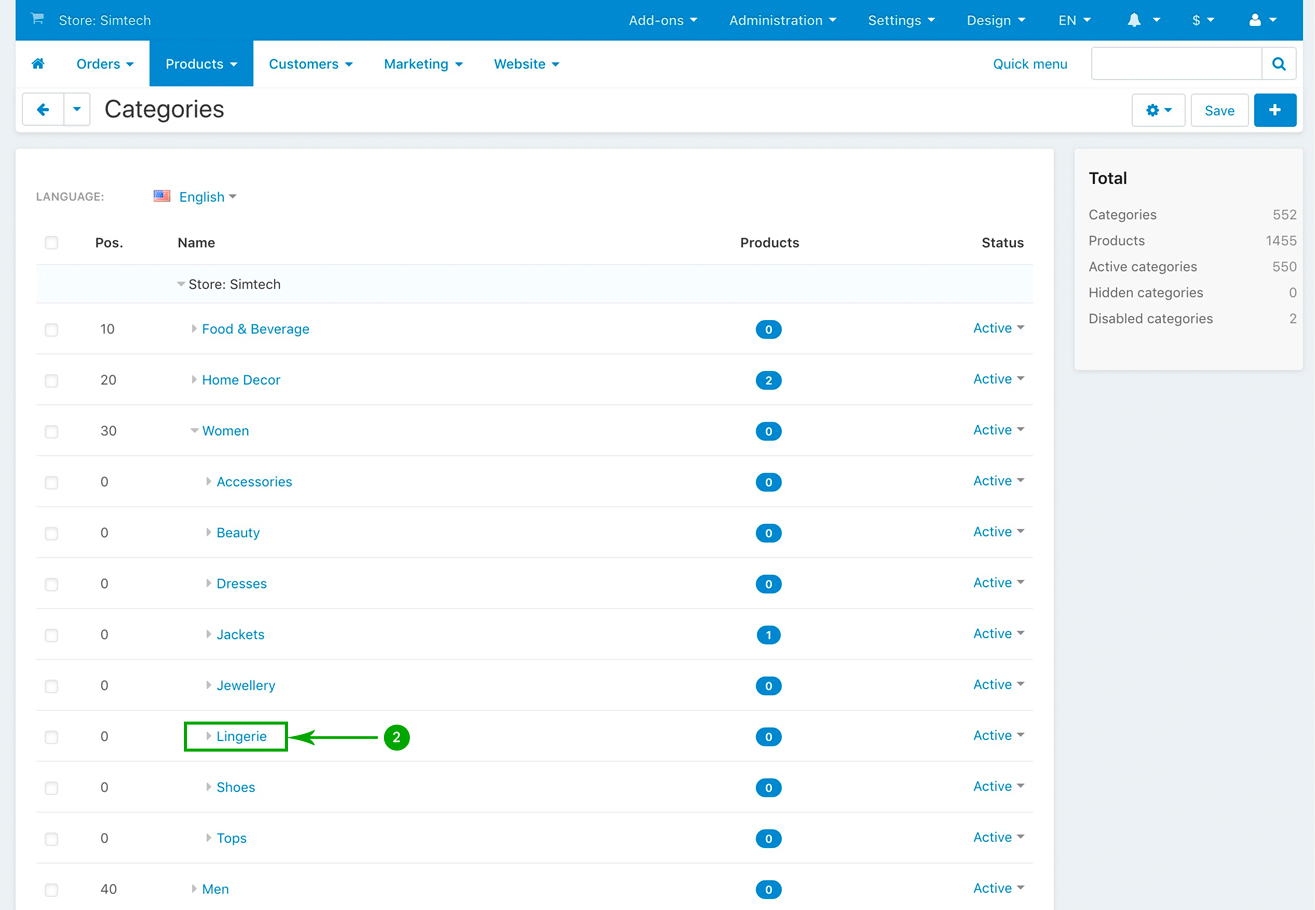
In your admin panel, go to “Products” - “Categories”
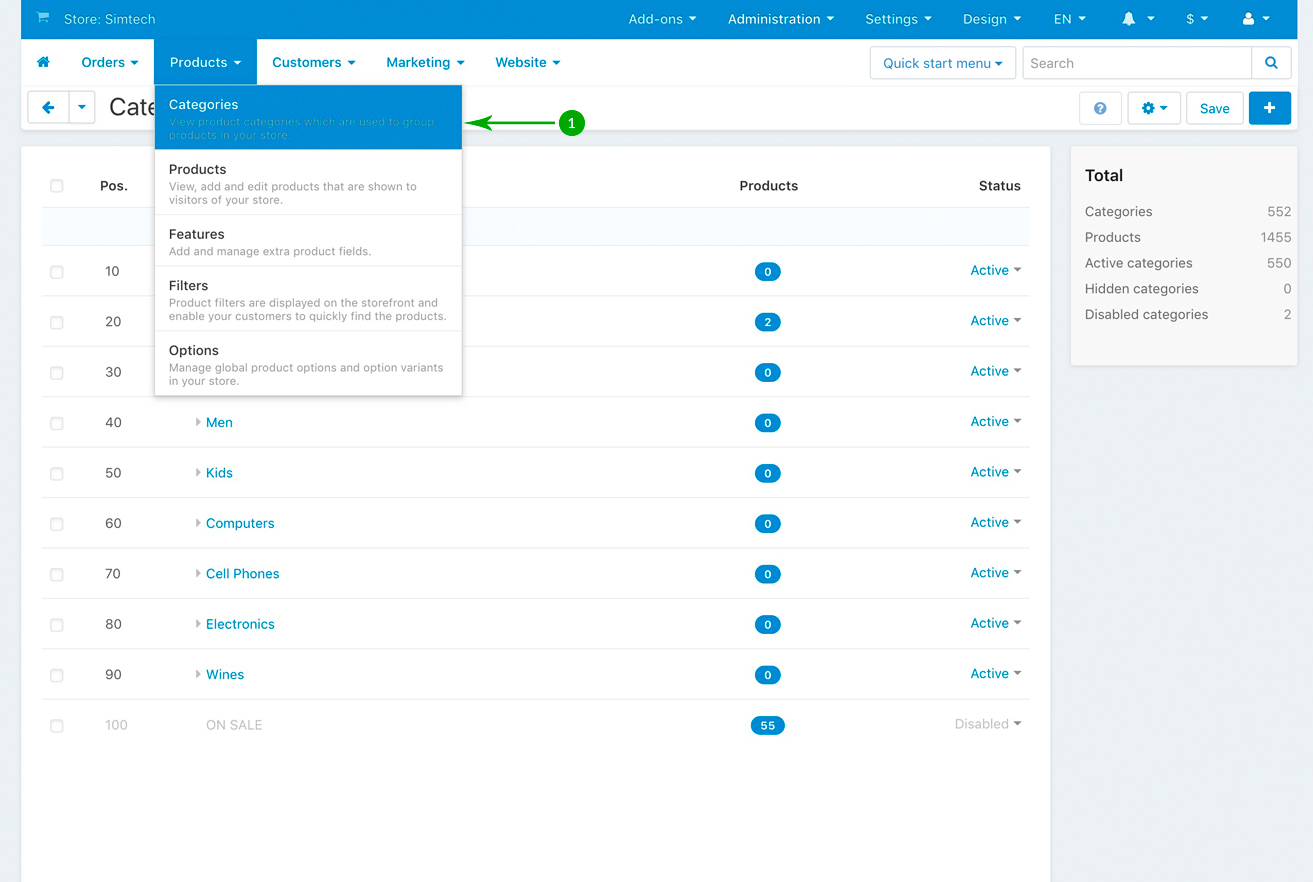
- Step 2
In the next page you’ll see a list of all of your first level categories. Click on a first level category that you to edit. In our example, we’ll edit the first level category called “Women”, so, we’ll click it.
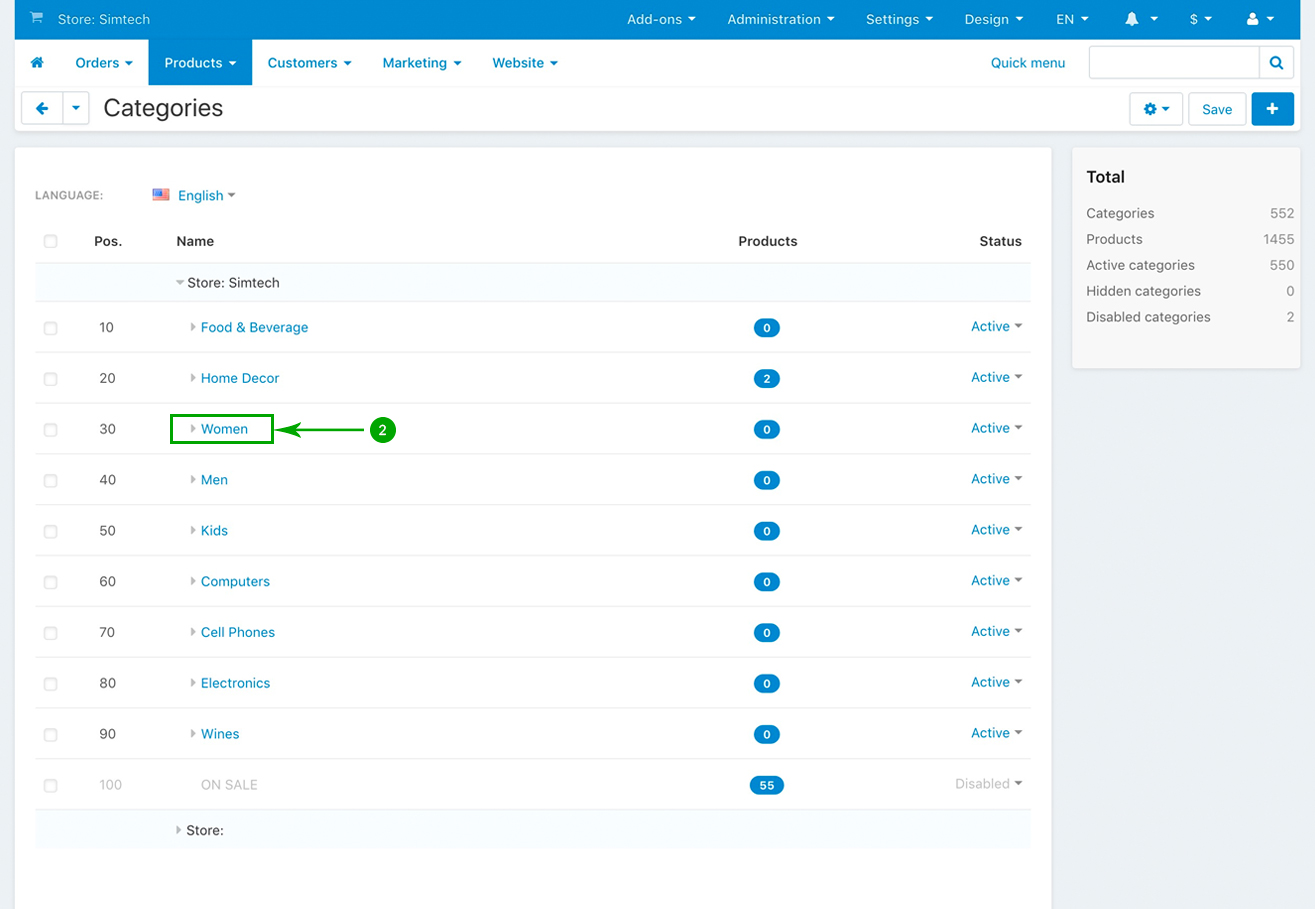
- Step 3
In the newly opened page, click on the “ET - Advanced Mega Menu” tab
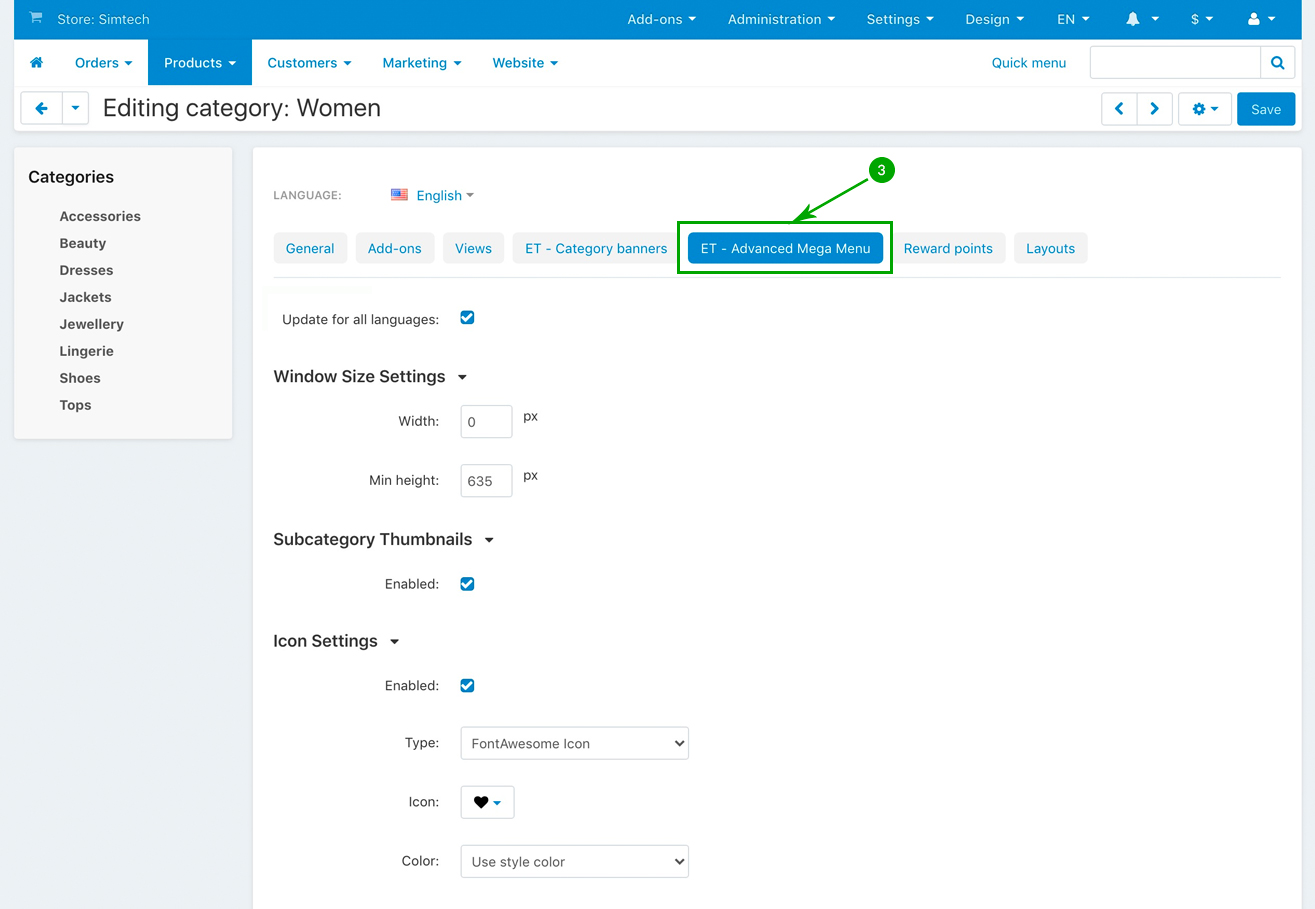
- Step 4
Select your own options as indicated below. Then click on the top right “Save” button when you’re done.
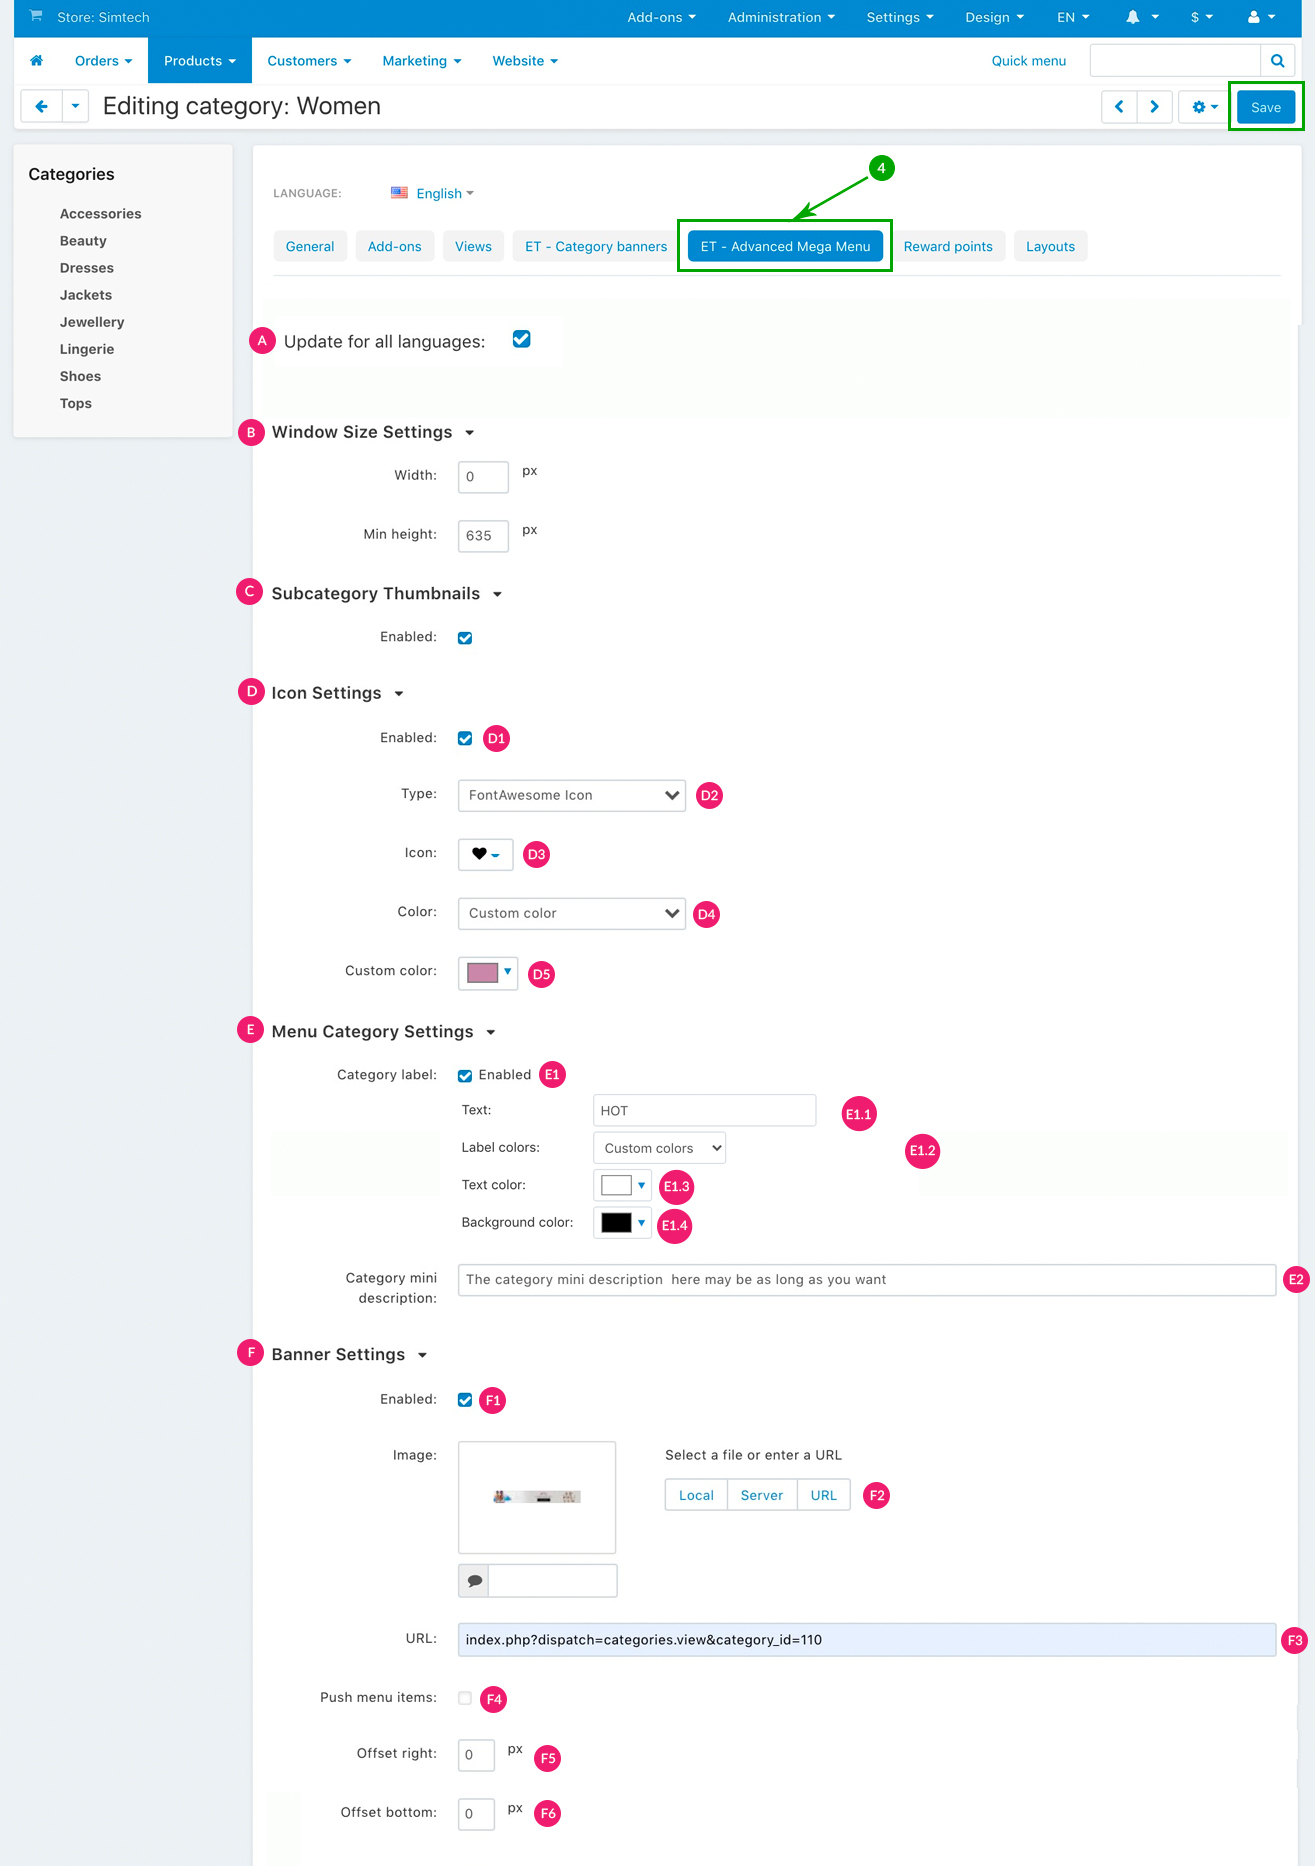
- D1: Enabled - Check this box if you want to add an icon/image to your first level category. If this box remains unchecked, then no menu icon/image will be displayed.
- D2: Type - If you chose to add an icon to your menu item, select the type of icon you want to use. You can choose between picking “Image”, “Font Awesome” icon, or add your own “Custom” icon
- D3: Image/Icon/Custom class - If at the above “Type” section you selected the “Image option” option, then upload your “Image”, as well as the “Hover image”(image which appears when hovering over the first image). These images may be in jpeg, jpg or png format. If at the above “Type” section you selected the “FontAwesome” option, simply choose your desired icon from the icon picker. If at the above “Type” section you selected the “Custom Icon” option, insert the class of your custom icon in the “Custom class” field. We have chosen “FontAwesome” option for this example
- D4: Icon color - This option is only available if at point D2 you have selected either “FontAwesome” option, or “Custom Icon” option. In this case, for the icon color you have two options: “Use style color” and “Custom color”. So, choose “Use style color” if you want to use the already pre-defined VIVAshop style colors (from your current chosen style), or choose “Custom color” if you want to use your own custom color
- D5: Custom color - If you chose the “Custom color” option for “Icon color”, then just pick your desired color from the color picker
- E1: Enabled - Check this box if you want to add a label to your first level category. If this box remains unchecked, then no category label will be displayed
- E1.1: Text - Type the text for your category label
- E1.2: Label colors - You have two options: “Use style colors” and “Custom colors”. So, choose “Use style colors” if you want to use the already pre-defined VIVAshop style colors (from your current chosen style), or choose “Custom colors” if you want to use your own custom colors
- E1.3: Text color - If you chose the “Custom color” option for “Label colors”, then pick your desired label text color
- E1.4: Background color - If you chose the “Custom color” option for “Label colors”, then pick your desired label background color
- E2: Category mini description - Choose a short category description for your first level category. If this field remains empty, then no category description will be shown
- F1: Enabled - Check this box if you want to add a banner/image to your Mega Menu
- F2: Image - Choose your desired image
- F3: Push menu items - Check this box if you want the image to not overlap with the categories displayed in the right side Mega Menu window
- F4: Offset right - This value controls how far the image should be outside or inside the menu horizontally. Use positive values if you want the image to be more inside the menu (move the image to the left) and use negative values if you want the image to be more outside the menu (move the image to the right).
- F5: Offset bottom - This value controls how far the image should be outside or inside the menu vertically. Use positive values if you want the image to be more inside the menu (move the image up) and use negative values if you want the image to be more outside the menu (move the image down).
Second level categories - Add category labels and display category image thumbnails

All of your second level categories can be added a category label which can be customized as per your own needs. Also, if you choose to add an image to your second level category, the respective image thumbnail will be displayed here inside the right side Mega Menu window. Below you’ll learn how to do it:
- Step 1
In your admin panel, go to “Products” - “Categories”
- Step 2
In the next page you’ll see a list of all of your first level categories. Expand a first level category in order too see its second level categories. Click on a second level category that you to edit. In our example, we’ll edit the second level category called “Lingerie”, under the “Women” main category, so we’ll click on it.
- Step 3
Choose the desired category image under the “Image” section. NOTE: The image sizes on our demo site is 400px X 400px
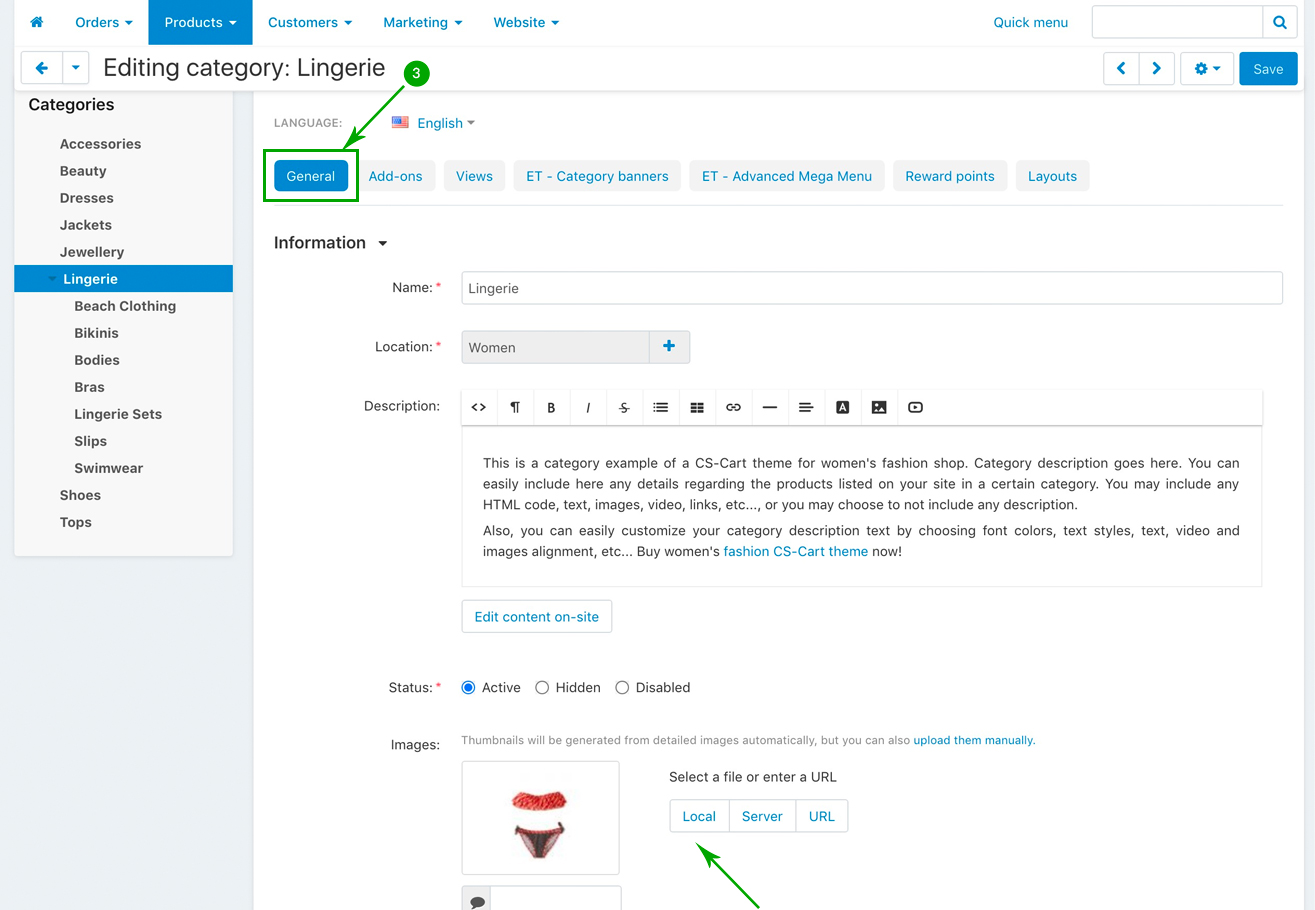
- Step 4
Click on the “ET - Advanced Mega Menu” tab
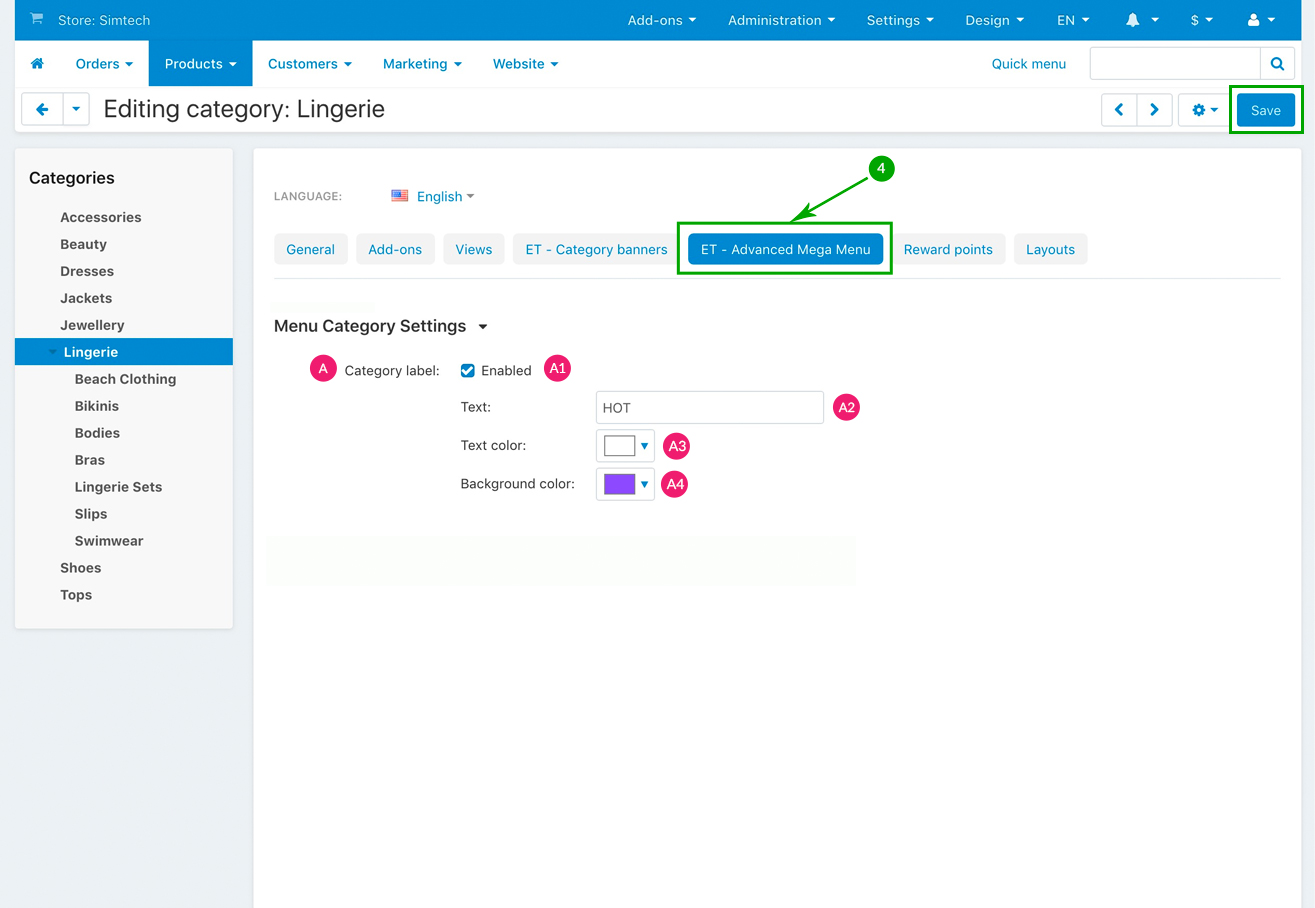
- A1: Enabled - Check this option if you want to add a label to your second level category. If this box remains unchecked, then no category label will be displayed
- A2: Text - Type the text for your category label
- A3: Text color - Pick the text color for your category label
- A3: Background color - Pick the background color for your category label
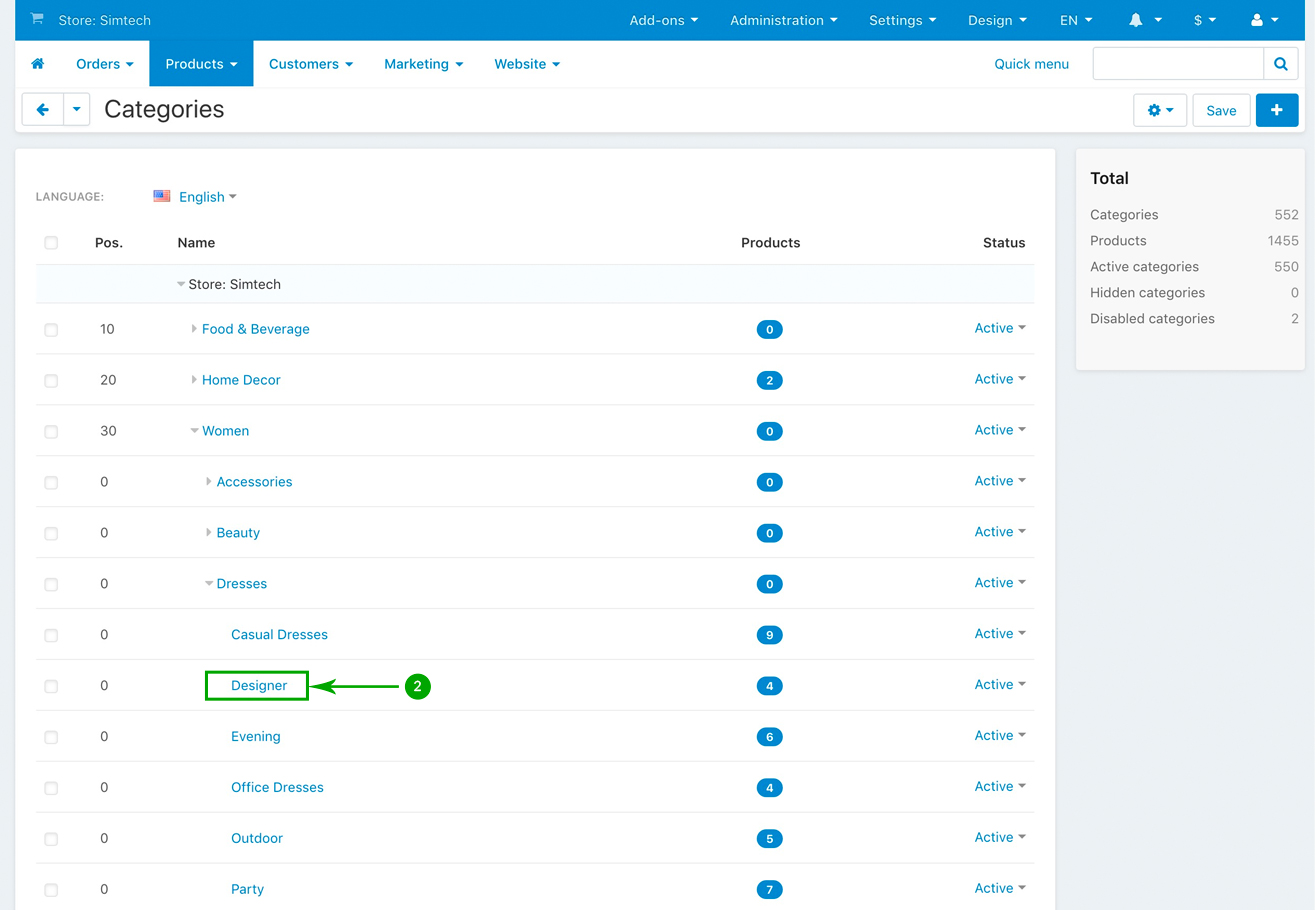
Third level categories - Add category labels
All of your third level categories can be added a category label which can be customized as per your own needs. Below you’ll learn how to do it:
- Step 1
In your admin panel, go to “Products” - “Categories”
- Step 2
In the next page you’ll see a list of all of your first level categories. Expand a first and second level category in order too see its third level categories. Click on a third level category that you to edit. In our example, we’ll edit the third level category called “Designer”, under the “Dresses” second level category, so we’ll click on it.
- Step 3
Click on the “ET - Advanced Mega Menu” tab
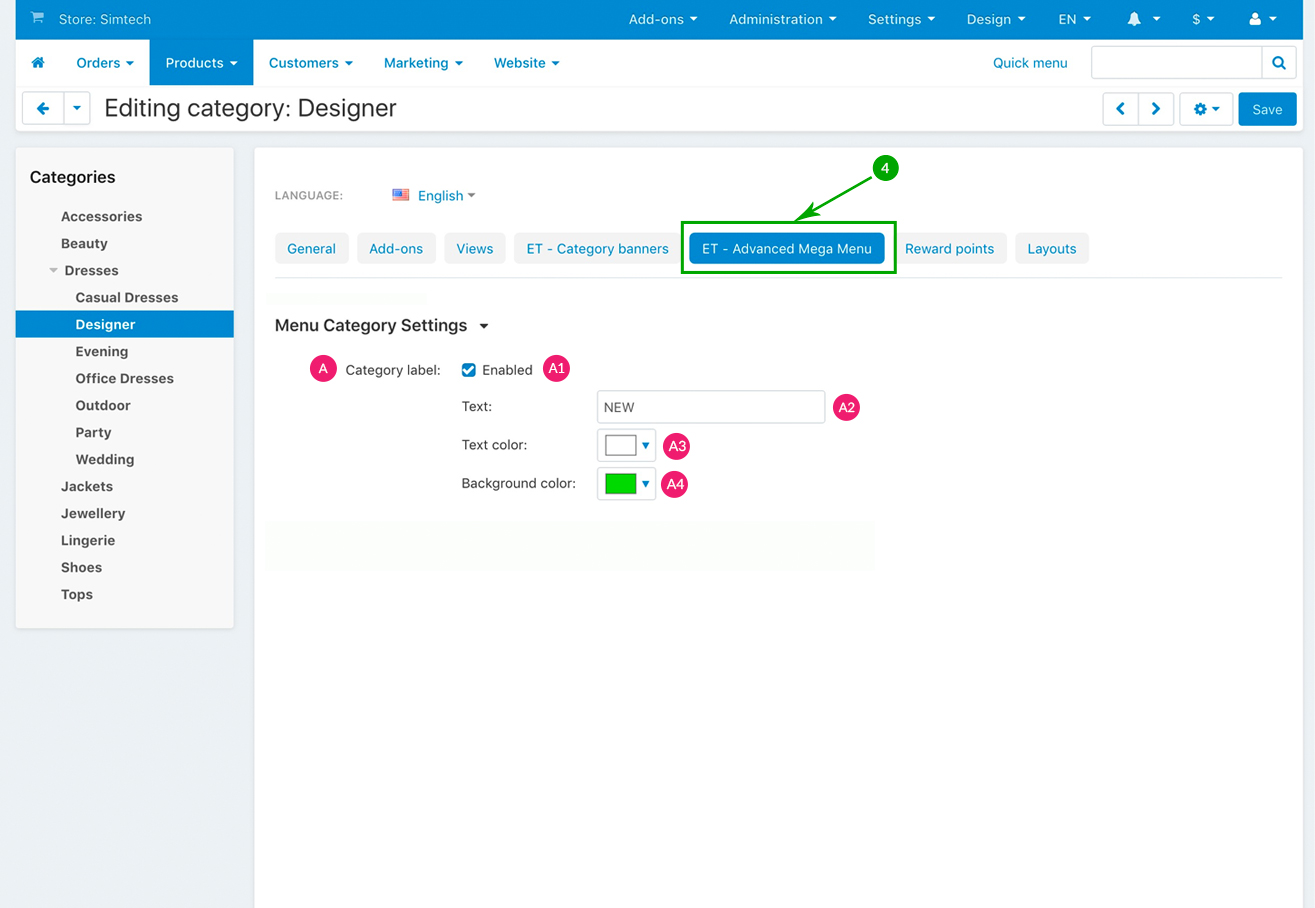
- A1: Enabled - Check this option if you want to add a label to your third level category. If this box remains unchecked, then no category label will be displayed
- A2: Text - Type the text for your category label
- A3: Text color - Pick the text color for your category label
- A3: Background color - Pick the background color for your category label