How to update from v3.0 to v3.10
Preparing the update
1. Before starting the theme update process, you firstly need to update your CS-Cart/Multi-Vendor software to version 4.15.2.
2. After you updated your CS-Cart/Multi-Vendor software to version 4.15.2, simply go to the Downloads section of your account and download the VIVAshop theme archive version 3.10. You will find it under the name “vivashop_ultimate_v3.10.zip” (for VIVAshop Ultimate), or “vivashop_multivendor_v3.10.zip” (for VIVAshop Multi-Vendor). Once you have downloaded the theme archive, simply unzip it into your computer.
Create a backup
We STRONGLY recommend making a local backup of all your files and the database, or at the very least use the built in CS-Cart database backup functionality before making any updates or major customizations to your store. To create a backup using the CS-Cart functionality, please follow the steps below:
- Step 1
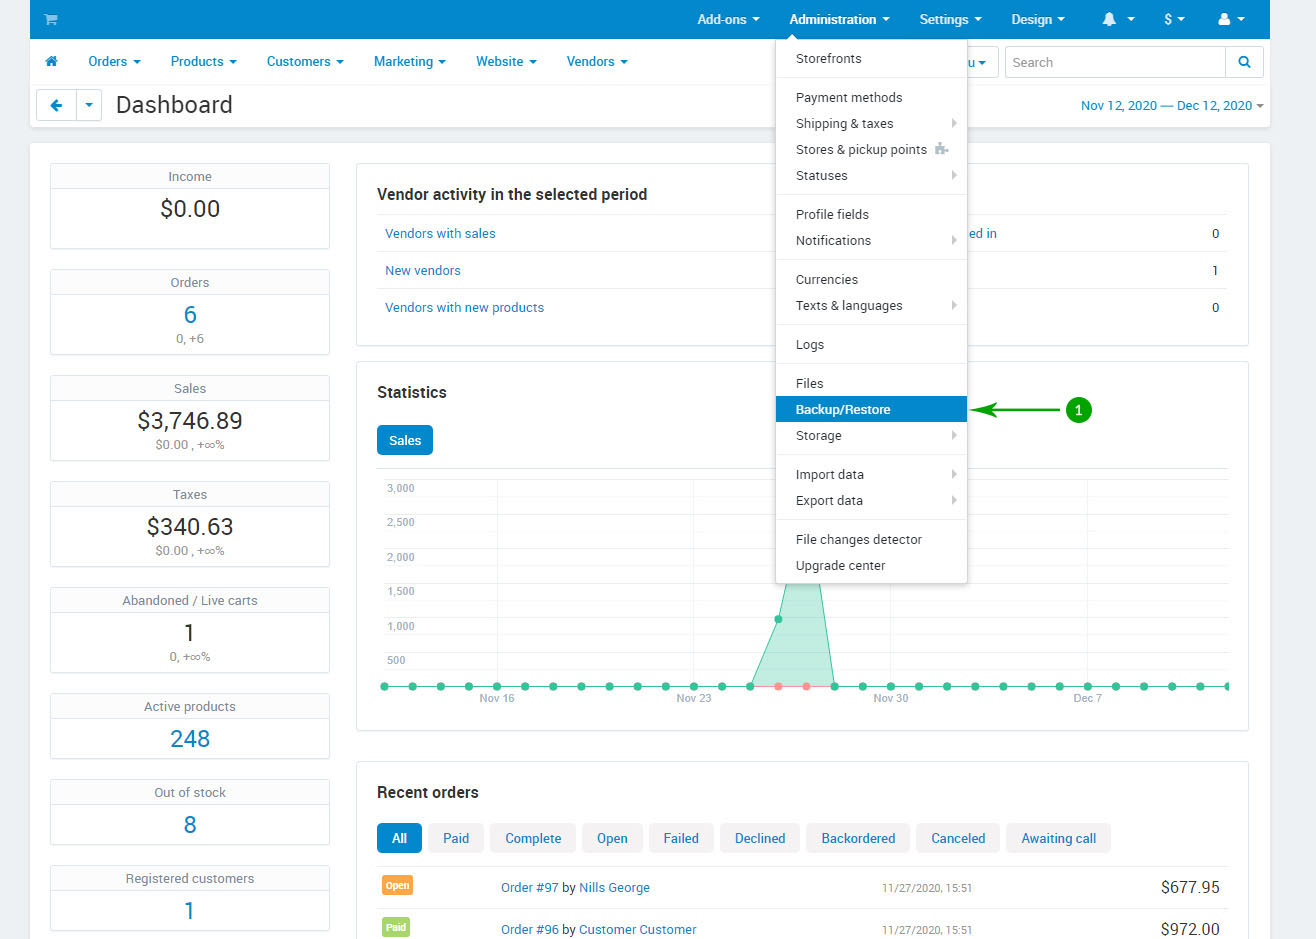
Log into your administrator area and navigate to "Administration" - "Backup/Restore".
- Step 2
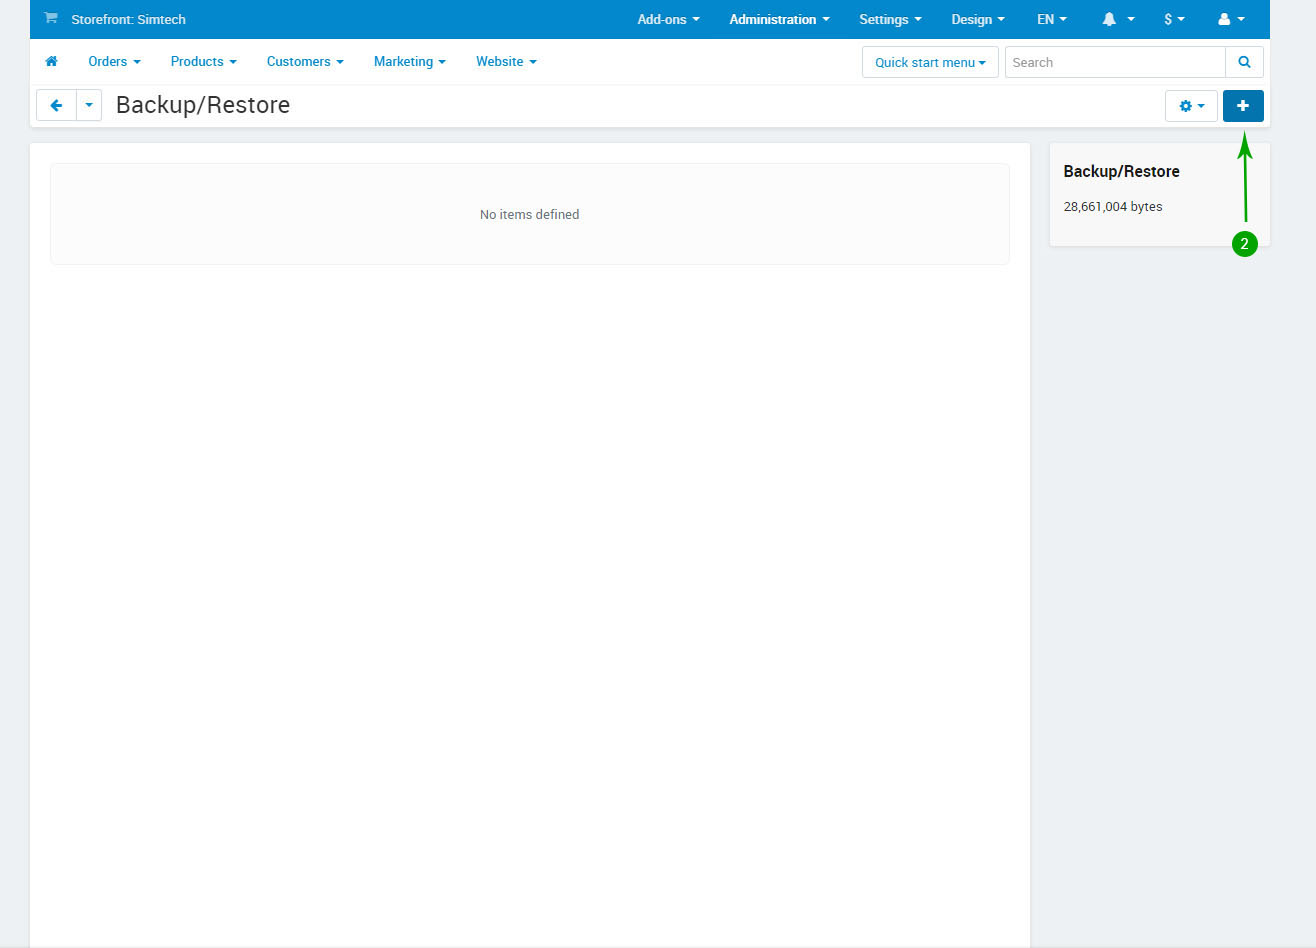
Click the "+" icon at the top right
- Step 3
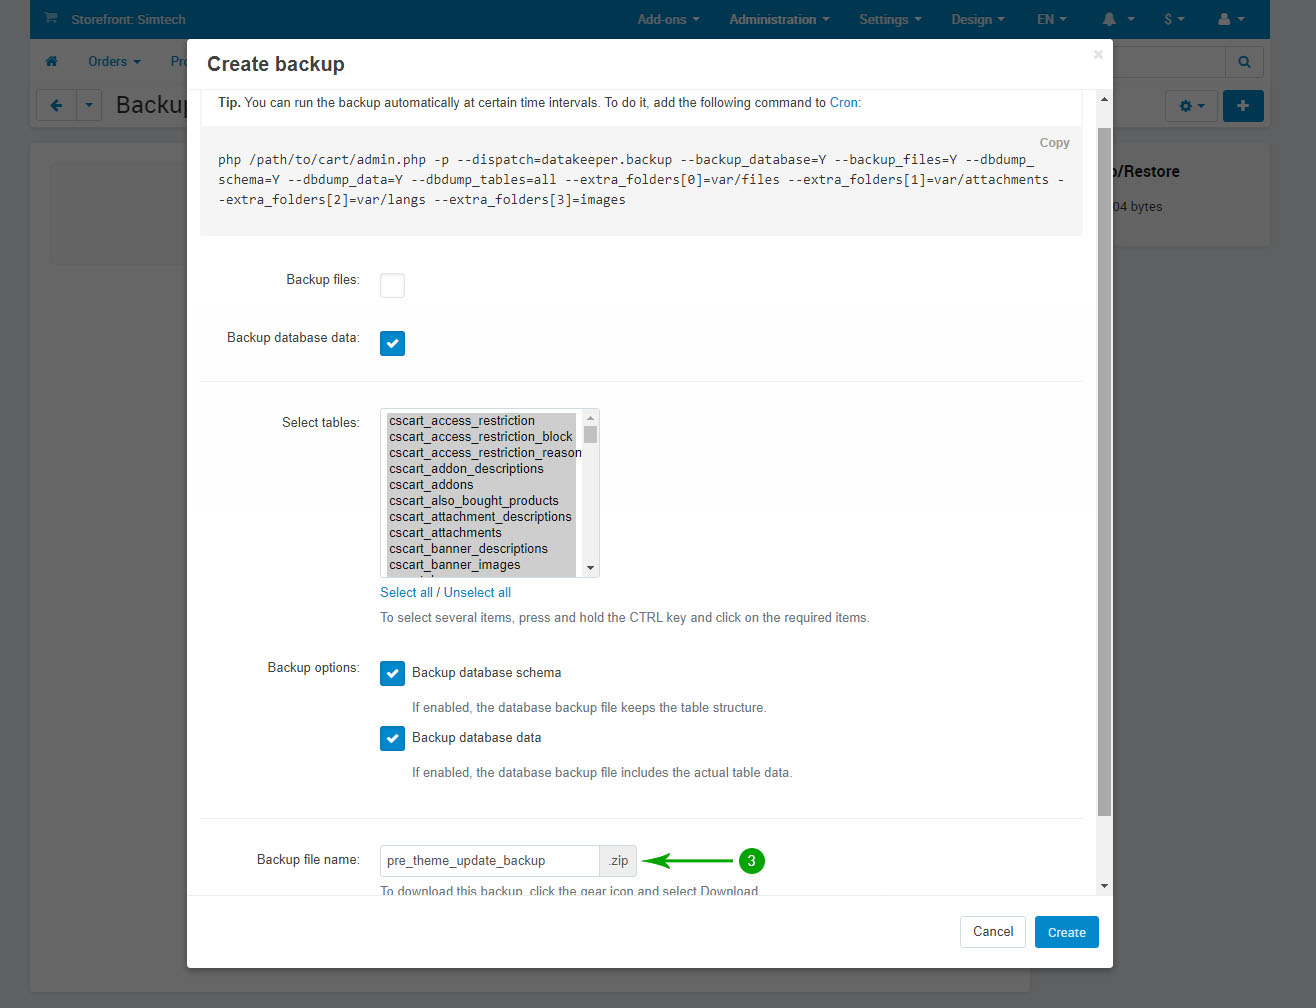
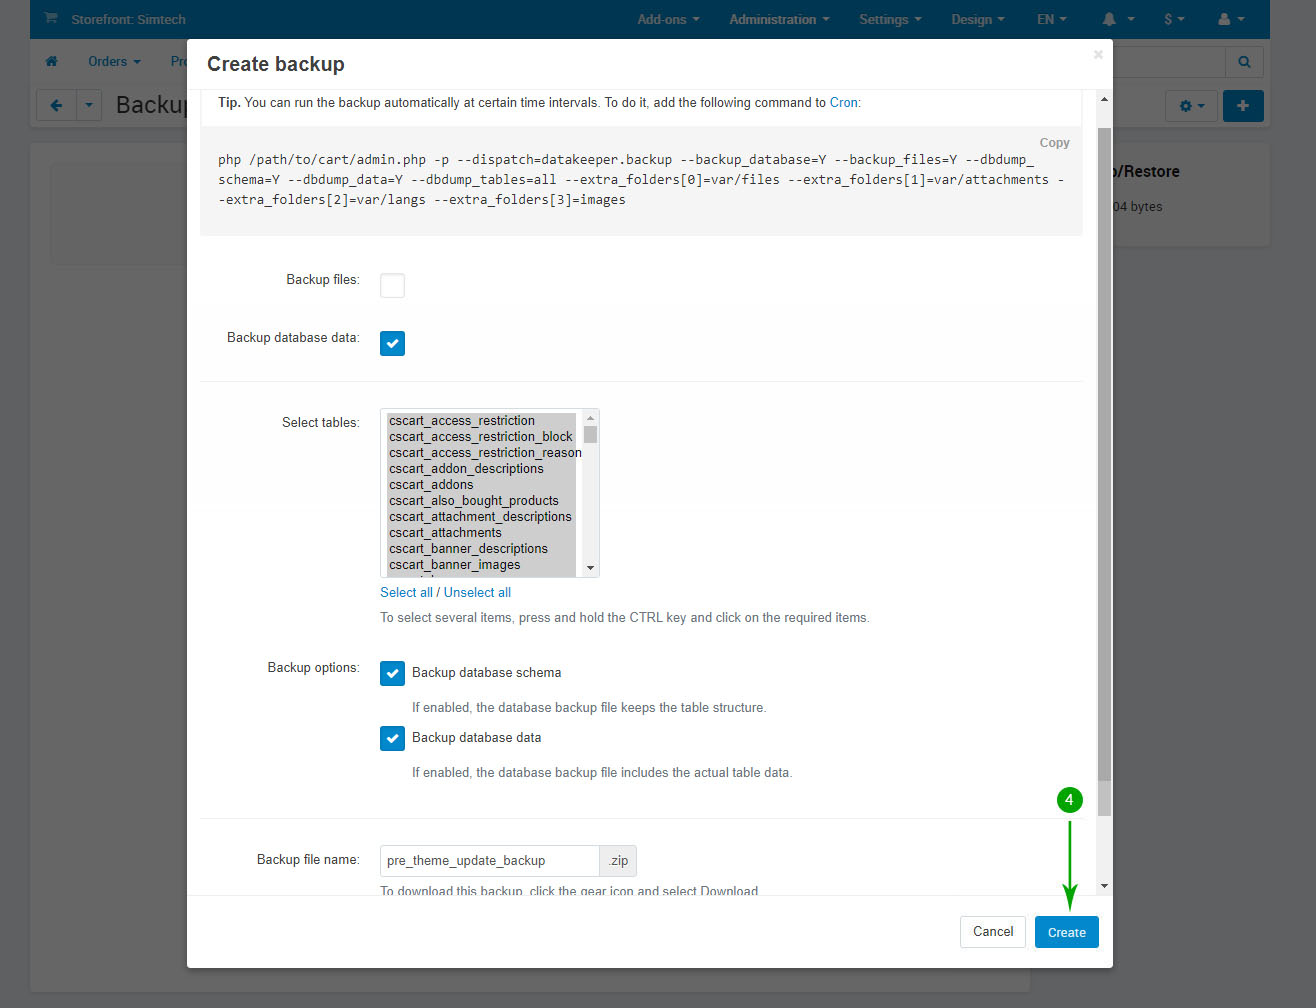
In the new popup window make sure the following options are enabled:
- Backup database data: Checked
- Click the blue "Select all" link to select all the database tables
- Backup options: Backup database schema: Checked
- Backup options: Backup database data: Checked
- Backup file name: pre_theme_update_backup
- Step 4
Click the blue Create button in the lower right
In case you encounter issues once the theme update is completed you may restore using this backup by hovering over the name "pre_theme_update_backup.sql.zip" then clicking the gear icon and selecting the "Restore" option.
Install and configure the default CS-Cart/Multi-Vendor add-on "Product reviews"
To install and configure the new "Product Reviews" default CS-Cart/Multi-Vendor add-on, please follow the steps below:
- Step 1
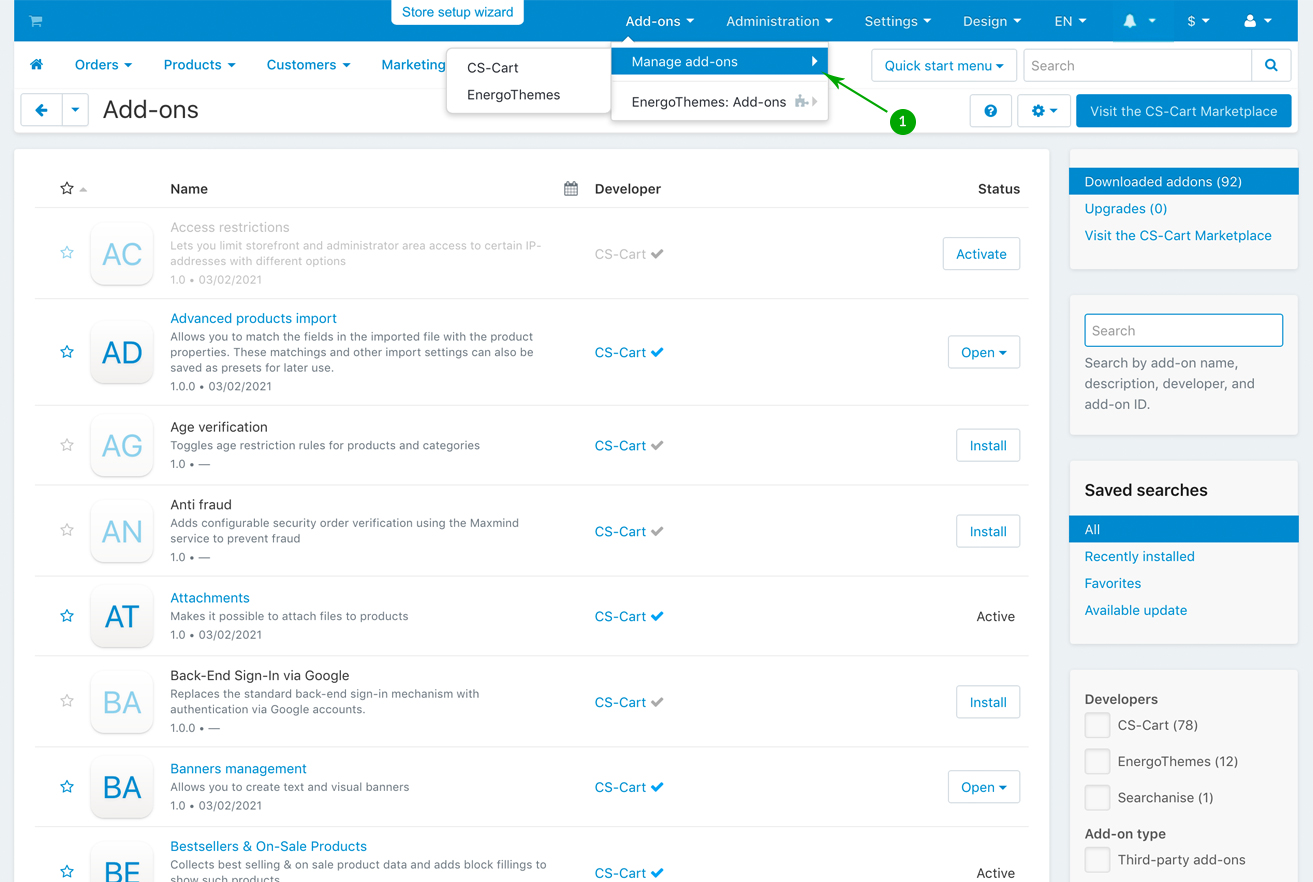
Log into your Administrator area of your CS-Cart installation and navigate to "Add-ons" - "Manage Add-ons"
- Step 2
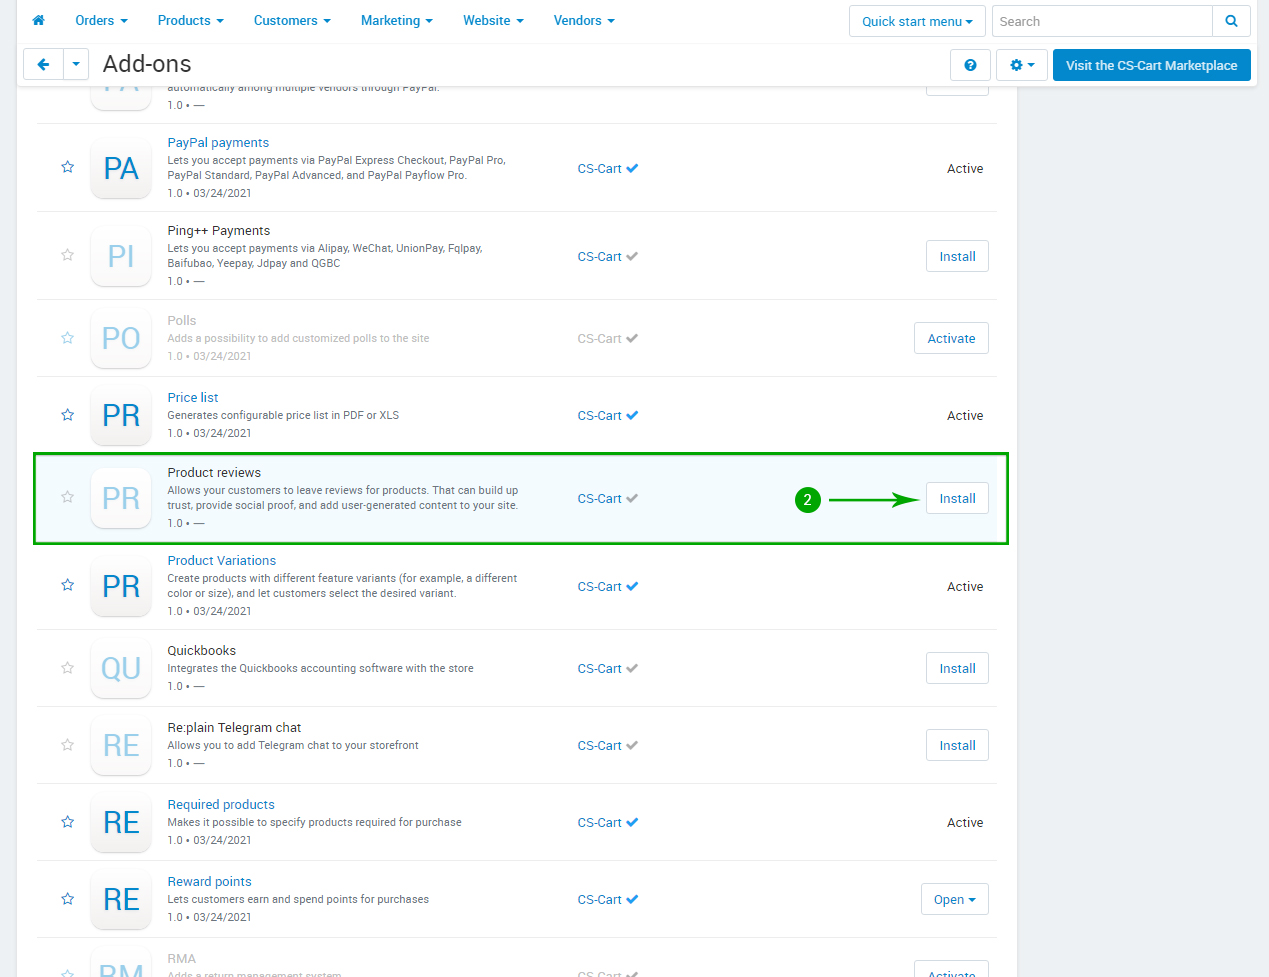
Scroll down and find the "Product Reviews" add-on then click the "Install" button
- Step 3
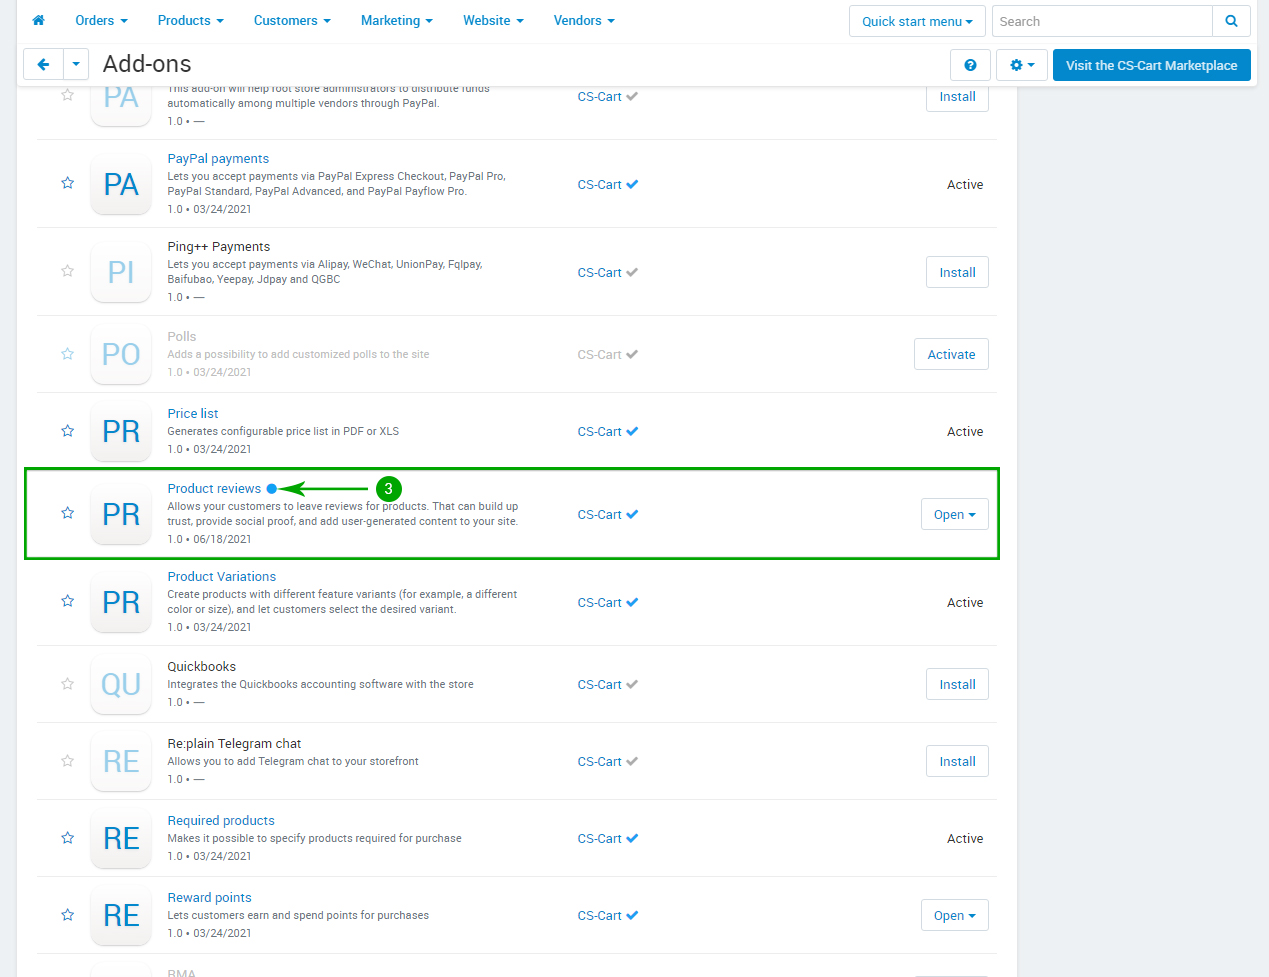
Click the "Product Reviews" add-on title
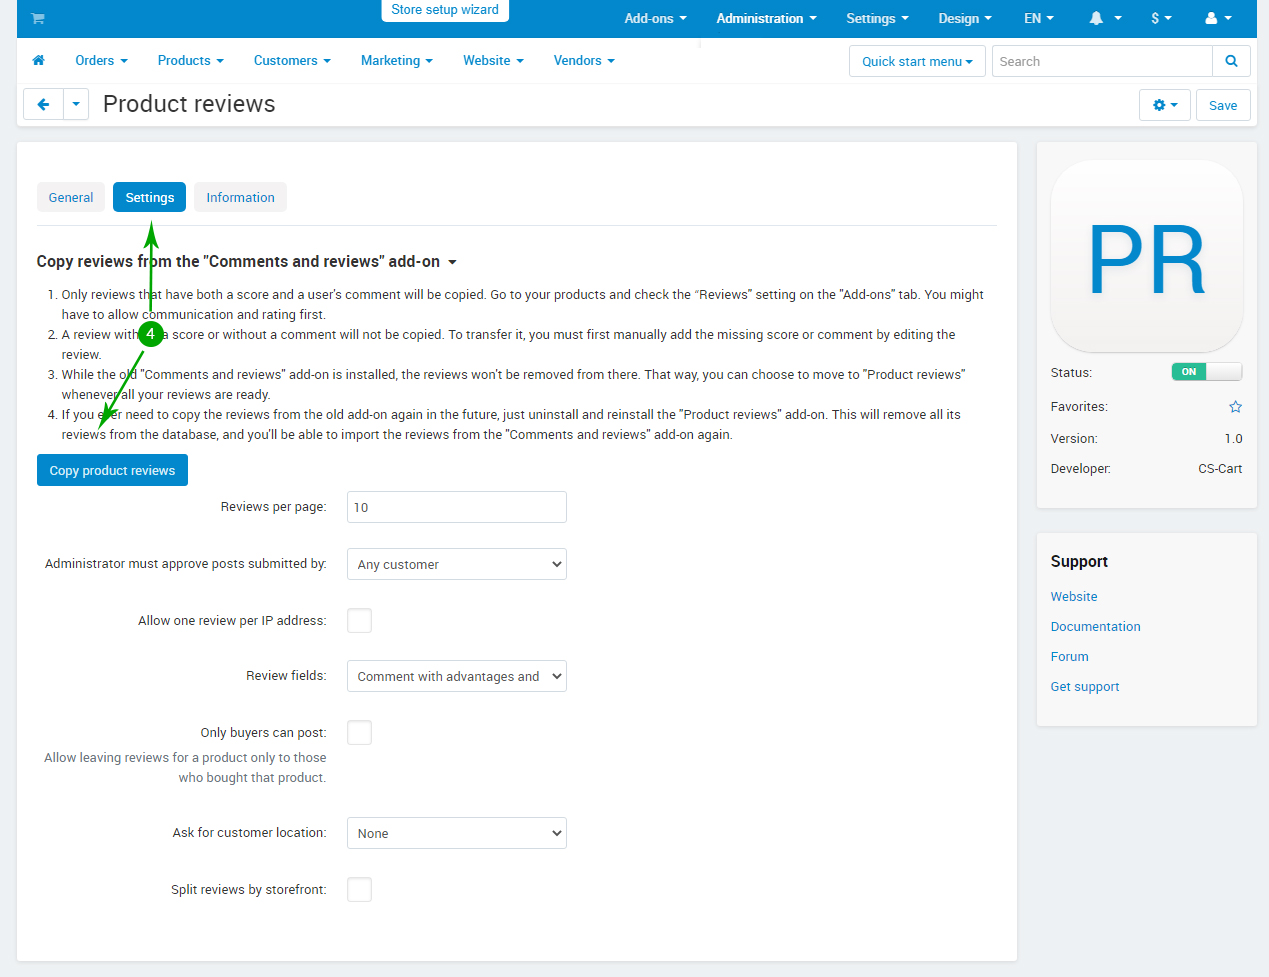
- Step 4
In the new page, switch to the "Settings" tab and click the "Copy product reviews" button
Install the default Multi-Vendor add-on "Vendor panel configurator" (Multi-Vendor only)
To install the new "Vendor panel configurator" default Multi-Vendor add-on, please follow the steps below:
- Step 1
Log into your Administrator area of your CS-Cart installation and navigate to "Add-ons" - "Manage Add-ons"

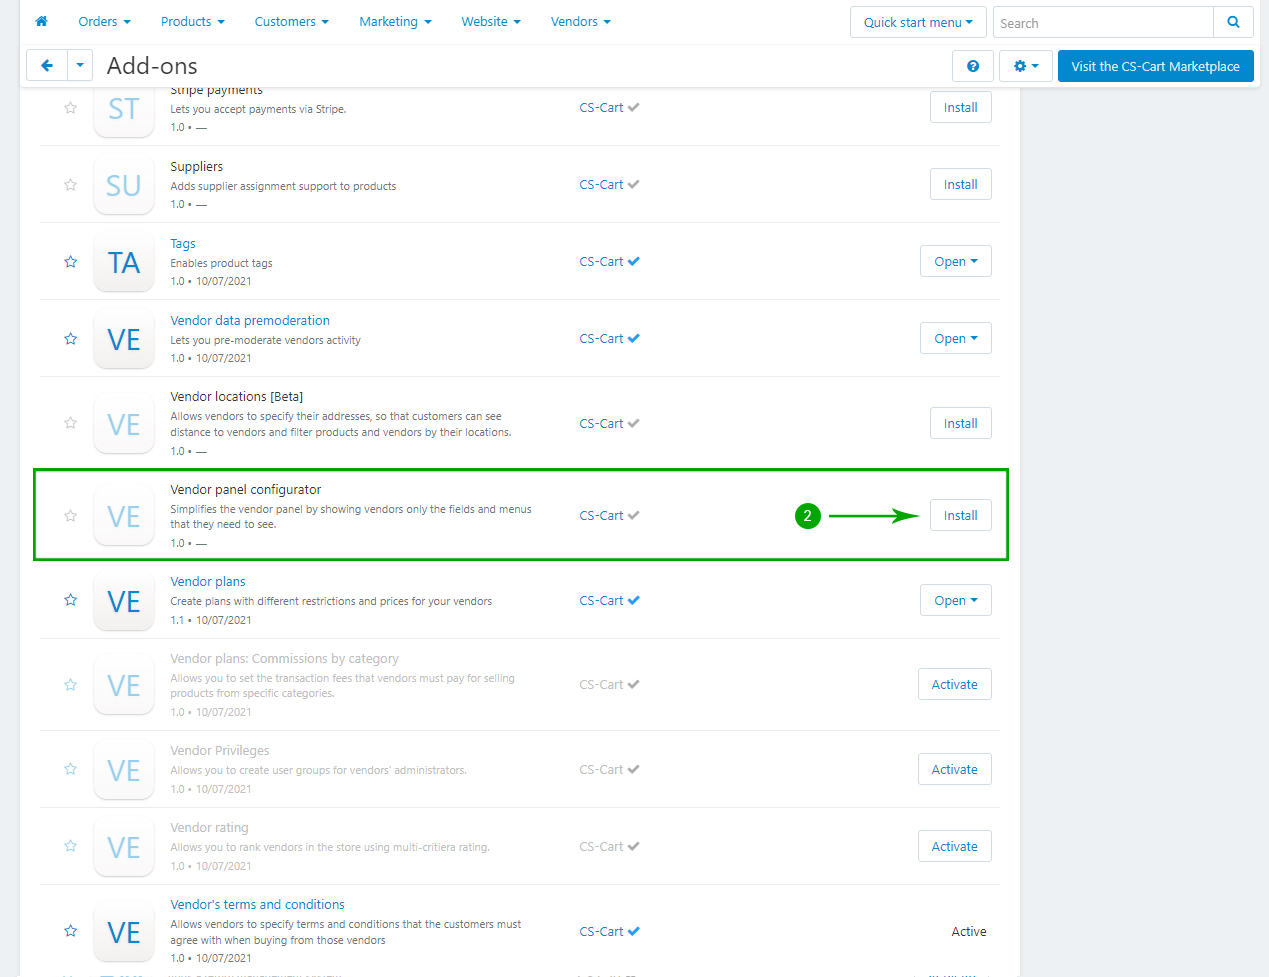
- Step 2
Scroll down and find the "Vendor panel configurator" add-on then click the "Install" button
More information regarding this addon can be found in the official CS-Cart documentation available at https://docs.cs-cart.com/latest/user_guide/addons/vendor_panel_configurator/index.html
Export your language variables
The language variables are reset during add-on update by the core CS-Cart/Multi-Vendor functionality. If you have any language other than English, or you have made translations to any language variables added by an add-on, you need to export your current language variables and re-import them after the theme update is complete. To export your language variables, please follow the steps below:
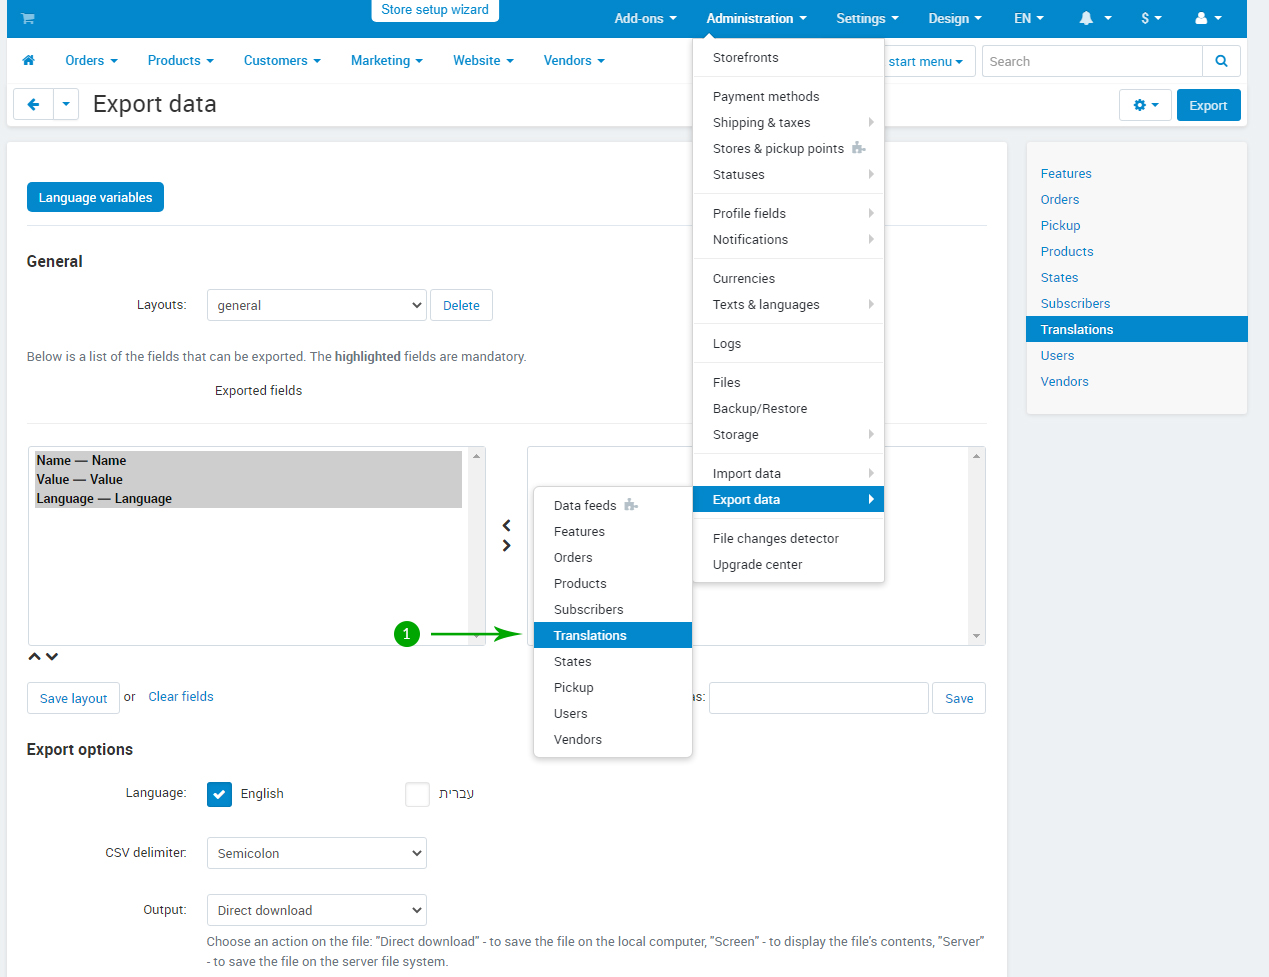
- Step 1
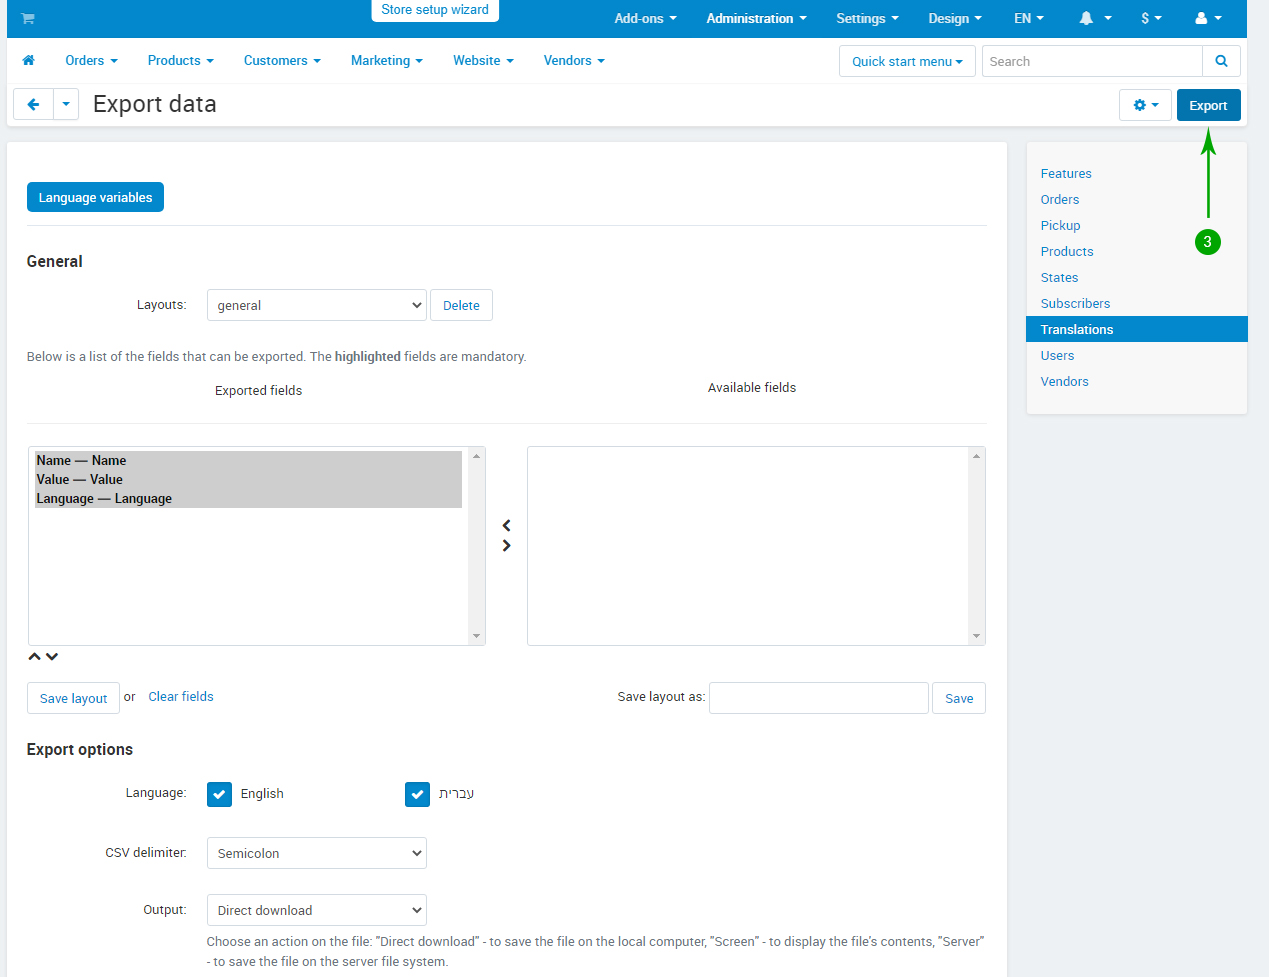
Log into your Administrator area of your CS-Cart installation and navigate to "Administration" - "Export data" - "Translations"
- Step 2
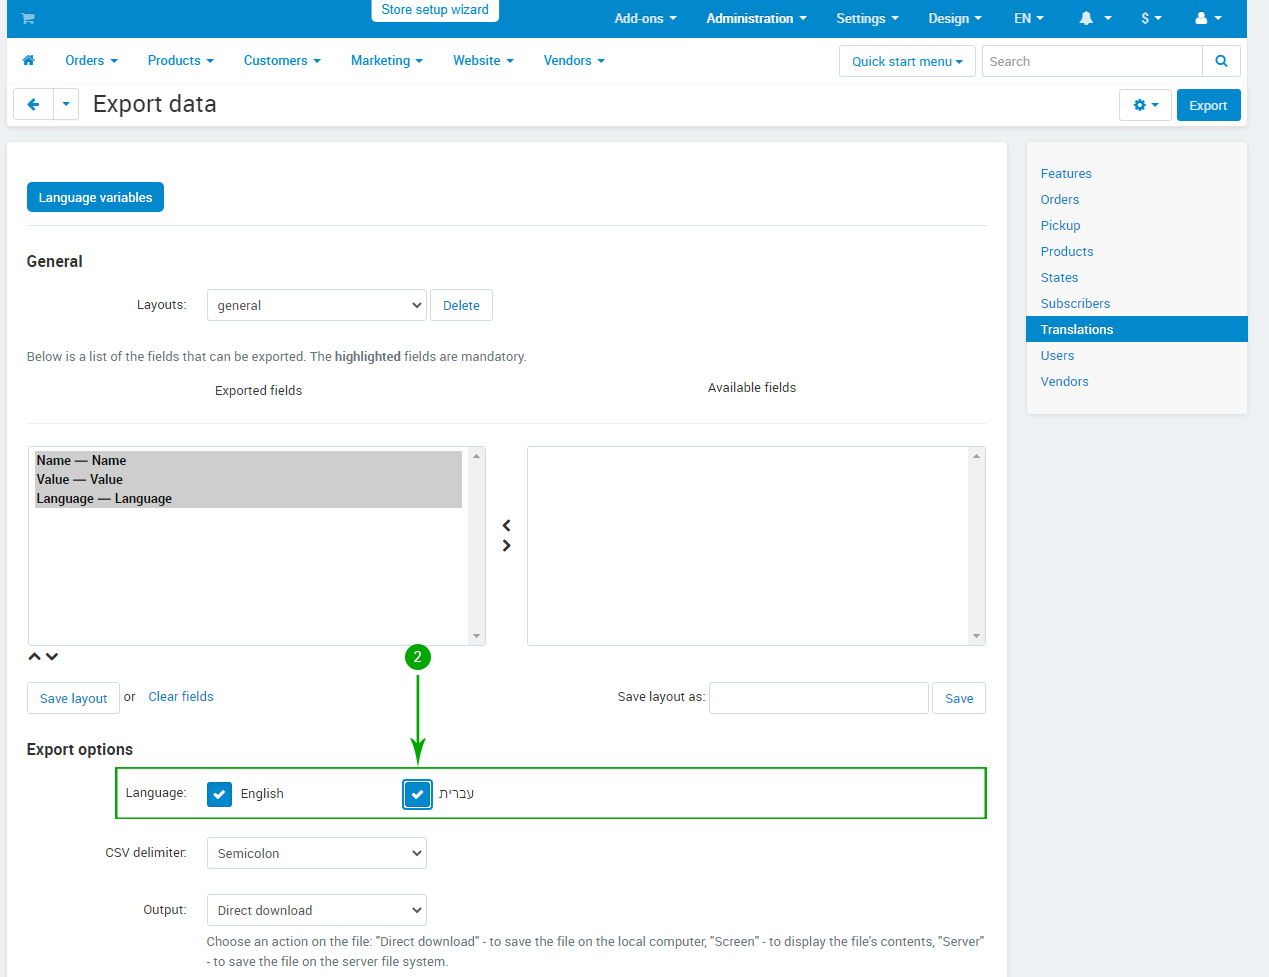
In the "Export options" section check all the languages you want to export
- Step 3
Click the "Export" button in the top right and save the resulting file to your computer
Updating the add-ons
To update the theme add-ons, please follow the steps below:
- Step 1
Log into your Administrator area of your CS-Cart installation and navigate to "Add-ons" - "Manage Add-ons"

- Step 2
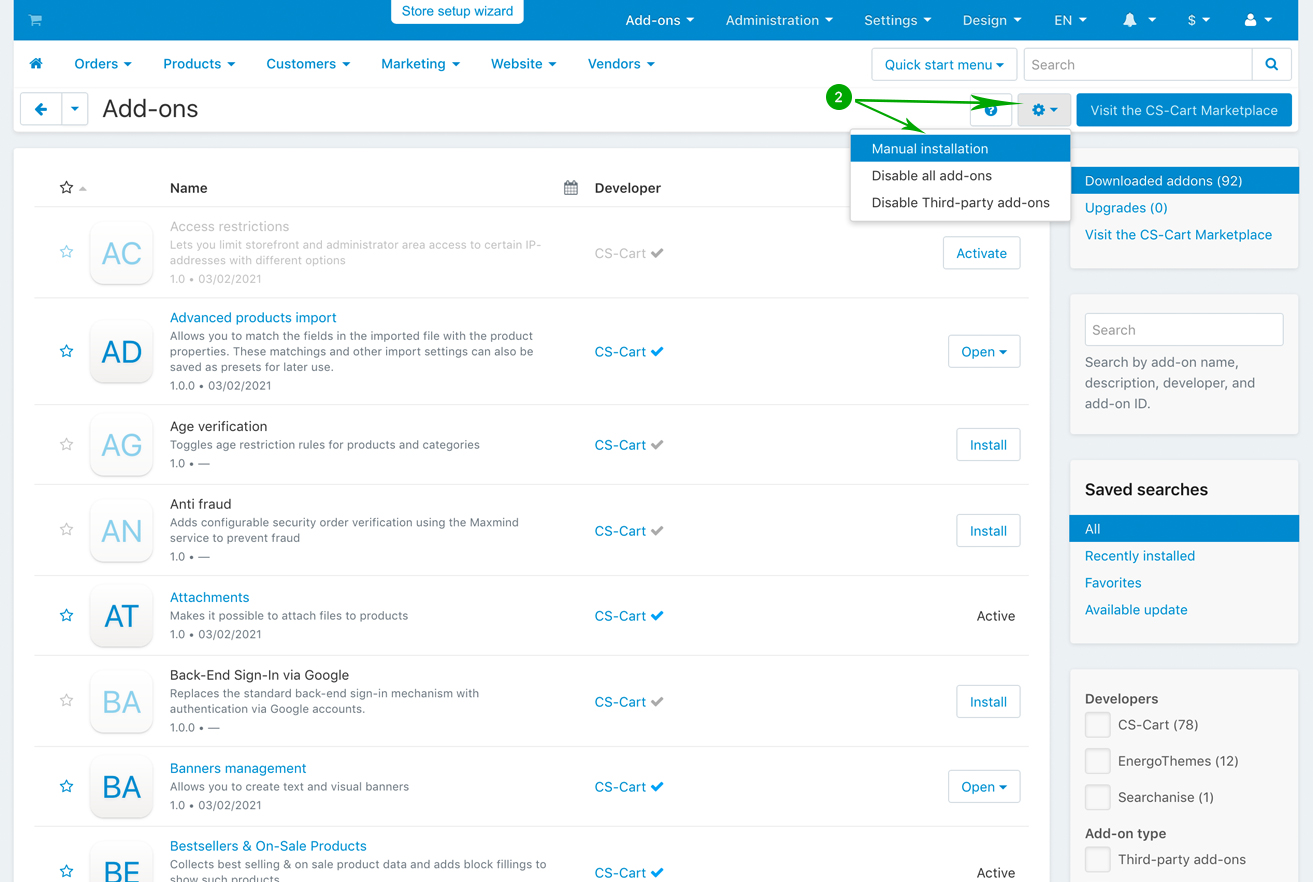
Click on gear icon, and choose Manual installation from the dropdown
- Step 3
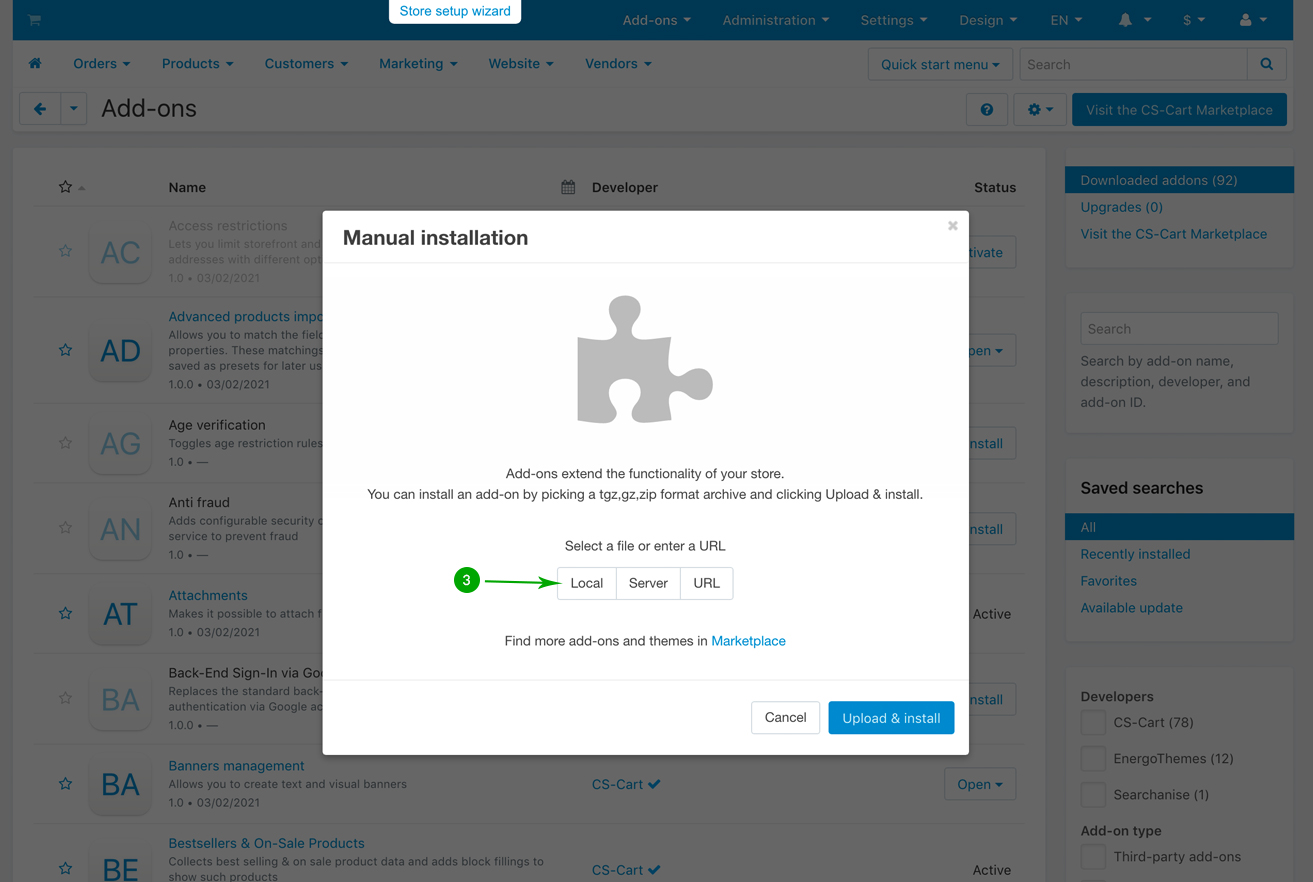
In the newly opened pop-up window under "Select a file or enter a URL" click on the "Local" button and locate the "addons" folder from your unzipped archive.
- Step 4
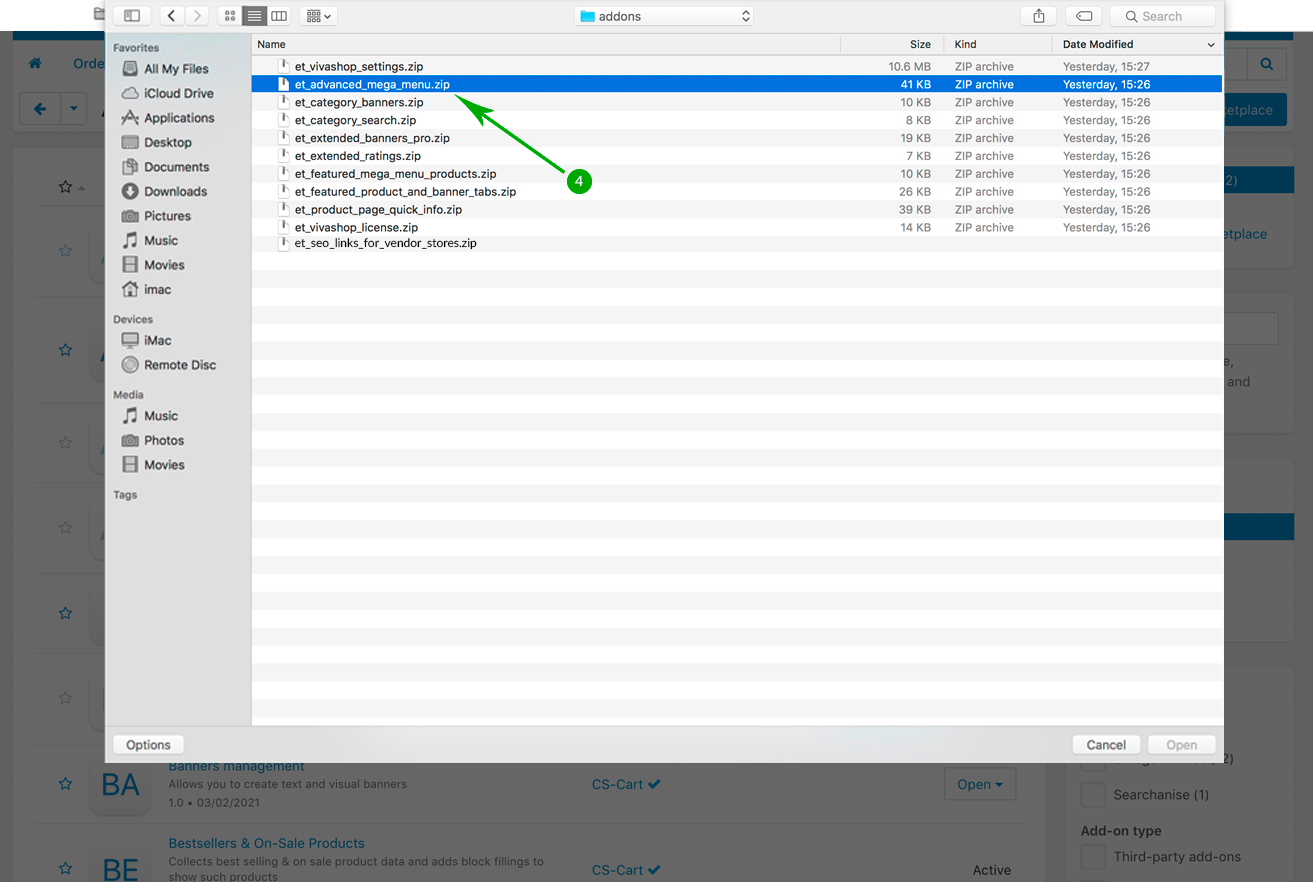
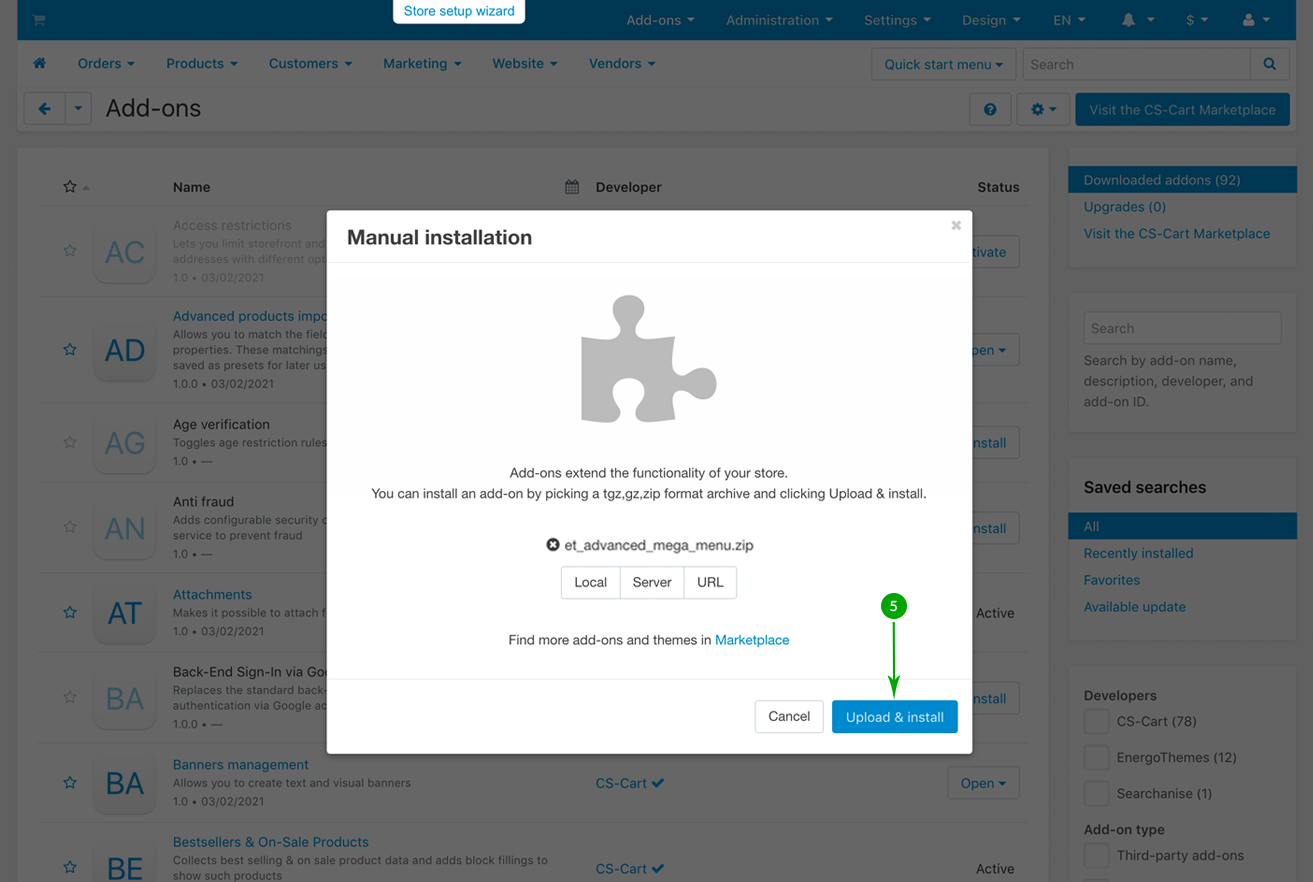
Select the add-on that you want to install and click on “Open”. In this example we have selected the first add-on called “et_advanced_mega_menu.zip”.
- Step 5
Click the blue "Upload & install" button.
- Step 6
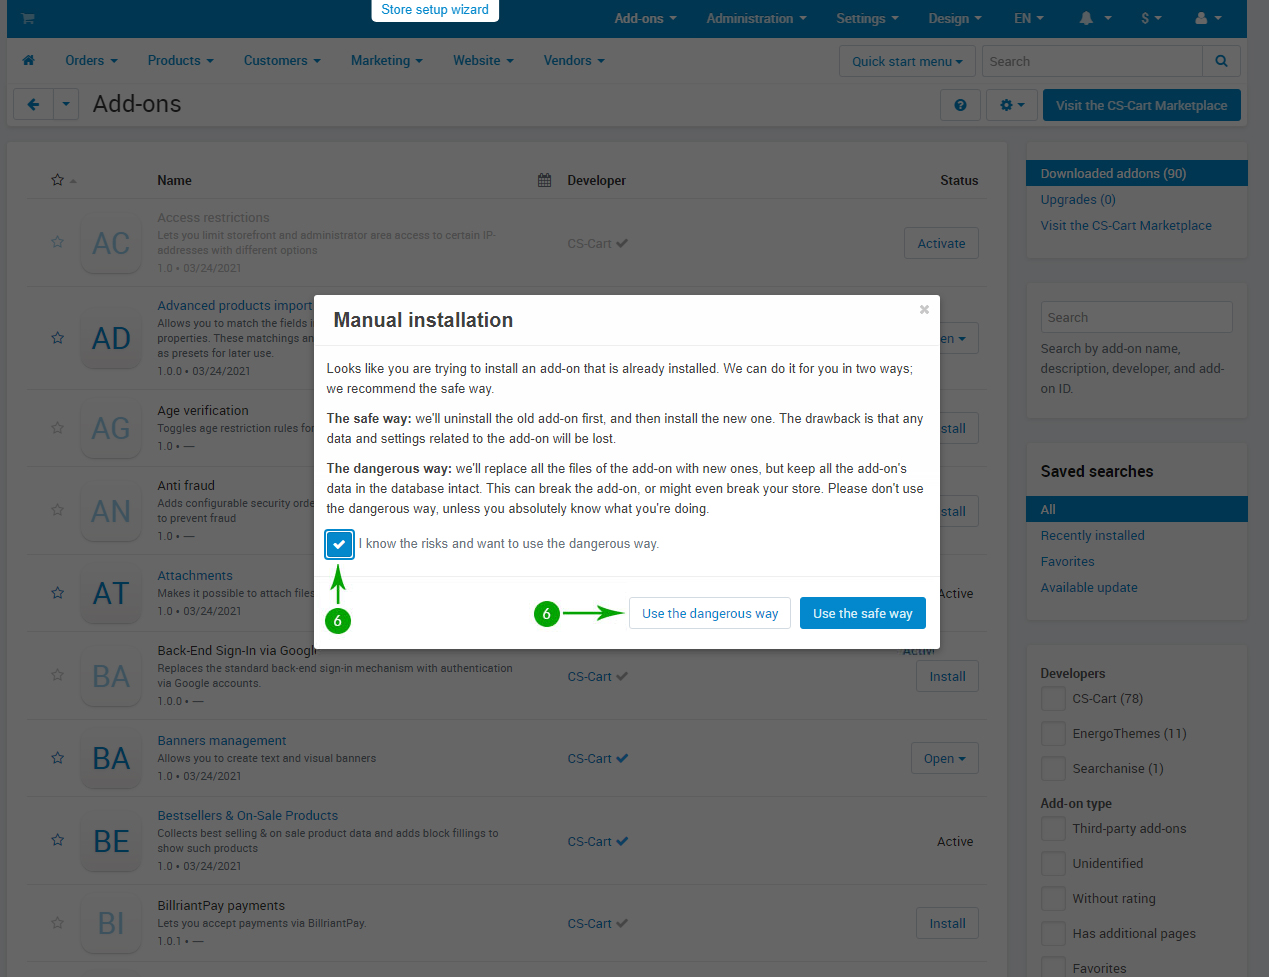
In the new window check the "I know the risks and want to use the dangerous way." option then click the "Use the dangerous way" button.
- Step 7
Repeat the above 6 steps in order to install, one by one, all of the other add-ons included in the “addons” folder.
Updating the "ET - SEO links for vendor stores" addon (Multi-Vendor only)
In order to correctly finish updating the "ET - SEO links for vendor stores" addon, please follow the steps below:
- Step 1
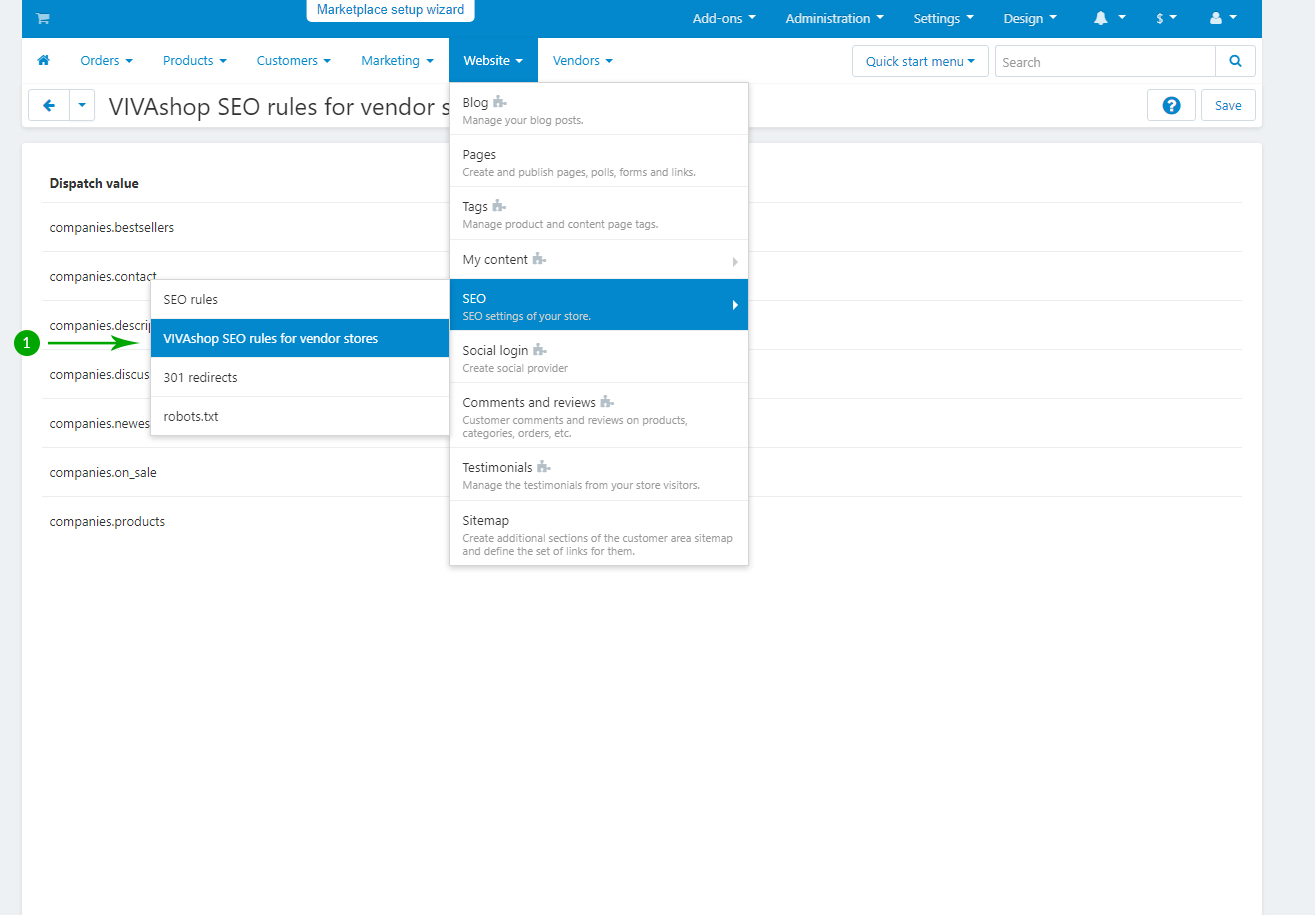
Log into your Administrator area of your Multi-Vendor installation and navigate to "Website" - "SEO" - "VIVAshop SEO rules for vendor stores"
- Step 2
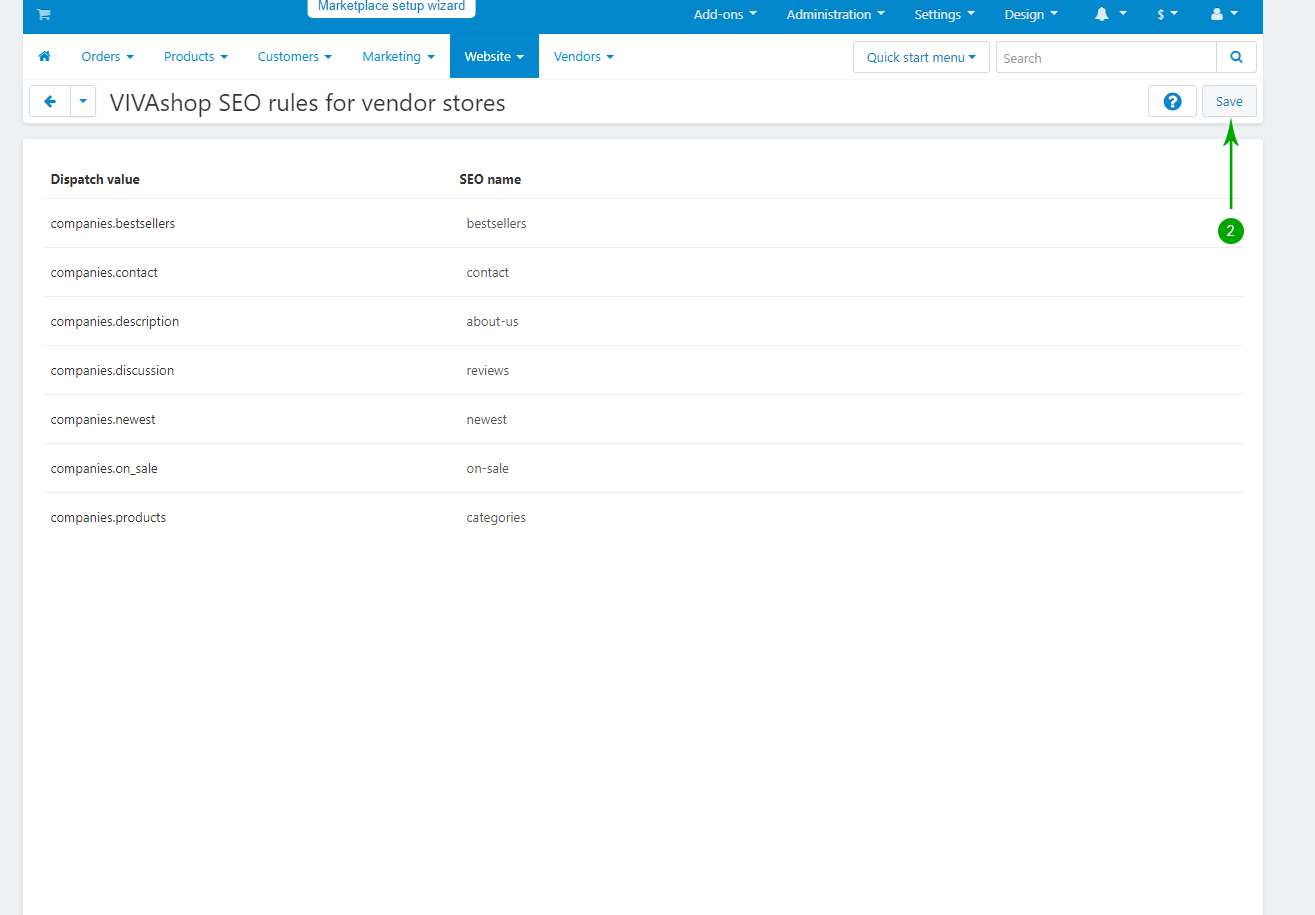
Click on "Save" button
Updating the theme files
If you have custom modifications to the theme files please make a backup of those files and re-implement them after the update is complete.
In order to update the theme files, follow the steps below:
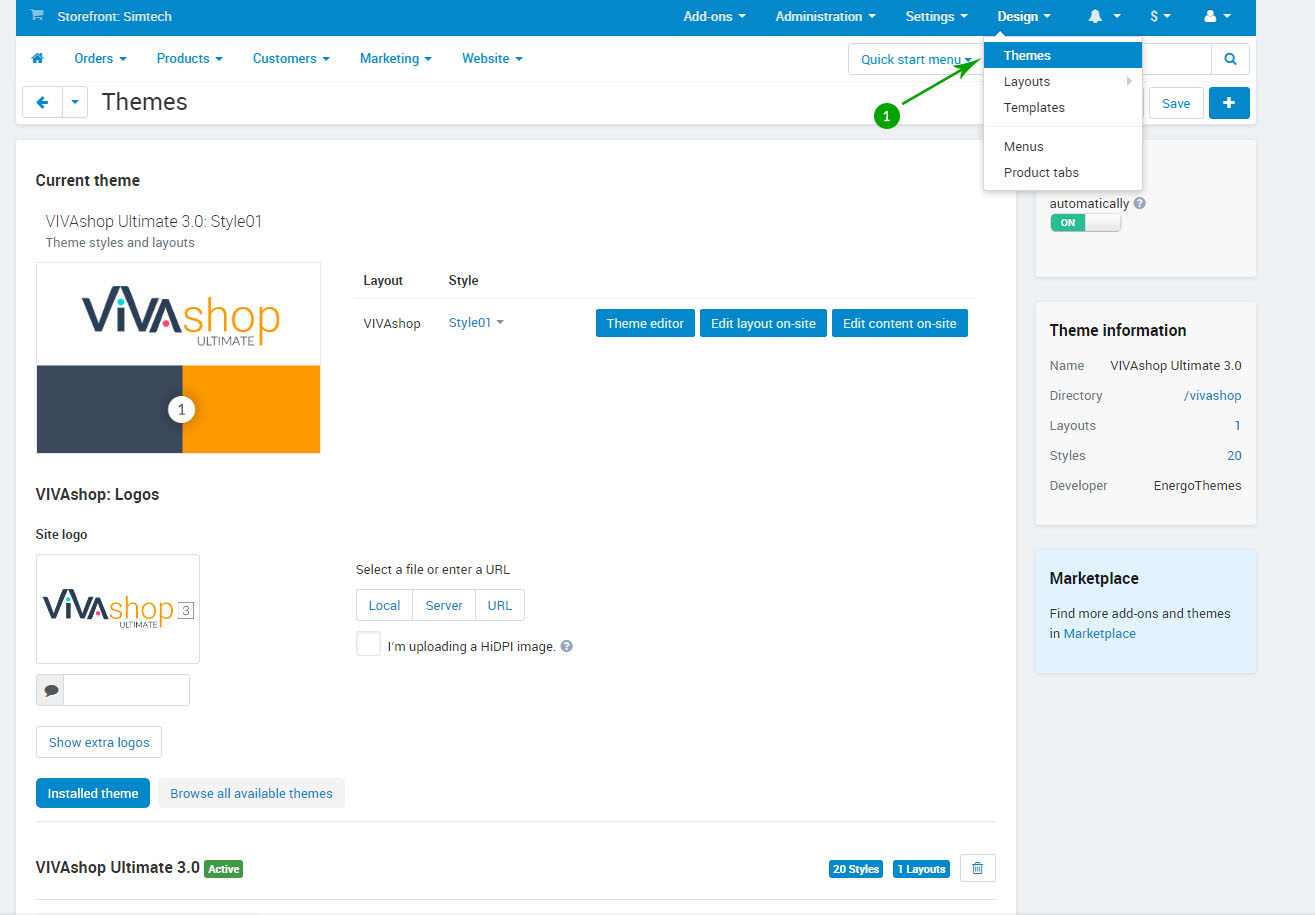
- Step 1
Log into your Administrator area of your CS-Cart installation and navigate to "Design" - "Themes"
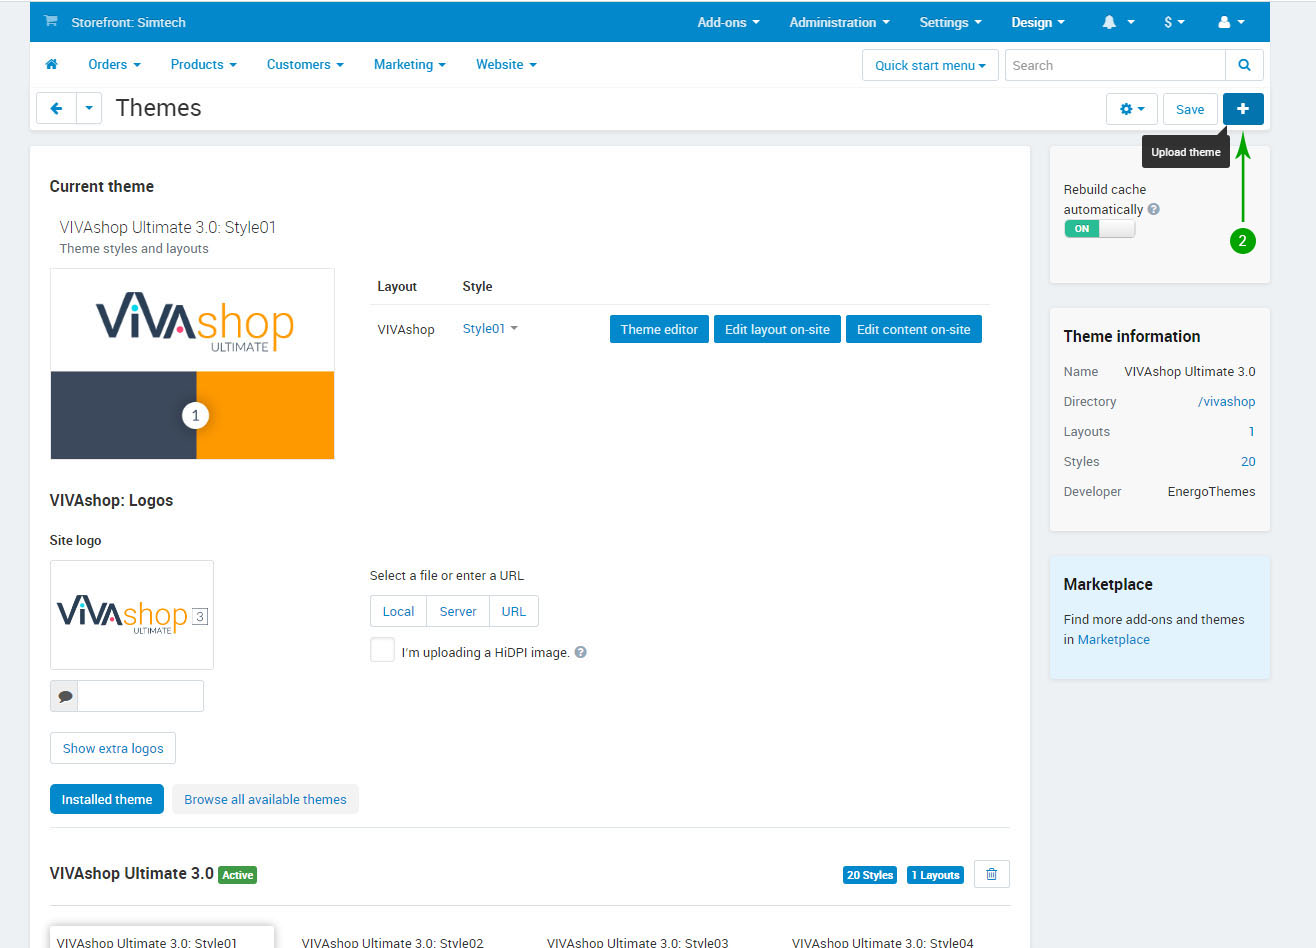
- Step 2
Click on “+” sign (Upload theme)
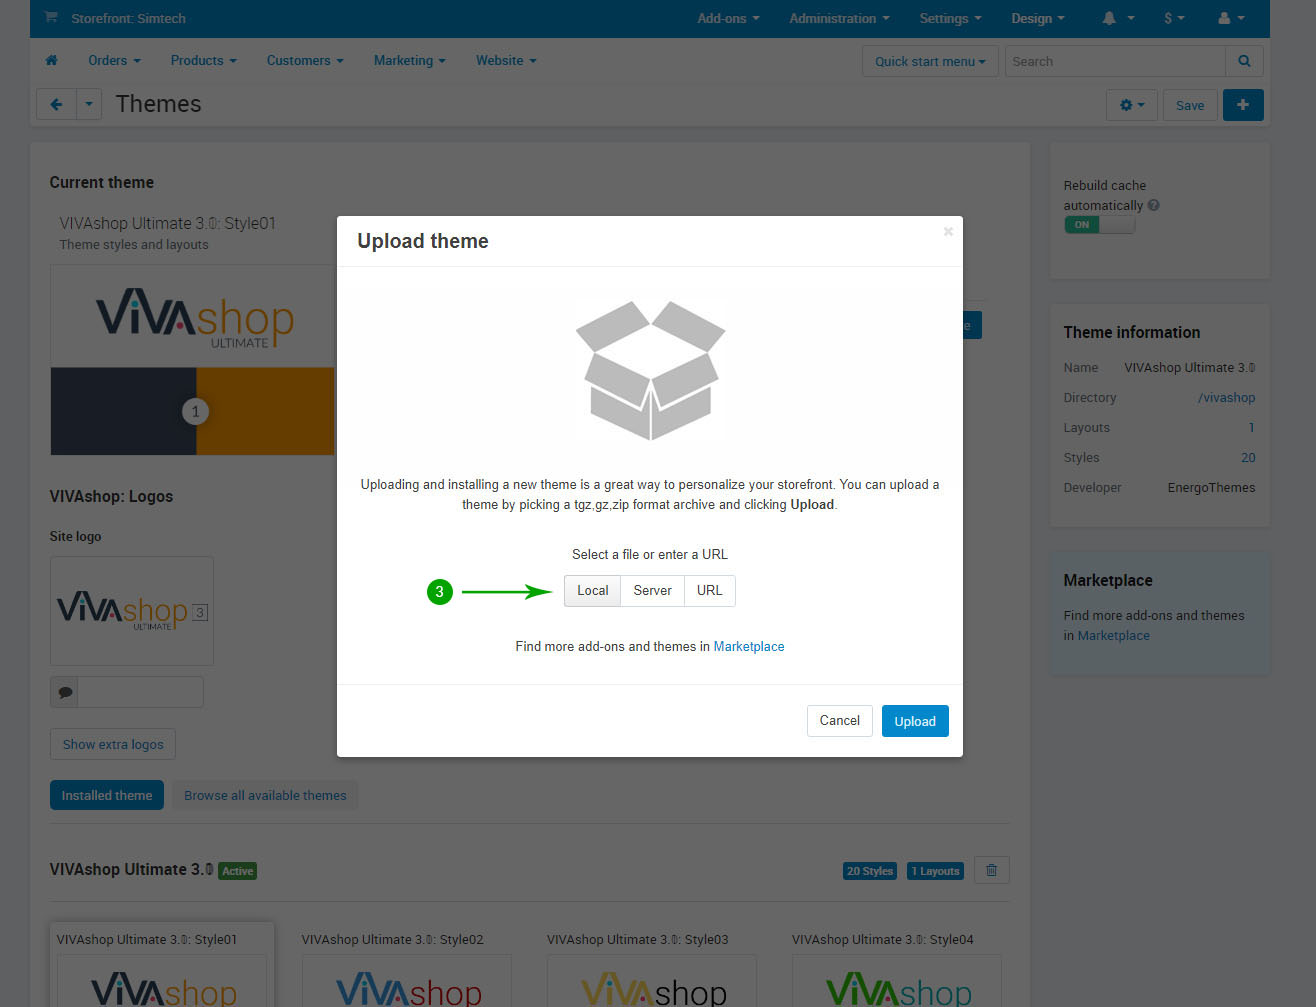
- Step 3
In the newly opened pop-up window under "Select a file or enter a URL" click on the "Local" button and locate the "theme" folder from your unzipped archive.
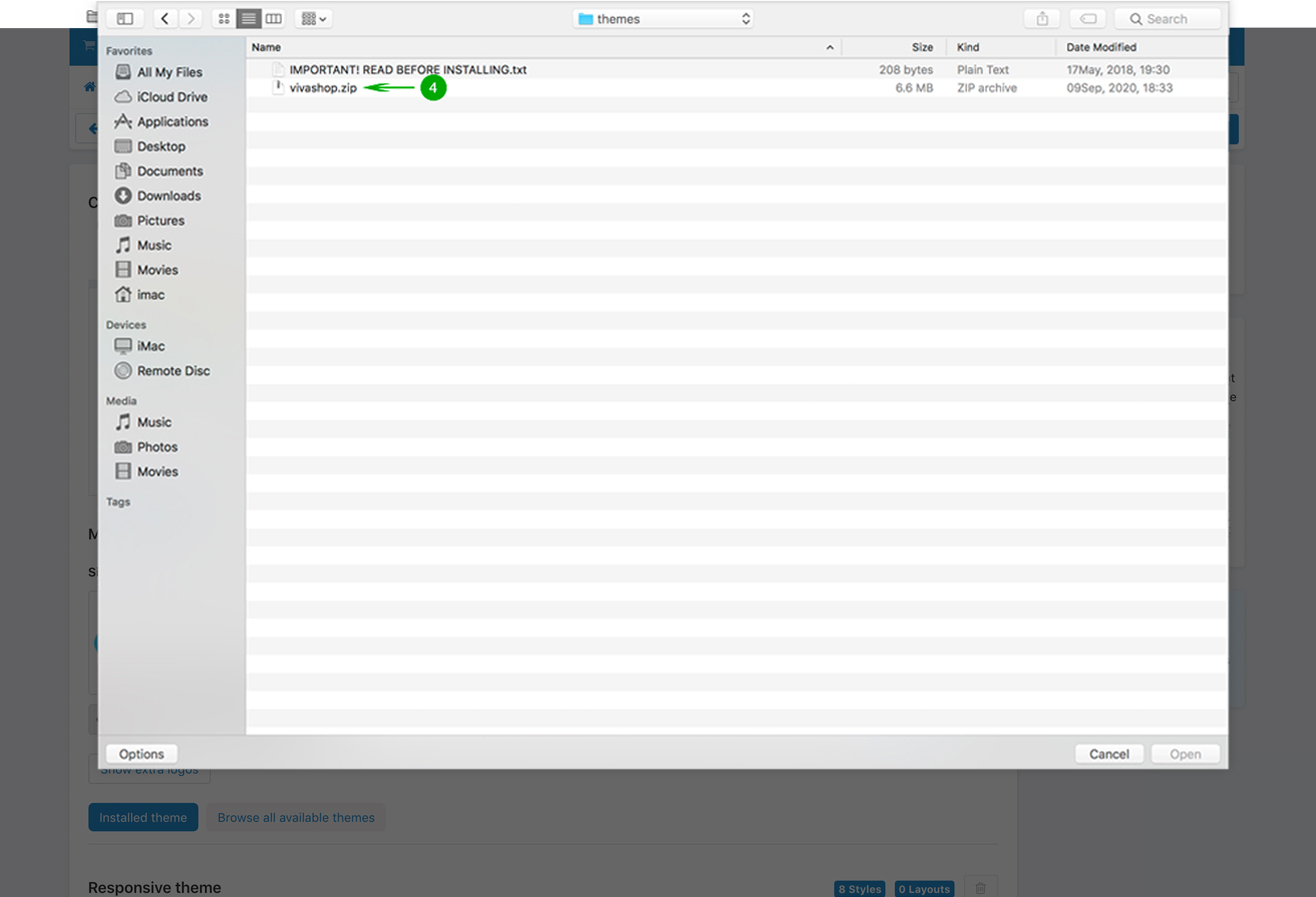
- Step 4
Select the file vivashop.zip and click.on “Open”.
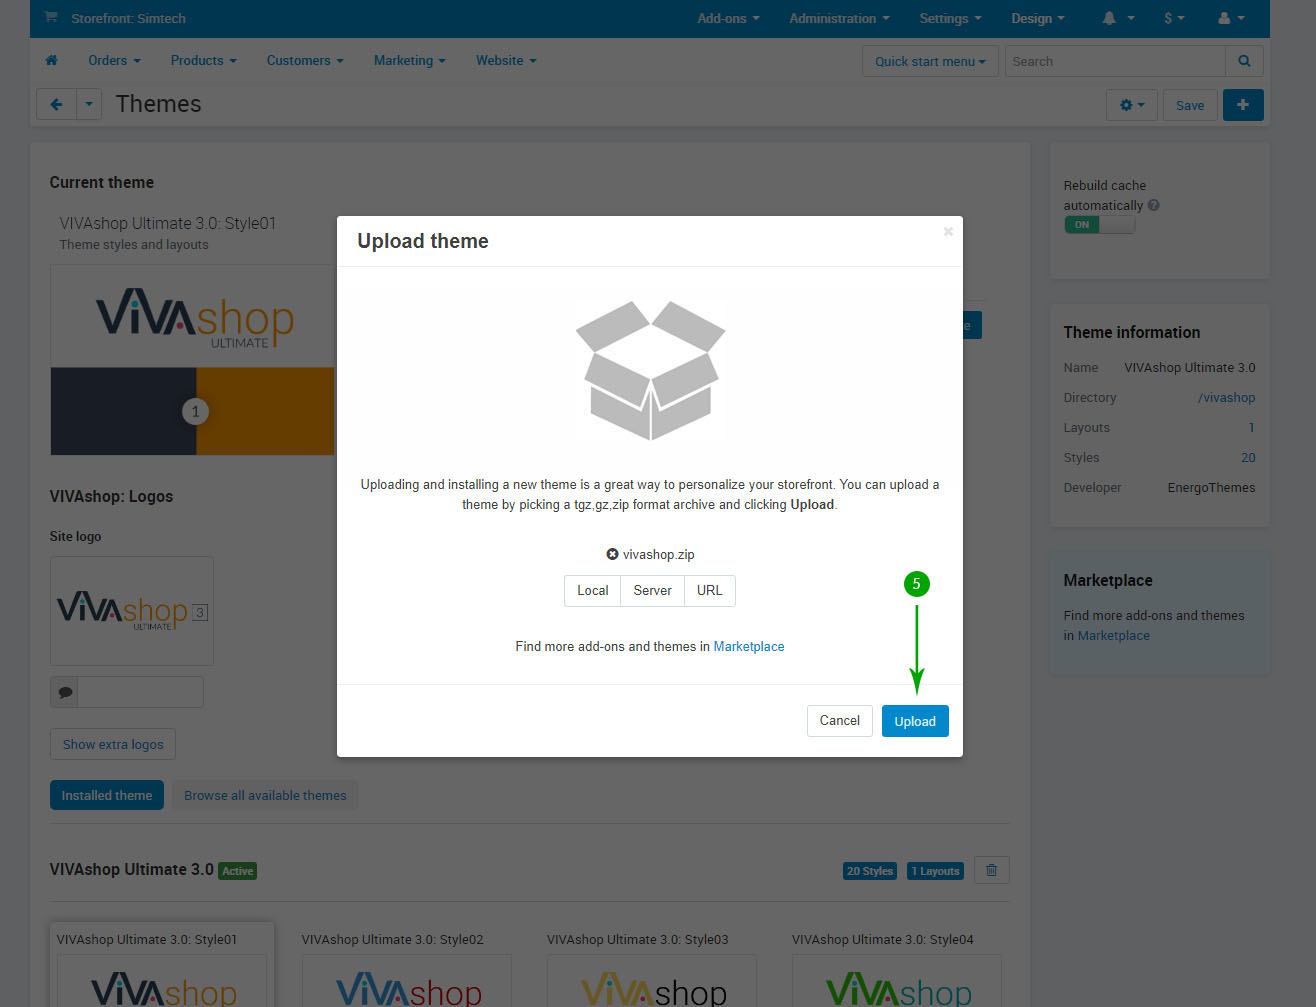
- Step 5
Click the blue "Upload" button.
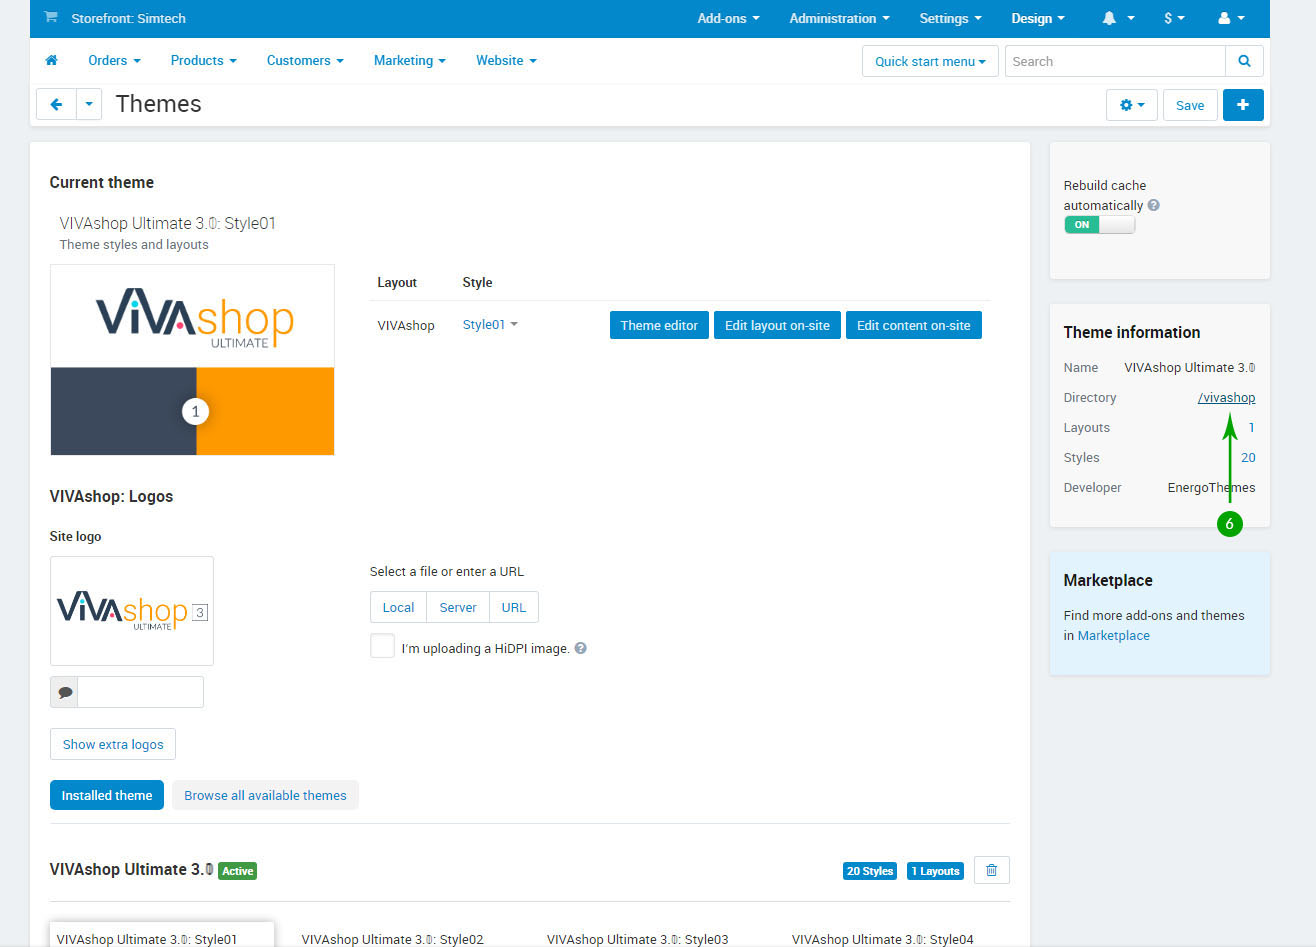
- Step 6
On the right side of the page, under the "Theme information" section, find the "Directory" text and click on the "/vivashop" link.
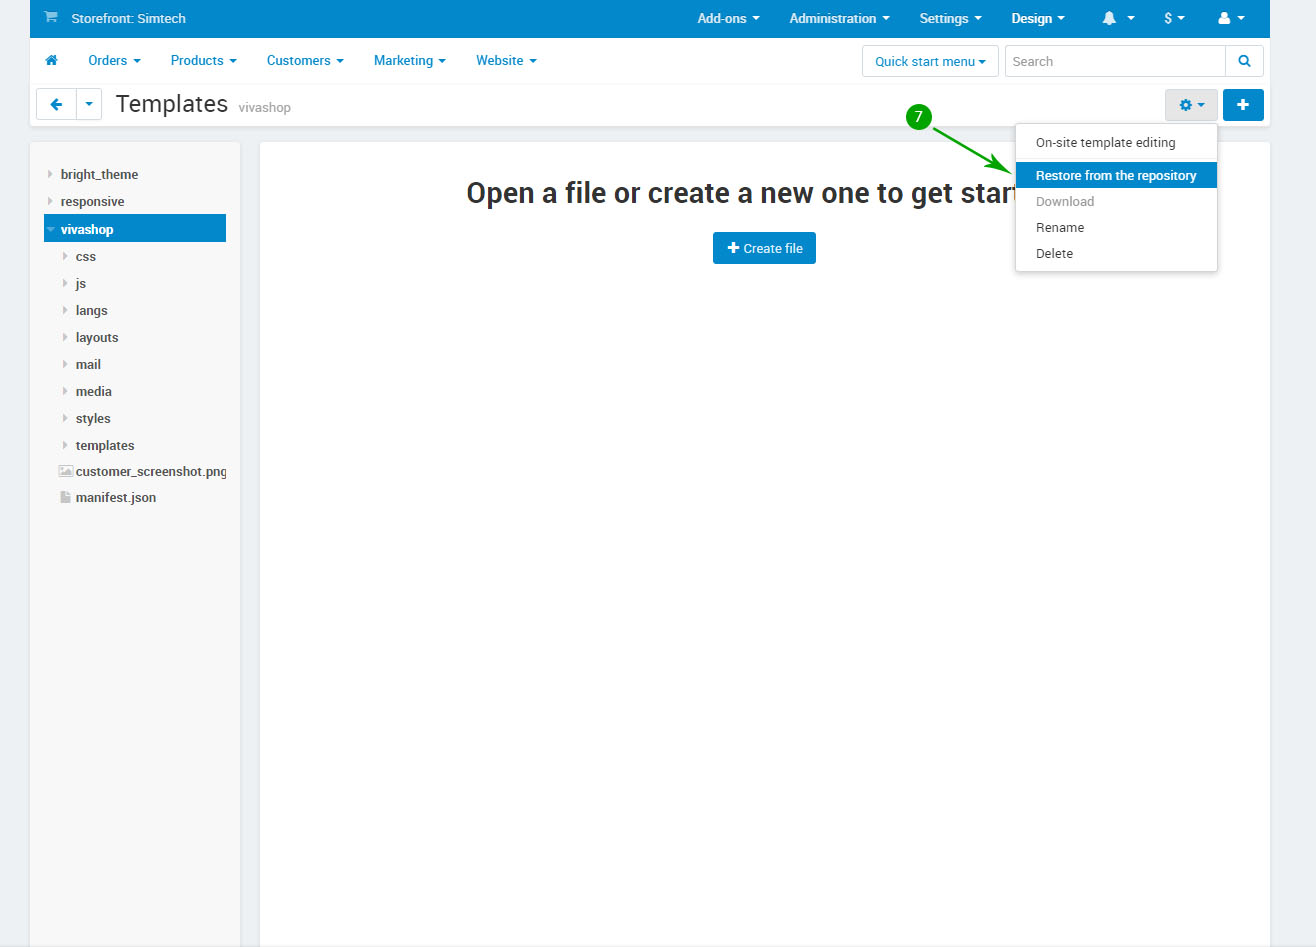
- Step 7
Click on the gear button at the top right and select the "Restore from the repository" option.
Reactivating the theme
In order to reactivate the theme, follow these steps:
- Step 1
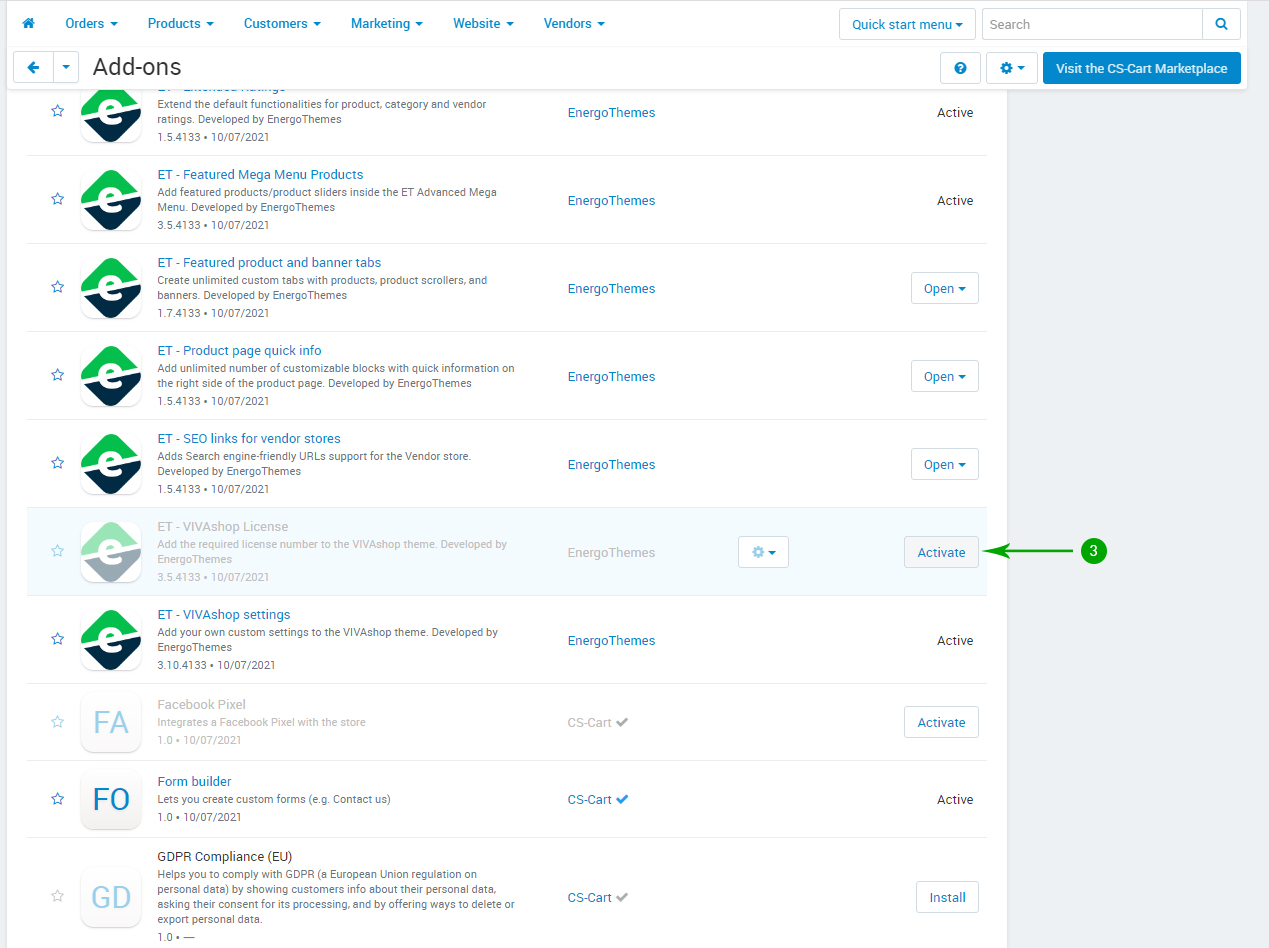
Log into your Administrator area of your CS-Cart installation and navigate to "Add-ons" - "Manage Add-ons"

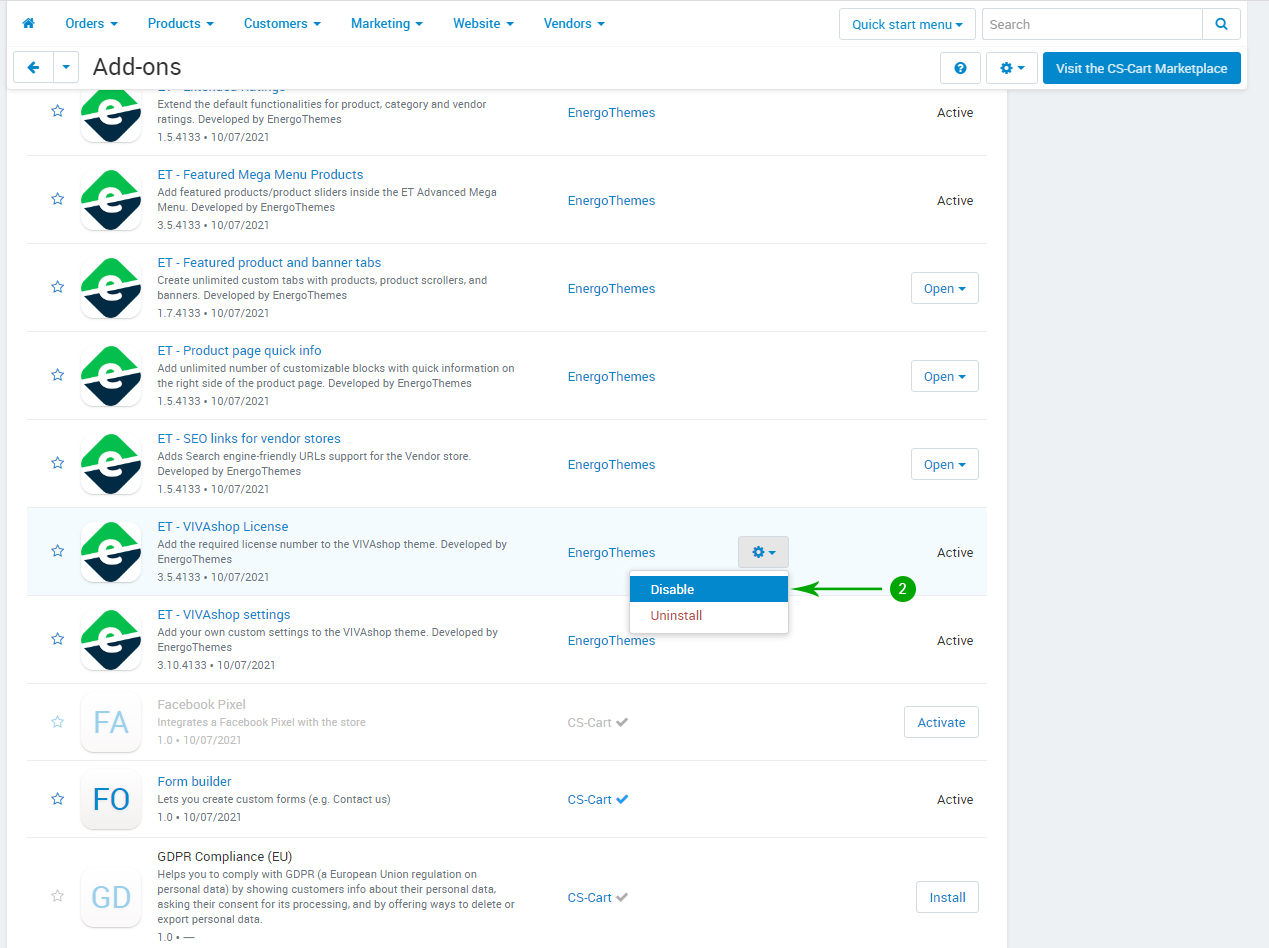
- Step 2
Scroll down the page until you see the "VIVAshop license" add-on, hover over the right side of the add-on, click the gear icon then select "Disable".
- Step 3
After the add-on is disabled, click the "Activate" button.
Import your language variables
To import your language variables, please follow the steps below:
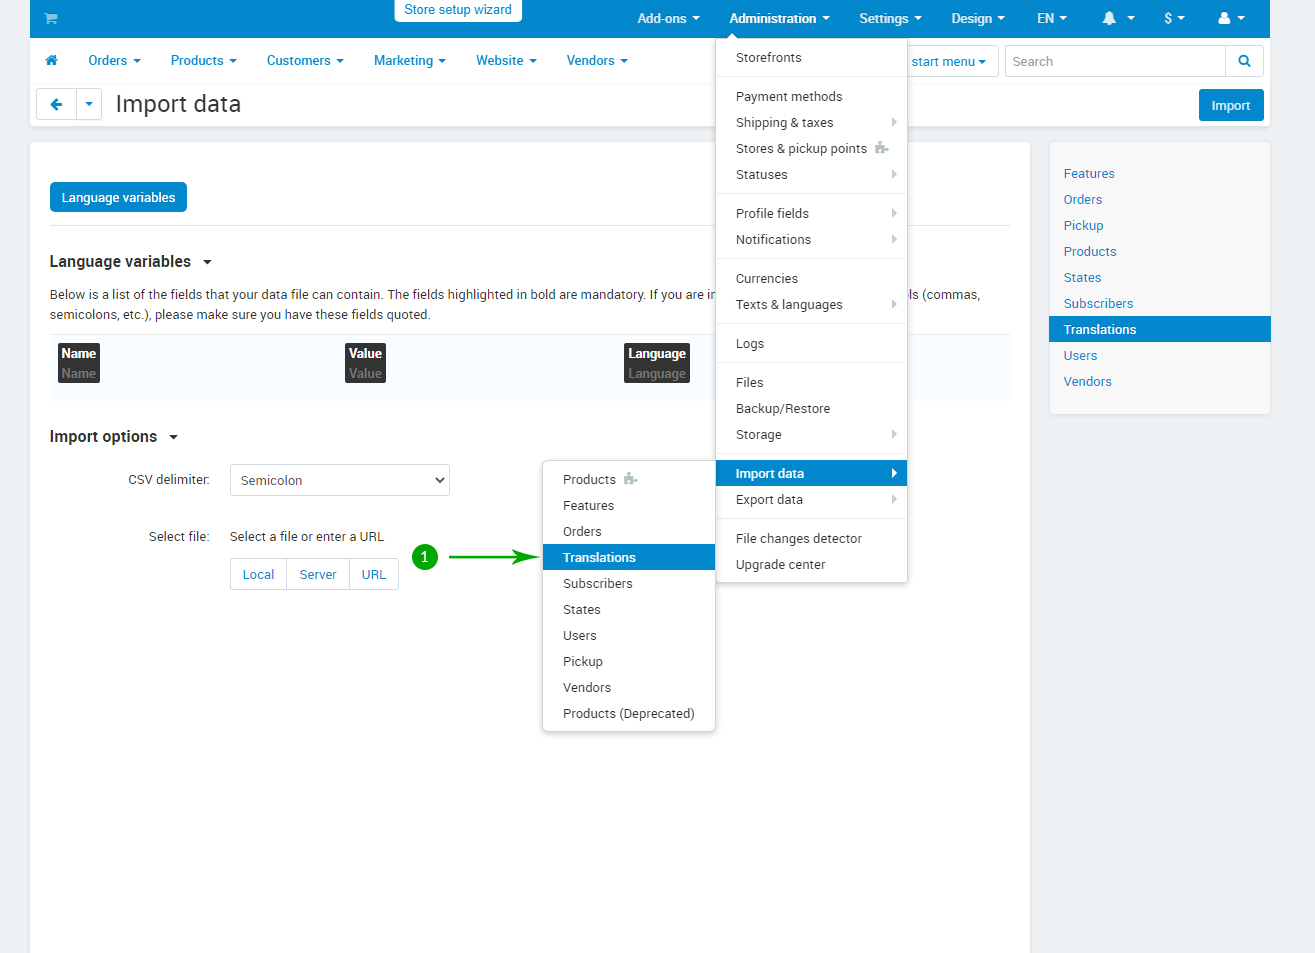
- Step 1
Log into your Administrator area of your CS-Cart installation and navigate to "Administration" - "Import data" - "Translations"
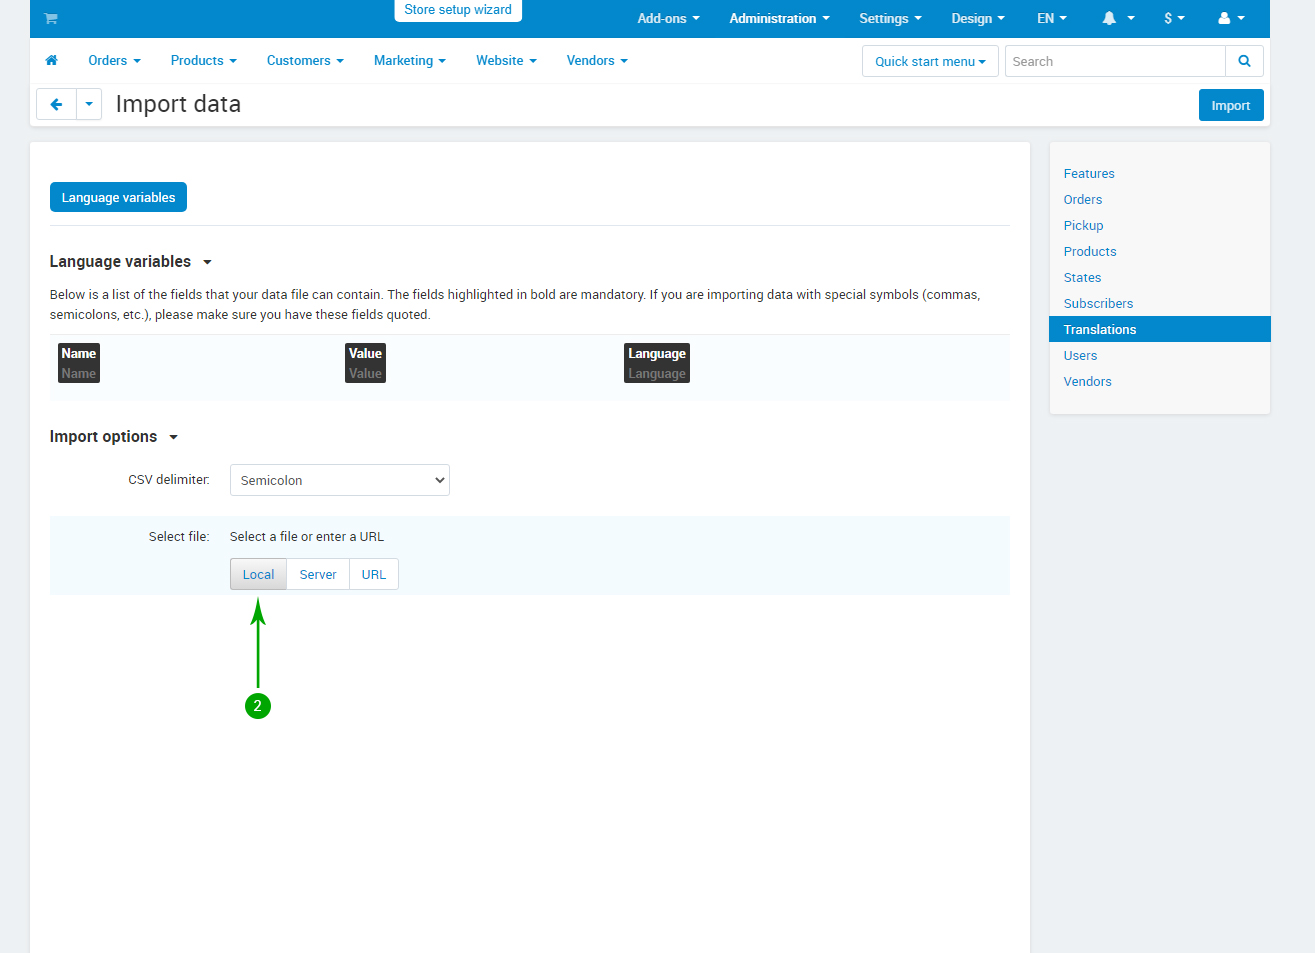
- Step 2
In the "Local" button and select the language file exported in the previous section
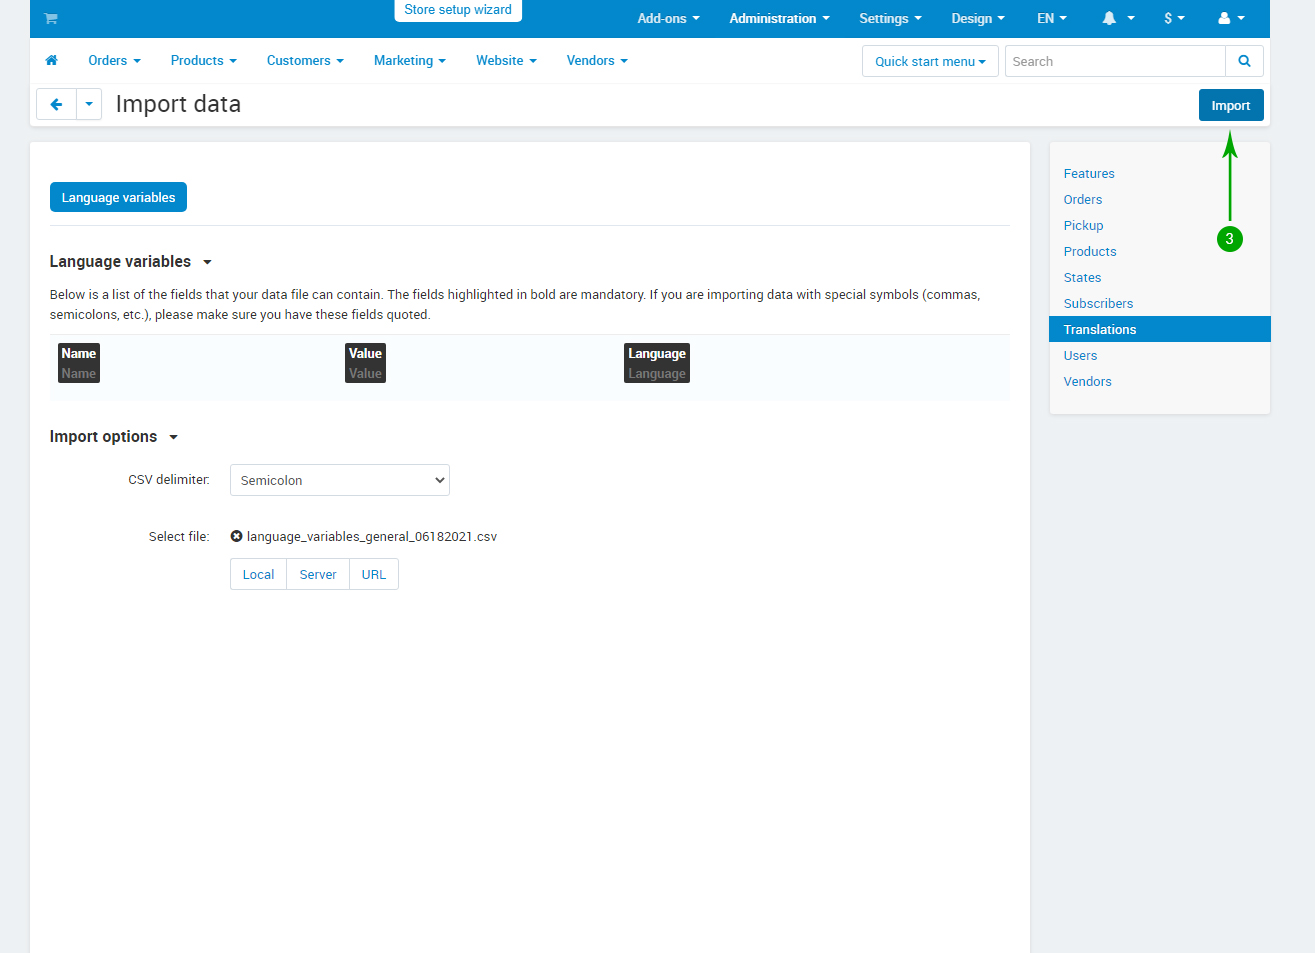
- Step 3
Click the "Import" button in the top right
Updating the layout
In order to update the layout, follow these steps:
- Step 1
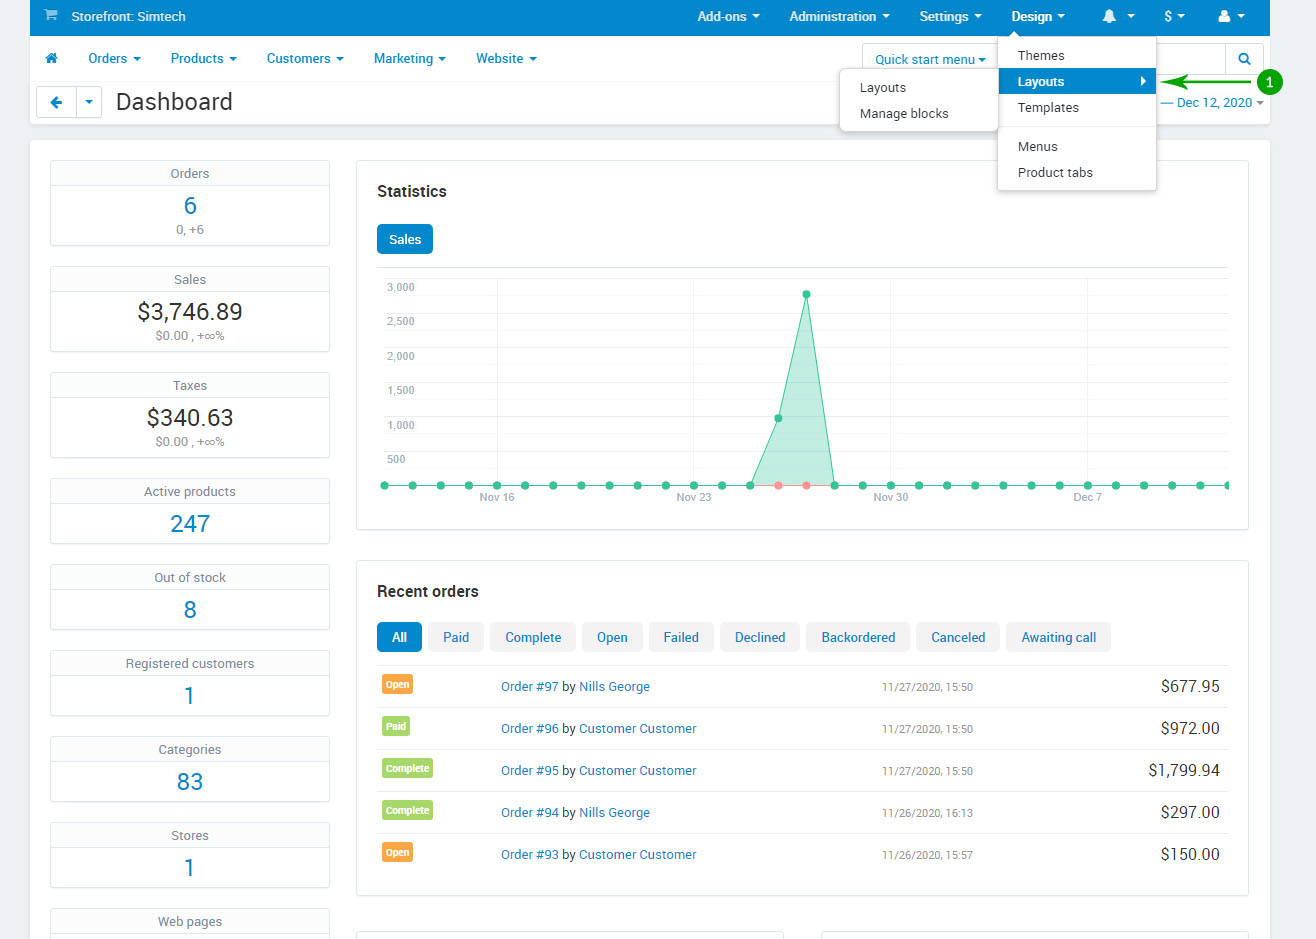
In your admin panel, go to “Design” - “Layouts”:
- Step 2
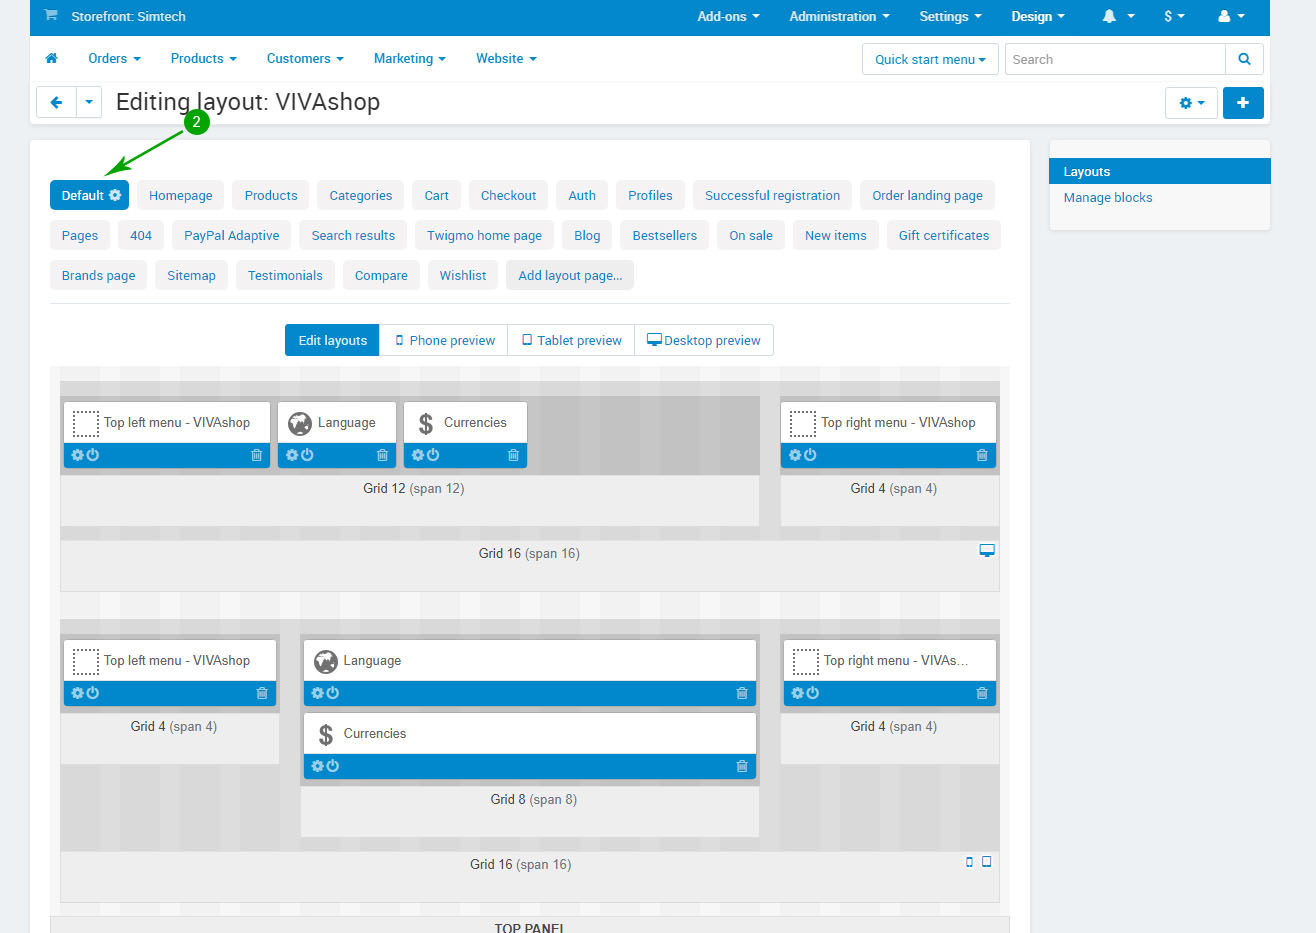
Make sure you are on the "Default" page layout
- Step 3
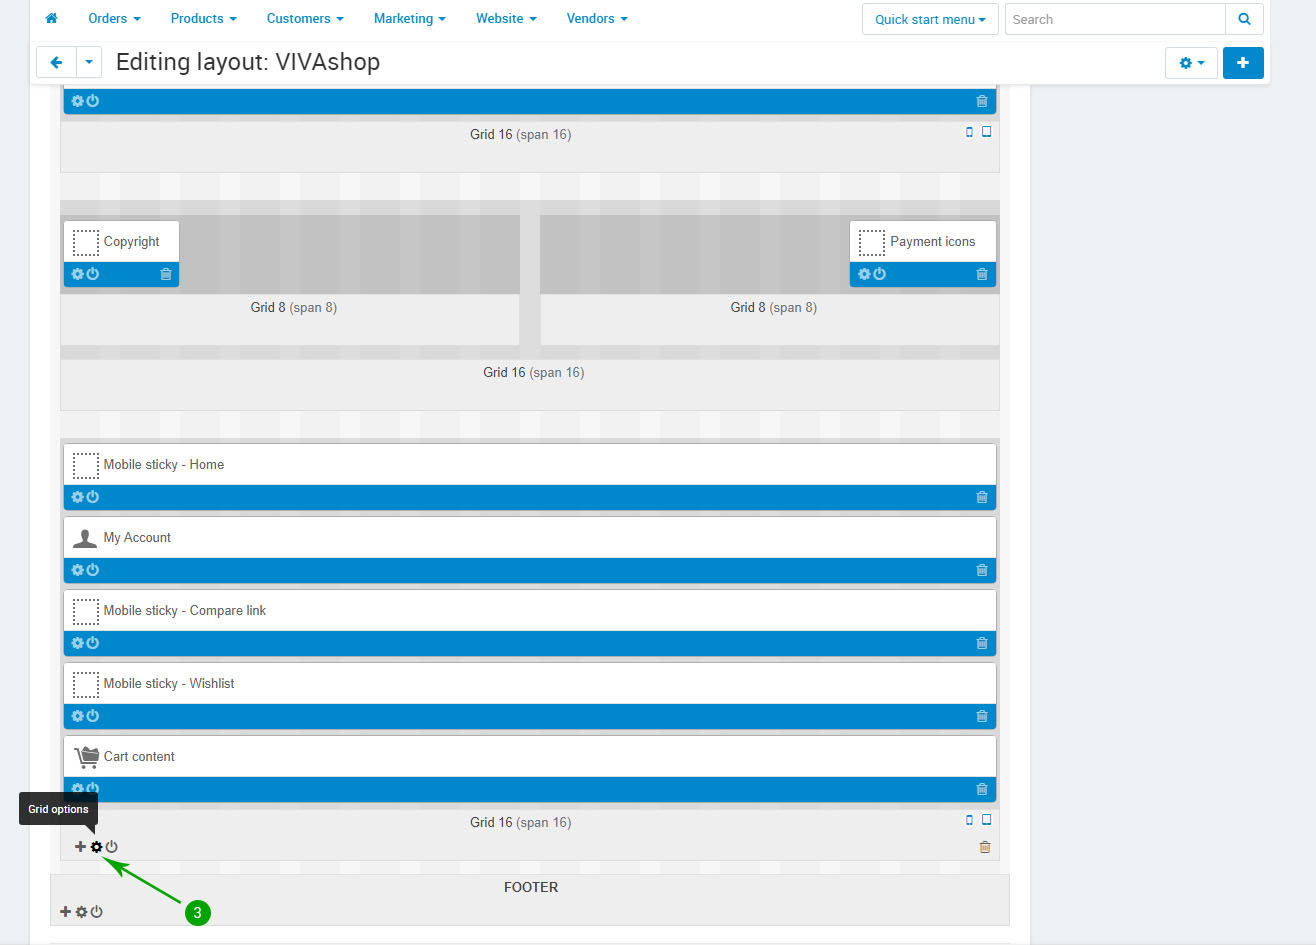
Scroll to the bottom and find the "Grid 16 (span 16)" grid that contains the contains the following blocks: "Mobile sticky - Home", "My Account", "Mobile sticky - Compare", "Mobile sticky - Wishlist", "Cart content". Click the gear icon (Grid options).
- Step 4
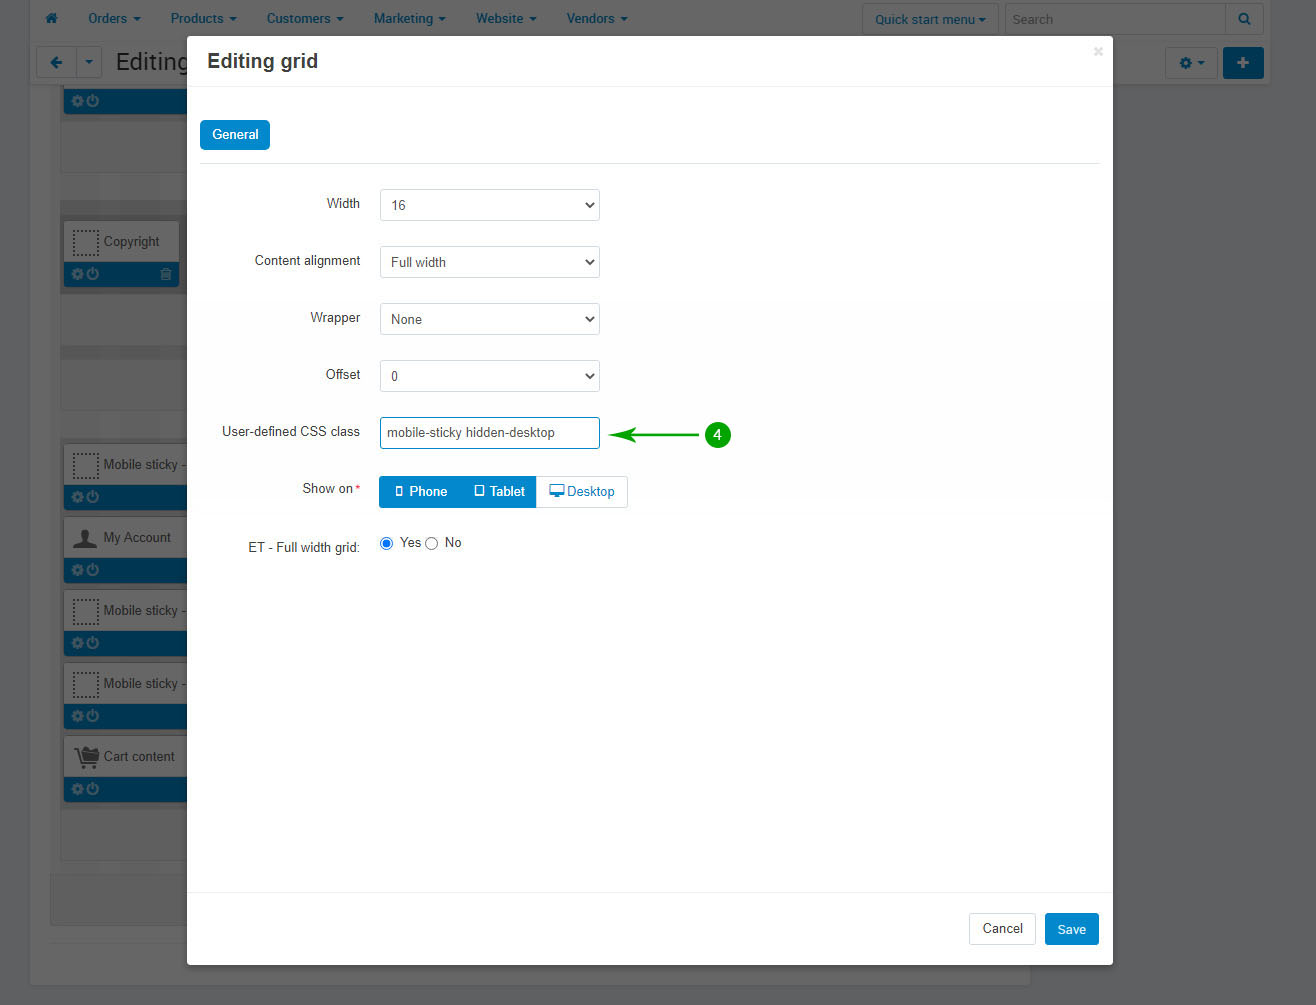
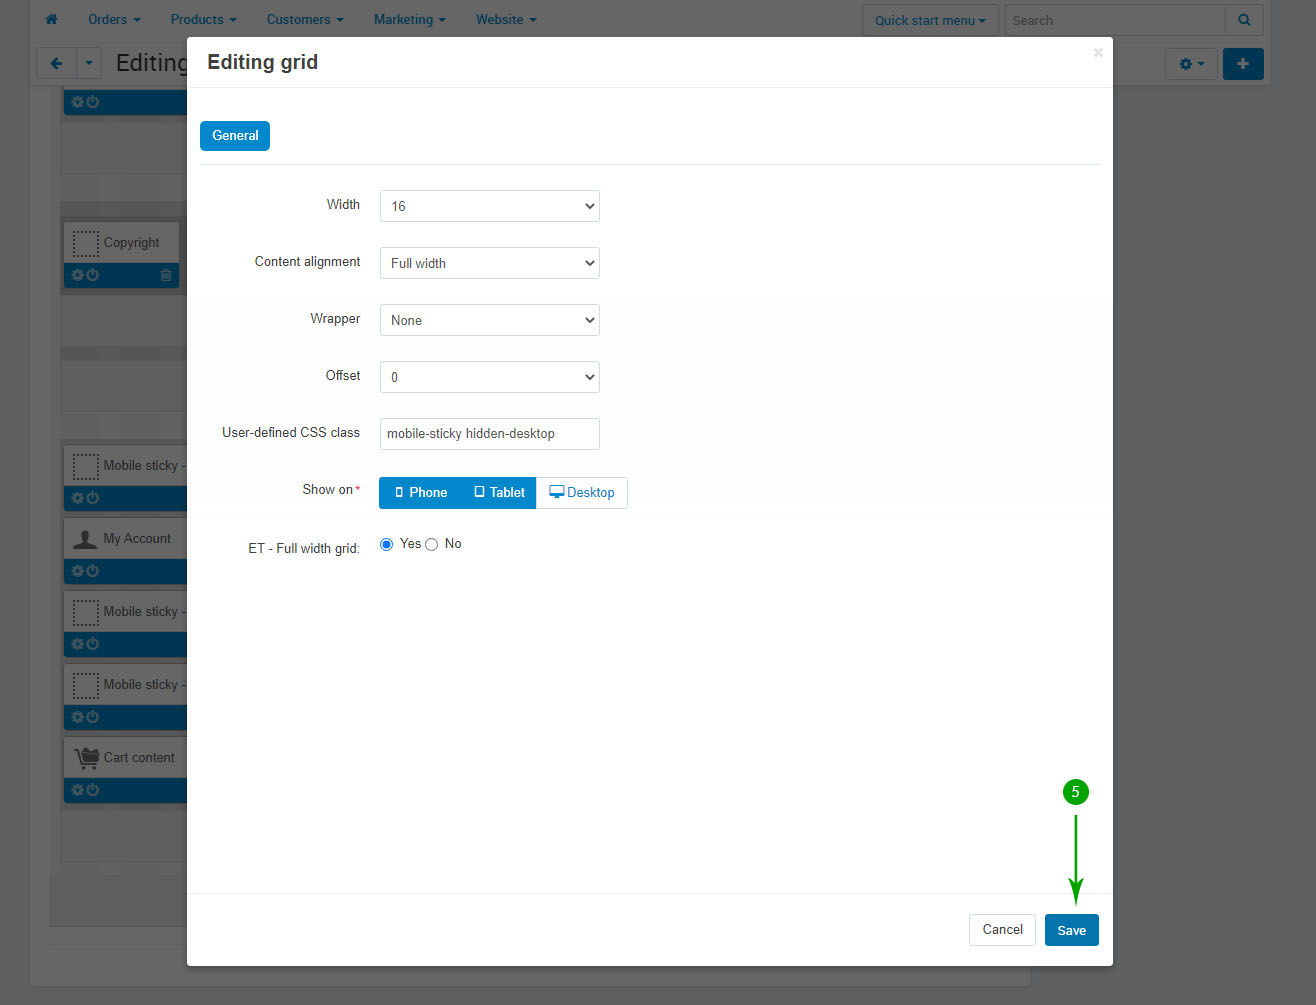
In the new pop-up window set the "User-defined CSS class" option to: mobile-sticky hidden-desktop
- Step 5
Click on the “Save” button
Update the layout (Multi-Vendor only)
In order to update the layout, follow the steps below:
- Step 1
Log into your Administrator area of your CS-Cart installation and navigate to "Design" - "Layouts"

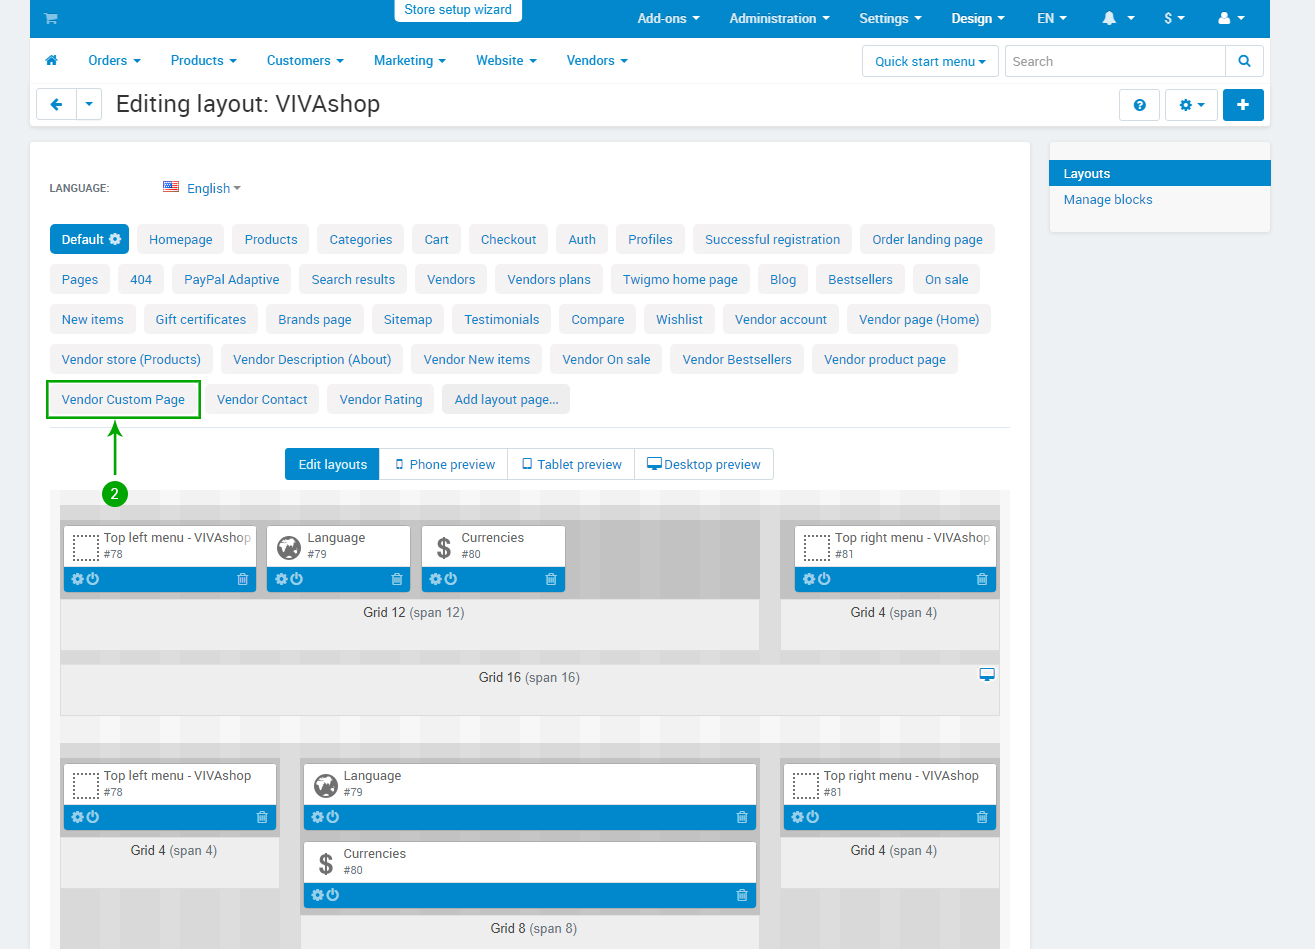
- Step 2
Click on the Vendor Custom Page layout
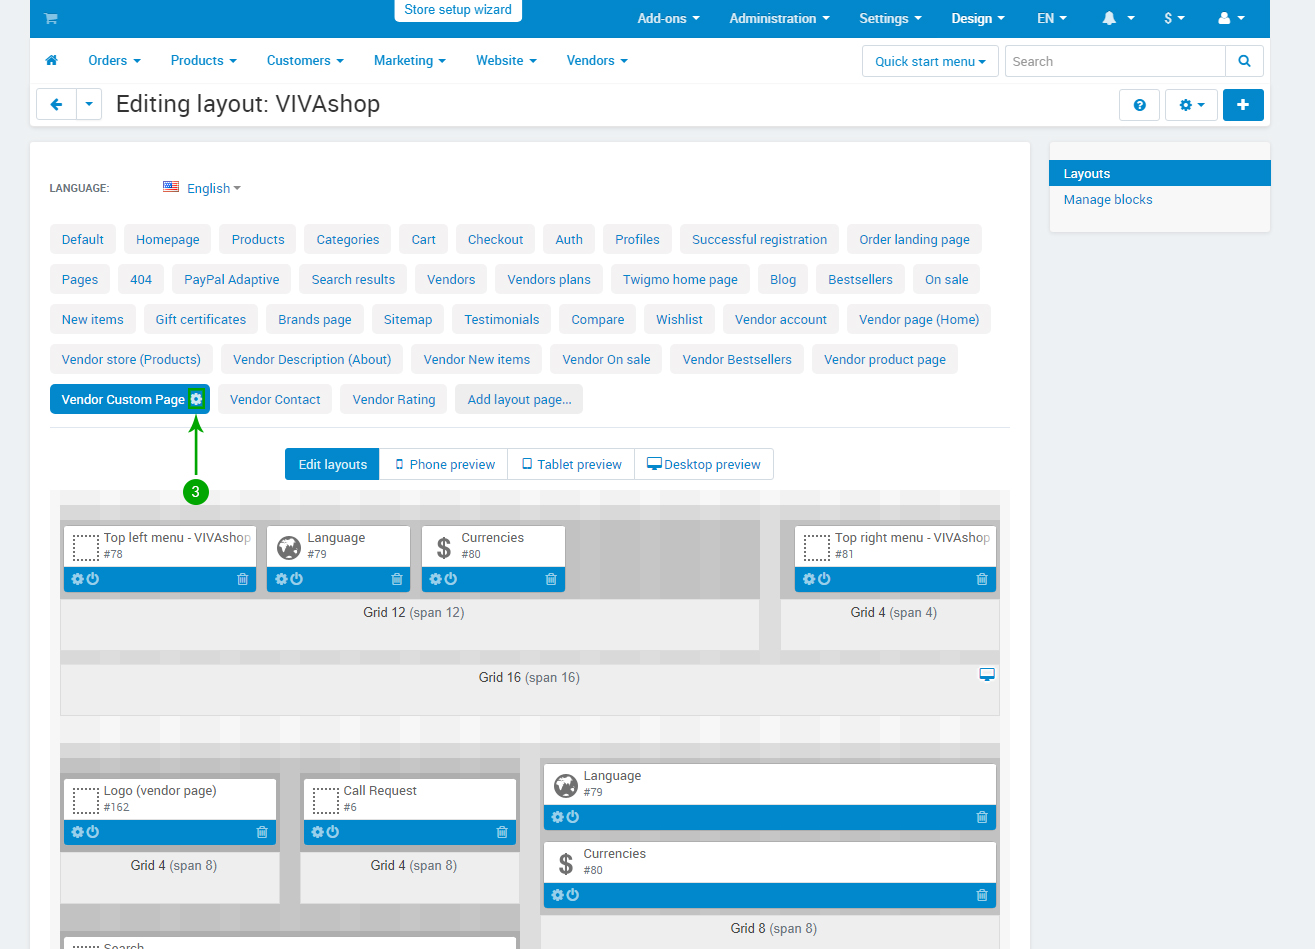
- Step 3
Click the gear icon of the Vendor Custom Page layout
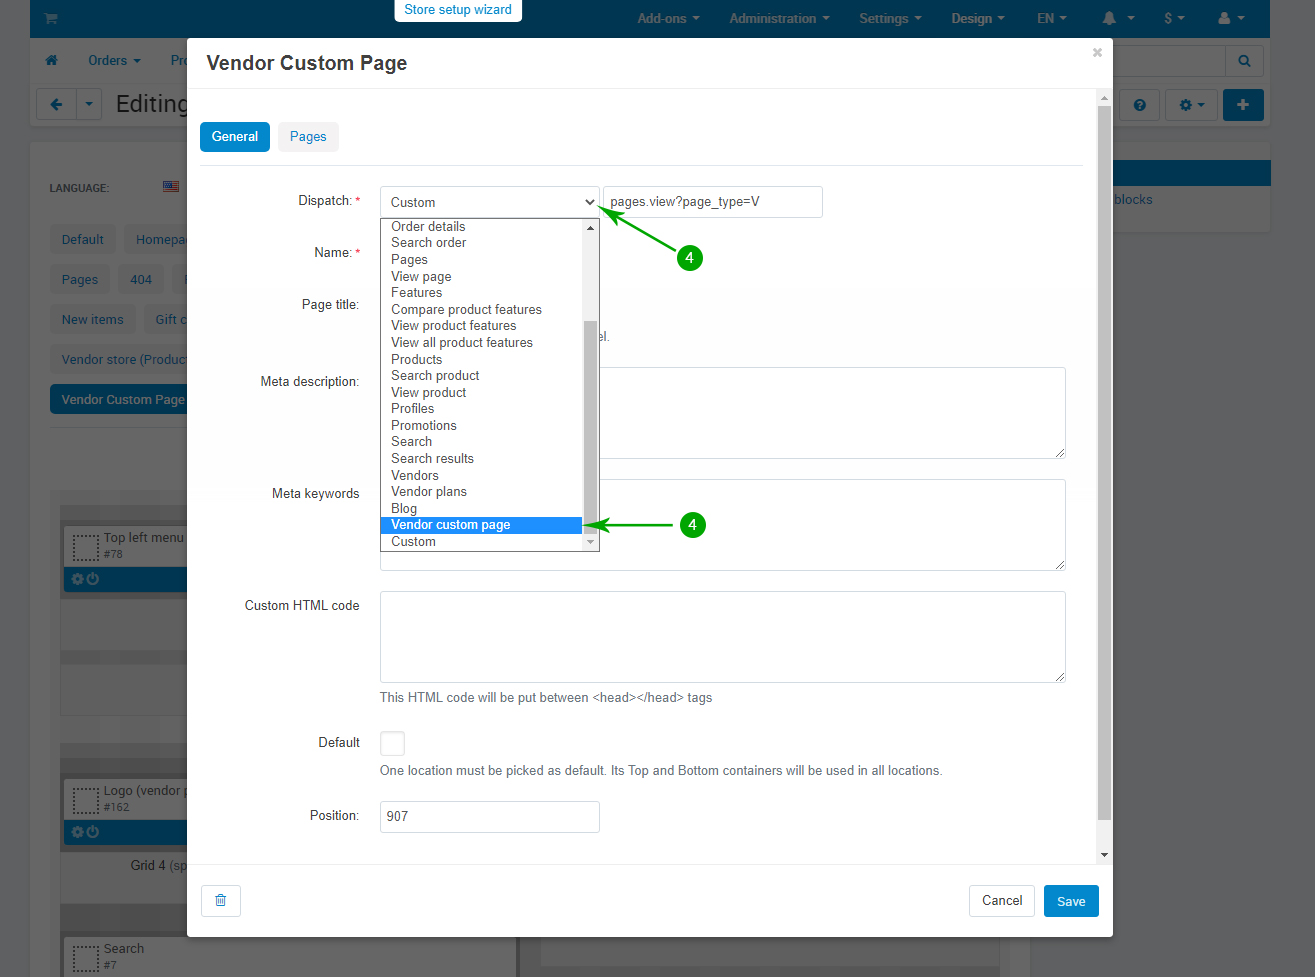
- Step 4
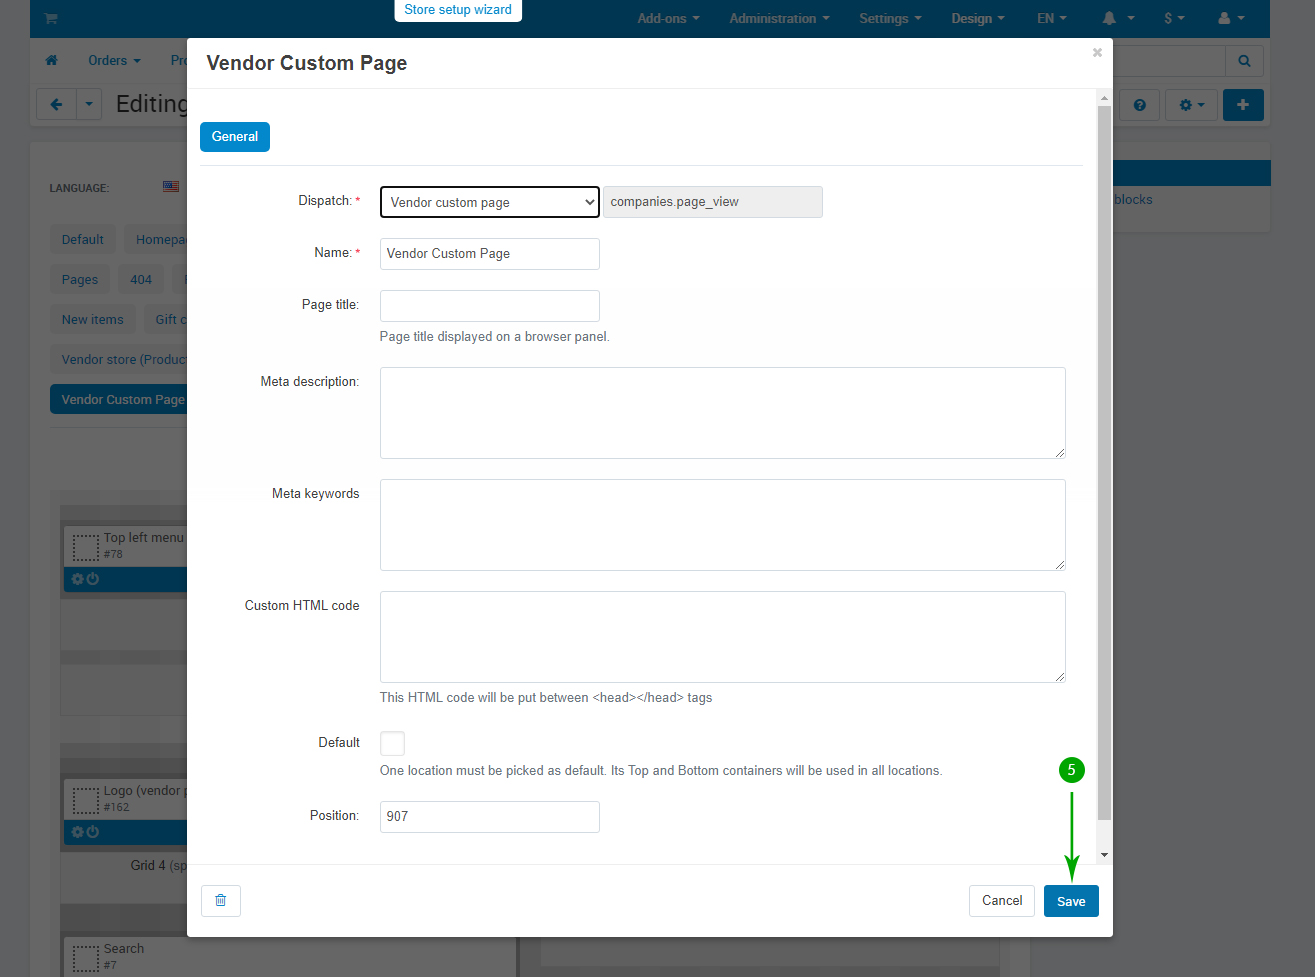
In the new window click the "Dispatch" dropdown and select "Vendor custom page"
- Step 5
Click the "Save" button
